
Configure the Search Service Application
A powerful feature of SharePoint 2010 is its enterprise search capabilities. The term enterprise search refers not to the edition of SharePoint that hosts it but to the ability of the service to index and support searching of all content in an organization’s network (i.e., the enterprise).
As the quantity of digital content tracked and stored by organizations continues to grow, workers spend more time searching for content. A 2006 study by International Data Corporation (IDC) estimated that users may spend an average of 48 percent of their time searching for and analyzing information. The purpose of enterprise search software is to minimize this effort by allowing users to reliably search all the content that they have access to, using a single tool. SharePoint 2010 provides this service through its ability to index content stored in a variety of formats and locations in the network and compile a single index that users can search.
Setting up the enterprise search service involves the following steps:
1. Configuring the accounts that will be used by the search service
2. Configuring the SharePoint Foundation Search Service
3. Creating the SharePoint Search Service
Configuring the Search Service Accounts
Before you create the service application itself, it is important to configure the accounts that will be used by the service. We generally recommend that you create at least two dedicated service accounts for search, but you might need to create as many as four or even more if multiple search service applications are created.
An important point to remember is that the content crawler account is not maintained in SharePoint as a managed account. One of the features of managed accounts is that a farm administrator can configure the account to automatically change its password to meet password expiration policies. However, the content crawler account’s credentials are stored separately from the managed accounts. If the content crawler setting uses an account that is also a managed account, and then if the account automatically changes its password, the account will not be usable by the crawler to conduct crawls until the password is manually reset in the search service.
Table 8.1 lists the Active Directory domain accounts that you should create before implementing the search service. The table also indicates which ones should be registered as SharePoint managed accounts (for more details on creating managed accounts, see Chapter 12, “Configuring Records Management”).
Table 8.1: Search service accounts
| Account | Purpose | Managed Account? |
| Search Service | Windows service account shared by all search service applications | Yes |
| Search Admin Web Service Application Pool | Assigned to the Search Administration Web Service for Search Service when it is created | Yes |
| Search Query and Site Settings Web Service Application Pool | Supports search queries and settings change at the site collection level | Yes |
| Crawler Account | Used for authenticating to the content being crawled | No |
Configuring the SharePoint Foundation Search Service
In an installation of SharePoint Foundation, the SharePoint Foundation Search Service performs all the indexing and search functions for the farm. However, in a SharePoint Server installation, the SharePoint Foundation Search service is deprecated to indexing only the help files for the application. If you want to be able to search the help system in SharePoint, then you need to configure this service. To do so, follow these steps:
1. From SharePoint 2010 Central Administration, under System Settings, click Manage Services On Server.
2. Locate the SharePoint Foundation Search Service and, under the Action column, click Start.
3. In the Service Account drop-down, select the managed account you want to use for this service, as shown in Figure 8.1.
Figure 8.1: SharePoint Foundation Service Account settings
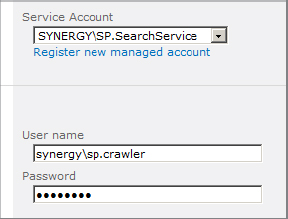
4. In the Content Access Account text boxes, enter the domain username and password for the account that will be used for content crawling, as shown in Figure 8.1.
5. In the Database Server text box, enter the name of the SQL server that will host the search database. In the Database Name text box, enter a name for the search database, as shown in Figure 8.2.
Figure 8.2: SharePoint Foundation Service Search Database settings
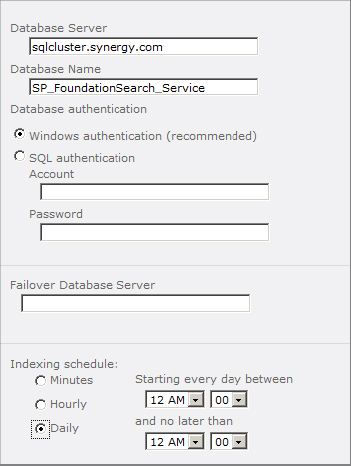
6. In the Indexing Schedule section, select the frequency for crawling the content. If this service is running in a farm that also hosts the full SharePoint Search Service, it will only be crawling the help files, which are not likely to change. Therefore, a frequency of once per day would be sufficient.
7. Click Start.
NOTE Once the service has started, the name will change to SharePoint Foundation Help Search.
In a farm that is running only SharePoint Foundation, you would next select the SharePoint Foundation Search server for each content database by configuring the content database properties. This step isn’t necessary when the farm is installed with SharePoint Server Standard or Enterprise edition.
Creating the SharePoint Search Service
Following creation of the appropriate search accounts, it is time to create the search service application. This service is somewhat sensitive to the sequence in which it is installed and configured, so it is important to perform the steps in the correct order:
1. From SharePoint 2010 Central Administration, under Application Management, click Manage Service Applications.
2. From the ribbon, click the New menu and select Search Service Application.
3. In the Name box, enter a descriptive display name for this service, as shown in Figure 8.3. If you intend to host more than one search service, it is a good idea to refer to the scope of the service in the name, for example, Search Service—Europe Division.
Figure 8.3: Creating a new search service application

4. For a server farm that is not using the FAST search component, you can leave FAST Service Application set to None. For the other settings, see the Microsoft documentation on FAST.
5. In the Search Service Account drop-down, select the managed account you want to use for this service.
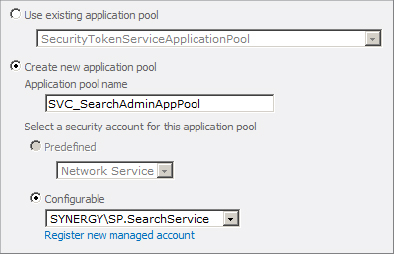
6. In the Application Pool For Search Admin Web Service section, either select an existing application pool or enter the credentials to create a new one, as shown in Figure 8.4. We recommend that you have a separate application pool for your search service accounts.
Figure 8.4: Application Pool For Search Admin Web Service settings
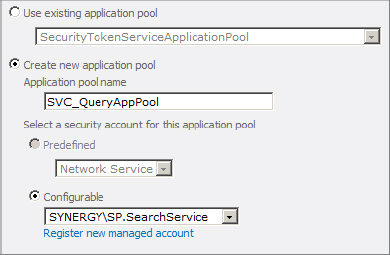
7. In the Application Pool For Search Query And Site Settings Web Service section, either select an existing application pool or enter the credentials to create a new one, as shown in Figure 8.5. It is an acceptable practice to use the same application pool for both the Search Admin Web Service and the Search Query and Site Settings Web Service.
Figure 8.5: Application Pool For Search Query And Site Settings Web Service settings
8. Click OK.
Once the search service configuration completes, return to the Services On Server page and confirm that the SharePoint Search Service is started. The configuration process creates two entries in the Service Applications list. One of these is the search service application that you just configured. The other is named WSS_UsageApplication, which supports the Usage and Health Data Collection Service.