
SharePoint 2010 builds indexes of content sources. The indexing process is called a crawl. Crawls occur on specific schedules and run according to crawl rules that you set up. You can view the crawl logs to determine whether indexing is working properly.
Managing Crawl Schedules
SharePoint 2010 indexes content sources based on scheduled crawl cycles. The crawl cycles must be configured as part of the setup of a content source. SharePoint 2010 can conduct two types of crawl:
Full Crawl A full crawl indexes all content in the content source. A full crawl is required when you index a content source for the first time in order to completely discover and capture all the content. Full crawls are not required thereafter except under specific circumstances such as the following:
- Changes to a search component, such as installing a new IFilter
- Modification to managed properties
- Updates to crawl rules
- Change to the default content access account
- Incremental crawls keep missing content changes
Many organizations schedule a full crawl on a periodic basis such as once a week or once a month to ensure that these issues are automatically covered. However, a full crawl of all content may take a long time and might need to be scheduled to occur during weekends or nonpeak hours.
Incremental Crawl Incremental crawls are used to update content on a regular basis after an initial full crawl has been done. If an incremental crawl is initiated before a full crawl has been performed, then SharePoint 2010 will automatically initiate a full crawl of the content source instead. Incremental crawls are much more efficient and faster than full crawls because they only update the index with additions, deletions, or changes to the content.
For incremental crawls of SharePoint 2010 sites in the farm, the search service is able to read the change log kept in each of the content databases and only crawls the content that has specifically changed. This produces very fast and efficient crawls. For all other content sources, the incremental crawl checks the date/time stamp of each item in the content source to determine if it has changed since the last crawl. It then indexes only the content that has changed.
Crawls are scheduled based on the frequency with which the content changes and therefore needs to be indexed. Crawl schedules are also based on the size of the content source and the length of time that it takes to complete a crawl. A large content source might take 4 hours to crawl; this crawl could be scheduled to run every 4 hours if necessary. A smaller content source may only take 15 minutes to crawl and can be scheduled much more frequently. Some very large content sources may take days to be crawled; such a crawl might be scheduled on a monthly basis.
To create a new crawl schedule:
1. From the Edit Content Source page, click the Create Schedule link.
2. On the Manage Schedules page, shown in Figure 8.13, choose to schedule the crawl on a daily, weekly, or monthly basis and have crawls conducted at periodic intervals within each day that is designated for crawling.
Figure 8.13: Manage Schedules page
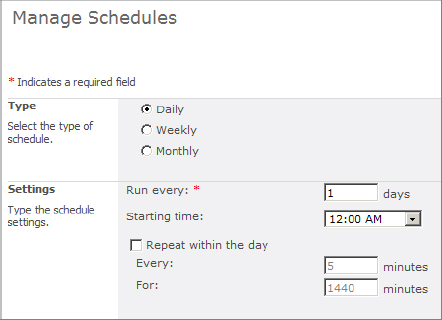
3. Choose whether you want the crawl to run at intervals within each day.
4. Click OK.
Managing Crawl Rules
Crawl rules are a means of adjusting the way that SharePoint crawls a particular content location without altering the content source addresses. One example of a crawl rule would be to exclude a subsite or subfolder from being indexed. Another example would be to specify an alternate account for crawling a particular server URL where the default content access account does not have permissions.
Viewing, Adding, and Testing Crawl Rules
To view all crawl rules and add new ones, from the Search Administration page, click Crawl Rules. (See Figure 8.7, earlier in this chapter.) The Manage Crawl Rules page opens, as shown in Figure 8.14.
Figure 8.14: Manage Crawl Rules page
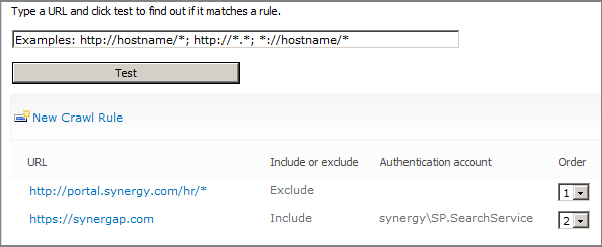
Crawl rules will be applied to content in the order that they are set in the crawl rules list. Use the Order column to change the order of the rules. To determine if a crawl rule will apply to a particular site or folder, enter the address in the text box at the top of the page and click the Test button. As shown in Figure 8.14, the result will indicate how the address will be treated and which crawl rule will apply to it.
Creating a Crawl Rule
To create a crawl rule, follow these steps:
1. Click New Crawl Rule on the Manage Crawl Rules page.
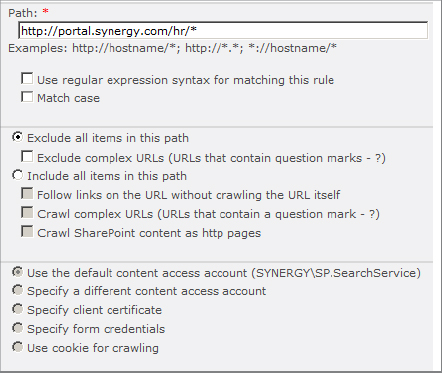
2. On the Add Crawl Rule page, shown in Figure 8.15, enter an address in the Path box.
Figure 8.15: Add Crawl Rule page
You can use the wildcard character (*) to specify ranges of content to affect. Here are two examples:
- The path http://portal.synergy.com/hr/* applies to any URL underneath the hr location.
- The path *://*.htm applies to all files with the .htm file extension.
3. In the Crawl Configuration section, select one of the following:
- Exclude All Items In This Path prevents all items in the path from being indexed.
- Include All Items In This Path allows special treatment of the items in the path. If you choose this, you can check one or more of the following options: “Follow links on the URL without crawling the URL itself” is useful for crawling site map pages without having them appear in search results. “Crawl complex URLs” is useful for crawling pages that use query strings to pass parameters or filter values. “Crawl SharePoint content as HTTP pages” causes all content under the path to appear in search results regardless of the item permissions on the pages.
4. Choose the authentication model that the crawl rule will use. The options are as follows:
- Specify A Different Content Access Account allows you to enter an alternate Windows domain account to connect to locations that the default content access account does not have permissions to.
- Specify Client Certificate can be used to associate a digital certificate that can be passed to a server for authentication.
- Specify Form Credentials is a necessary option when indexing a website that requires a login through a web page rather than a Windows prompt.
- Use Cookie For Crawling allows the selection of a cached or prerendered cookie to pass through to a Forms-authenticated website.
5. Click OK.
Viewing the Crawl Log
The crawl log tracks the history of every content indexing operation and the results of every content item request. By reviewing the crawl log, you can determine whether indexing is succeeding for all the content targeted and where it may be encountering problems. The log will report whether a location is inaccessible due to permissions issues, if a URL is excluded due to a crawl rule, or if content has been removed because it cannot be found by the indexer.
Because of the importance of monitoring the health of the index, we strongly recommend that you review the crawl log on a regular basis. To view the crawl log, do the following:
1. From the Search Administration page, click Crawl Log.
2. On the Crawl Log page, click one of the five views at the top of the page to filter the log entries. The views are Content Source, Host Name, URL, Crawl History, and Error Message.
The Content Source and Host Name views display the totals for the primary types of results:
Successes Indicates the total number of items that were crawled successfully without any issues.
Warnings Indicates the count of items that could not be crawled due to configuration settings such as the site being marked as excluded from search.
Errors Summarizes the items that could not be indexed due to some failure such as an “access denied” response from the server.
Deletes Indicates items that were not found during the last crawl and were removed from the index.
Top Level Errors Indicates the errors totaled separately because an error in accessing the root of an address typically prevents crawling of any part of the address.