
In SharePoint 2010 Standard Edition or higher, all sites have the ability to support web content management functionality. However, not every site needs the functionality or would benefit from it. An intranet portal, for example, would likely need web content management tools, but a collaboration site, such as a project team site, would not.
In the portal, the presentation of information is usually as important as the content itself and a great deal of attention needs to be given to the drafting, editing, approval, and release of content pages. These tasks often require a dedicated web content manager and someone who will have time to master the tools and techniques involved. In a team site, by contrast, the focus is typically on sharing documents and information with a minimum of administrative overhead and with more emphasis on the approval of documents than on the pages used to navigate to them.
To support these different requirements, Microsoft has implemented the web content management functionality in a set of features that are disabled by default in most sites but that can be enabled if needed. These include the SharePoint Server Publishing Infrastructure feature, which can be enabled at the site collection level, and the SharePoint Server Publishing feature, which can be enabled at the site or subsite level.
Activating the Site Collection Publishing Infrastructure Feature
Two site templates built into SharePoint 2010 have the Publishing features automatically activated. Both of these templates create site collections that are fully functional web content management sites:
Publishing Portal This site collection template is used when creating a formal intranet or internet site where the content will generally be contributed by a limited set of authors and organized by a content manager.
Enterprise Wiki This site collection template is used to create a site where a collaborative approach is used that relies on many authors and features a less structured environment than the Publishing Portal provides.
Some other site templates can be used to create subsites only within site collections that have the Publishing features enabled. These are the Enterprise Wiki site template and the Enterprise Search Center site template.
While it is common to create a new web content management site by using one of the publishing site templates, it is also possible to turn any site into a web content management site by activating specific SharePoint features.
SharePoint Server Publishing Infrastructure Feature This site collection feature creates the supporting libraries, lists, and command links that allow publishing capabilities in a site collection.
SharePoint Server Publishing Feature This site feature creates a library named Pages in the site that allows the creation of pages that use the full web content management options of SharePoint.
To activate the Publishing Infrastructure feature in a site collection:
1. Open the root site in a site collection.
2. From the Site Actions menu, select Site Settings.
3. In the Site Collection Administration section, click Site Collection Features.
4. Next to the SharePoint Server Publishing Infrastructure feature, click Activate, as shown in Figure 13.1.
Figure 13.1: Activating the SharePoint Server Publishing Infrastructure feature

Activating the SharePoint Server Publishing Feature
To activate the SharePoint Server Publishing feature in a site:
1. Open the root site in a site collection.
2. From the Site Actions menu, select Site Settings.
3. In the Site Actions section, click Manage Site Features.
4. Next to the SharePoint Server Publishing feature, click Activate, as shown in Figure 13.2.
Figure 13.2: Activating the SharePoint Server Publishing feature

Creating a Publishing Page
Publishing pages are designed to allow users to edit content without needing to know much about HTML or how web technology works. One of the unique aspects of a publishing site is that it contains a Pages library where all new pages are automatically placed when they are created. Nonpublishing sites have a SitePages library that serves the same purpose.
SharePoint 2010 includes several forms of publishing pages, associated with different content types. All of the pages contain predefined editable regions. In this section we will look at the publishing page known as the Wiki page, one of the most common publishing page types.
Creating a Wiki Page
Wiki pages are a form of SharePoint publishing page designed explicitly for open and relatively free-form communication. As with other pages, anyone with edit permissions can overwrite and change the content and add their own thoughts. Wiki pages automatically save previous versions of the page and make it easy for them to be recovered and restored. The idea behind Wiki pages is to remove the fear people may have of “losing” information by changing live content, and to encourage users to put their thoughts on the page so that ideas are captured and shared. To this end, the Wiki page in SharePoint 2010 supports a new content editing field that accepts virtually any form of content that SharePoint 2010 supports. Figure 13.3 shows a Wiki page with several kinds of content.
Figure 13.3: Wiki page

On this page you see the following elements:
- Editable text content
- HTML—a hyperlink
- Embedded web part—the Media Web Part connected to a video stored in SharePoint
- Embedded picture with text wrapping around it
- Edit This Page link—clicking this link places the page in Edit Mode to provide an intuitive means of participating in collaboration
To create a Wiki page:
1. Inside a publishing site, from the Site Actions menu, select New Page.
2. In the New Page dialog box, enter the name for the page. The page name becomes part of the URL. It can contain any characters except for characters that are illegal in URLs:
# % & * : < > ? / { } ~ |
3. Click Create.
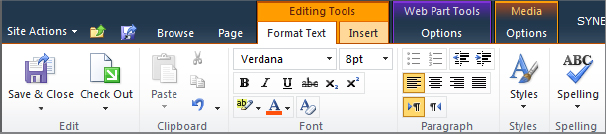
The new page will appear in Edit mode. The SharePoint 2010 ribbon is a new feature of all pages and provides extensive editing tools (see Figure 13.4).
Figure 13.4: Wiki page Edit ribbon
The Wiki page includes both a Ratings field and a Categories field on every page, which are visible in Figure 13.3, earlier in this section.
Using Ratings Information on a Wiki Page
The Ratings field is an available option for most lists and libraries in SharePoint. It can be enabled under the list or library settings. Usually the Ratings column appears only in the list or library view. In the case of the Wiki page, the Ratings column is included by default in the layout of the page itself.
Clicking on one of the five stars in the Ratings column will cast the user’s “vote” for the rating of this content. All ratings are aggregated and processed by two timer jobs executing on an hourly basis. You can force ratings to be recalculated manually by running these two jobs:
User Profile Service – Social Data Maintenance Job Aggregates the ratings and resets the social data change log
User Profile Service – Social Rating Synchronization Job Synchronizes the ratings values between the social database and content database
Using a Term Set on a Wiki Page
Categories on Wiki pages make use of the term store, discussed in Chapter 11, “Configuring the Managed Metadata Service.” To make a set of category values available to users, you need to configure a term set and assign it to the Wiki Categories site column as follows:
1. Open the root site in a site collection.
2. From the Site Actions menu, select Site Settings.
3. Under the Site Administration, click Term Store Management. Choose an appropriate term set or create one following the steps provided in Chapter 11.
4. Return to the Site Settings page and, under Galleries, click Site Columns.
5. On the Site Columns page, in the Custom Columns section, click Wiki Categories.
6. In the Term Set Settings box, select the term set that will provide values for the Wiki Categories column.
7. Click OK.
Selecting a Page Layout
A valuable feature of pages in a publishing site is the ability to change the way a page is organized without re-creating it. This is done by changing the page’s Layout setting. A page layout is a template for the arrangement of the fields or columns on a page. It is easy to change a page layout because behind the scenes the information on publishing pages has no discrete arrangement in itself, but instead is simply a set of metadata that is stored in a SharePoint content database under the page name. The page layout is the “framework” that the metadata hangs on when the page is rendered. By switching to a different layout, the arrangement of the information can be changed without editing the content itself.
To change a page’s layout:
1. Open the page and select Site Actions and then Edit Page to place the page in Edit mode.
2. From the Page ribbon tab, click the Page Layout drop-down menu, as shown for a Wiki page in Figure 13.5.
3. Select the desired layout.
Figure 13.5: Wiki page layouts
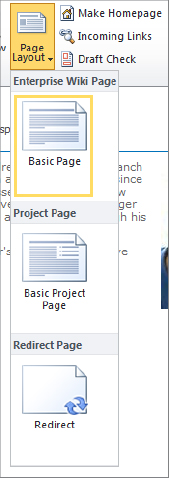
Some standard layouts are as follows:
Basic Page The standard page based on the Enterprise Wiki content type
Project Page Adds Web Page, Contact, and Status columns to the page for project tracking
Redirect Page Designed to automatically redirect viewers to a different page after 5 seconds
Page layouts are based on content types, so selecting a page layout conveniently assigns the content type and the page layout to the page at the same time.
The Publishing Portal creates a Pages library, which has many more content types and layouts associated with it. These include two additional content types:
Article Page These layouts do not have any web part zones on them and therefore contain only metadata. They are ideal for Internet-facing sites.
Welcome Page These layouts have web part zones, making them effective for intranet-facing sites where list and library data are more likely to be displayed.
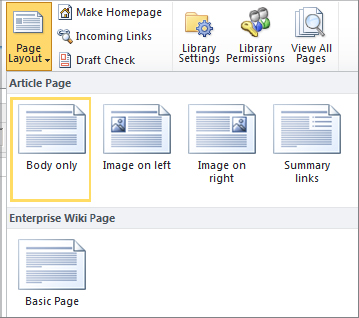
Clicking the Layouts drop-down from a page created in a Publishing Portal displays a list that includes the same layouts as the Wiki site along with many others, such as the Article layouts, as shown in Figure 13.6. These provide convenient arrangements of content that include fields for Page Image, Image Caption, Byline, and Article Date.
Figure 13.6: Publishing Portal page layouts
Understanding Page Properties
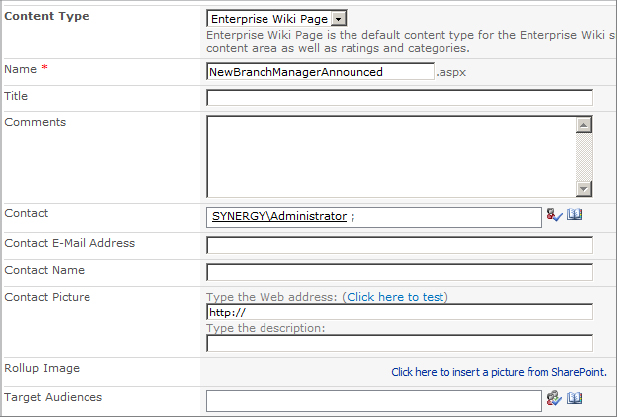
With the page open in Edit mode, from the Page ribbon tab select Edit Properties. One of the first things that you’ll notice is that many of the properties shown on this page are the same ones that are edited when the page is open in Edit mode. All the content of a publishing page can be edited from the properties page and the Edit mode of the page itself. The properties of the page are derived, in part, from the columns of the content type the page is based on. Therefore, no single set of properties exists that applies to all pages. However, all pages will have a common set of properties derived from the base page content type from which they all inherit and which are shown in Figure 13.7. These common properties are used primarily for administrative purposes by content editors or managers who want to understand what the purpose of the page is and who the primary contact person is for the page. They are not displayed to readers of the page.
Figure 13.7: Page properties
One of the properties found on the properties page that is not displayed in the Edit mode is Scheduling, shown in Figure 13.8.
Figure 13.8: Scheduling settings
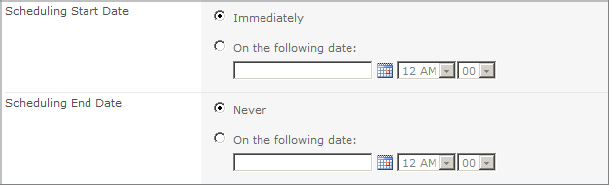
Content scheduling allows pages to be made visible and invisible at specific dates and times. Scheduling is supported only when Content Approval has been enabled on the library and versioning has been set to both Major and Minor versions. The goal of scheduling is to provide a process whereby a page can be created by a content editor (someone with Contributor rights), published to the site, and scheduled to be available at some point in the future or scheduled to expire at some point in the future. A timer job monitors the schedule and publishes the page at the correct time.
Creating Reusable Content
Often, a content editor is faced with the challenge of needing to include the same text on many different pages, such as a legal disclaimer at the bottom of an article. While the use of copy-and-paste may allow the content to be reproduced, it isn’t always accurate and some content, such as HTML with embedded formatting, is difficult to copy this way. A Publishing site collection contains a Reusable Content list, which allows content editors to store prewritten content that can inserted into any publishing page, as shown in Figure 13.9.
Figure 13.9: Reusable Content list
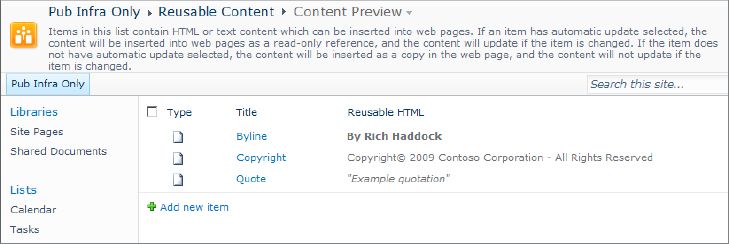
There are two forms of reusable content:
Reusable HTML This type allows editors to capture and store any valid HTML tags and text. Reusable HTML is useful for storing formatted text, hyperlinks, and images. Code such as JavaScript cannot be included because it is not allowed inside publishing page content.
Reusable Text Reusable Text content is useful when you want text to take on the font and style of the paragraph it is in.
To create a reusable content item:
1. Open the root site in a site collection.
2. From the Site Actions menu, select View All Site Content.
3. Under Lists, click Reusable Content.
4. From the Items tab, click either Reusable HTML or Reusable Text. The Reusable Content page is displayed, as shown in Figure 13.10.
Figure 13.10: Reusable Content page
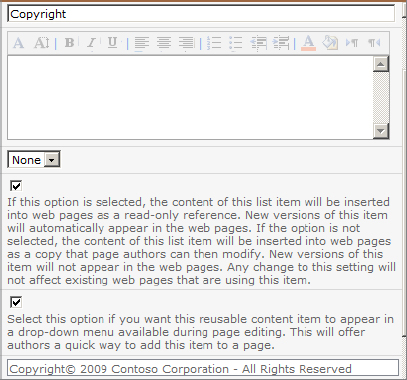
5. Enter a name in the Title field. In the Comments field, enter a description for the item.
6. Select a Content Category, which can help in sorting multiple items in a list.
7. Choose whether to enable the Automatic Update option. When you enable this option, SharePoint automatically pushes any changes to the content item out to all the pages where the item is being used. For instance, this would allow a change to the copyright notice to be propagated throughout the site without requiring the pages in the site to be edited again.
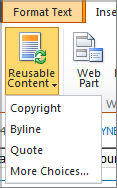
8. Choose whether to enable the Show In Drop-Down Menu option. This allows the item to be displayed in the SharePoint edit ribbon when the page is being edited, as shown in Figure 13.11.
Figure 13.11: Reusable Content drop-down menu
9. In the Reusable HTML or Reusable Text field, enter the content that will be displayed inside the web page.
10. Click Save.
To use a reusable content item:
1. Open the publishing page in Edit mode.
2. Click inside the page content area of the page.
3. From the Editing Tools ribbon, click the Insert tab, and then click the Reusable Content drop-down menu, as shown in Figure 13.11. Either select one of the items displayed in the menu or select More Choices to see all the reusable content available.