
Configure Web Application Security
Web application security settings apply to the whole web application and can override permissions within the web application’s site collections. In this section, we’ll look at controlling what permissions can be assigned, adjusting a web application policy, configuring anonymous access, and configuring antivirus settings.
Before we start, let’s define two important terms that are used when managing SharePoint permissions:
Base Permission A base permission is a very small unit of access, such as Override Check Out. SharePoint has 33 different built-in base permissions that are organized into three categories: List Permissions, Site Permissions, and Personal Permissions. Since these are so fine-grained, you cannot grant base permissions directly to a user or group. You also cannot create new base permissions. In fact, you only work with base permissions when constructing permission levels.
Permission Level A permission level, sometimes called a role, is a collection of base permissions. Examples of built-in permission levels include Full Control, Contribute, and Read. When assigning access to users, you do so by granting permission levels. SharePoint lets you create custom permission levels.
Configuring Web Application Policies
A web application policy is a set of permission levels that either grant or deny permissions to a set of users. Permissions defined at the web application level cascade across all site collections in the web application. By default, a web application has these four permission policy levels defined:
- Full Control
- Full Read
- Deny Write
- Deny All
Granting a permission level supplements any existing permissions. For example, if a user has Contribute (read/write) access to some websites and no access to others, granting the Full Read permission gives the user read access to all websites in all site collections. The user also retains Contribute access where it was granted.
Denying a permission level revokes existing permissions. For example, applying Deny All to a user prevents any and all access to a web application and all its site collections, even if the user had permissions on those sites previously.
Permissions granted at the web application level are not visible within site collections and thus are hidden from site collection administrators. A practical example on where this is useful is in auditing. Granting Full Read permissions to auditors ensures they can access all content in the web application without site collection administrators being involved.
NOTE Adjusting the web application policy is the only way to deny some form of access across SharePoint. SharePoint does not support the ability to deny within a single site collection.
To access the user policy for a web application using Central Administration:
1. Click Application Management, and then select Manage Web Applications.
2. Highlight the web application and click the User Policy button in the ribbon.
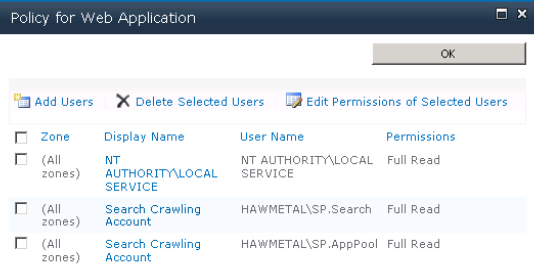
3. The current user policy for the web application is displayed as shown in Figure 14.2. If you have configured a Search service application, you’ll notice that SharePoint uses the user policy to grant full read access to your search crawling accounts.
Figure 14.2: Policy for web application
Once you are viewing the user policy, you can do the following tasks:
- To remove a defined policy, select the policy and click the Delete Selected Users link. Confirm the action when prompted.
- To add a new policy, click the Add Users link. Then perform the following steps:
1. Select All Zones or a single zone for the web application and click Next. When applying a user policy, you can limit it to a single zone, such as Internet. To learn more about zones, see Chapter 2, “Creating and Managing Web Applications.”
2. Choose the users or groups from AD or from your designated authentication provider. Multiple users or groups can be selected.
3. Check the permission policy levels that you want to apply. If custom permission policy levels (covered in the next section) exist, they can also be selected.
4. Optionally, select the Account Operates As System check box. This means that if a user creates or modifies an item in this web application, the Created By and Modified by entries will not show the user’s name but instead contain System Account.
5. Click Finish to save the users or groups added.
- To edit one or more existing policies, check the policy entries and click the Edit Permissions Of Selected Users link. In the Edit Users dialog box, adjust the permissions as needed and click Save when finished.
WARNING Adjusting permissions at the web application level is very powerful and should be used with caution. Any changes made here immediately affect the user interface within site collections, and this may cause confusion or frustration among users. We advise you test any changes you wish to make in a test environment or on a test web application to be sure the behavior is what you expect.
Configuring Permission Policy Levels
A SharePoint permission policy level is a custom set of grant or deny base permissions that can be applied when configuring the web application policy. As covered in the previous section, a web application has four built-in permission policy levels by default, and SharePoint allows you to add custom ones. For example, you might want to create a custom permission policy level that prevents users from just deleting items.
To create a new permission policy level using Central Administration:
1. Click Application Management, and then select Manage Web Applications.
2. Highlight the web application and click the Permission Policy button in the ribbon.
3. The current permission policy levels are displayed. Click Add Permission Policy Level to create a new one.
4. In the Add Permission Policy Level dialog box, enter the name and optional description for this policy.
5. Optionally, specify if this policy level grants Site Collection Administrator or Site Collection Auditor (full read) rights.
6. As appropriate, check the Grant or Deny permission boxes.
7. Click Save to save the new permission policy level.
Managing Anonymous Access
Anonymous access allows nonauthenticated (that is, guest) users to access a SharePoint web application. Anonymous access is commonly used for Internet-based websites but can also be used in an intranet. Anonymous access can be turned on when creating the web application or enabled at a later time on a single web application zone. Anonymous access can be enabled whether you are using Claims or Classic authentication.
NOTE SharePoint allows you to have anonymous access in addition to authenticated access, and using both together has its advantages. Take, for example, an extranet that is public facing. Anonymous guests can use the website to get limited read access to some content. By logging in (do so by clicking the Sign In button, located by default in the upper-right corner), you become an authenticated user and then receive access to private areas.
Anonymous access is controlled at the zone level for a web application. To enable anonymous access for a particular zone, follow these steps using Central Administration:
1. Click Application Management, and then select Manage Web Applications.
2. Highlight the web application and click the Authentication Providers button in the ribbon.
3. In the Authentication Providers dialog box, select the zone on which you want to allow anonymous access.
4. In the Edit Authentication dialog box, enable the check box labeled Enable Anonymous Access.
5. Click Save. These changes are propagated to each WFE server.
By default, anonymous users have no access to site collections until it is granted. Therefore, once anonymous access has been enabled, you must set what permissions anonymous users have. This is usually done within each site collection, as covered in the “Managing Permissions” section later in this chapter. However, as a web application administrator, you can place some restrictions on what level of access anonymous users can receive. This is done through the Anonymous Policy. Through this policy, you can either deny write access or deny all access to anonymous users. As with other web application policies, these settings take precedence over what has been defined within each site collection.
To set the Anonymous Policy, follow these steps using Central Administration:
1. Click Application Management, and then select Manage Web Applications.
2. Highlight the web application and click the Anonymous Policy button in the ribbon.
3. Select either All Zones or a specific zone.
4. Select the anonymous policy to apply. Your three choices are None, Deny Write, and Deny All.
5. Click Save to save your changes.
Configuring Antivirus Settings
SharePoint does not have built-in virus-scanning software. However, SharePoint can integrate with third-party products that are compatible with the Virus Scanning application programming interface (VS API). After a compatible third-party product is installed, SharePoint can automatically call into the product’s virus-scanning engine when users upload or download documents. This ensures SharePoint’s documents remain virus free.
When installing an antivirus product, be sure to install it on each WFE server in your farm.
Using Central Administration, you can configure when a document scan is done, and whether or not SharePoint should attempt to have an infected document cleaned. Any settings you adjust apply to the whole farm. Here’s how you can adjust the antivirus settings:
1. Click Security, and then select Manage Antivirus Settings.
2. To tell SharePoint to scan each uploaded file, select Scan Documents On Upload.
3. To tell SharePoint to scan each file downloaded, select Scan Documents On Download.
4. If necessary, enable Allow Users To Download Infected Documents. This is not usually advised but may be needed if you regularly get false positives from your antivirus engine. (A false positive occurs when an antivirus engine flags a clean file as infected.)
5. If desired, enable Attempt To Clean Infected Documents.
6. Optionally, adjust the Antivirus Time Out value. The default value is 300 seconds and should only be decreased if you are experiencing performance problems or as recommended by the antivirus product.
7. Optionally, adjust the Antivirus Threads setting. The default value is 5 threads and should only be adjusted as recommended by the antivirus product.
8. Click OK to save your changes.