
As we come to the end of this book, it is a good time to take a look at the Operational Intelligence application that you developed and add some simple customization to pull the app together from a presentation standpoint.
In this recipe, you will add custom navigation to your application to better organize the reports and dashboards.
To step through this recipe, you will need a running Splunk Enterprise server, with the sample data loaded from Chapter 1, Play Time – Getting Data In. Ideally, you should have completed all the earlier recipes in this book such that you have an Operational Intelligence application with a number of dashboards and reports contained within it. By now, you should be familiar with navigating the Splunk user interface and using the Splunk search language.
Follow the steps in this recipe to add some custom navigation and design tweaks:
- Log in to your Splunk server.
- Select the Operational Intelligence application

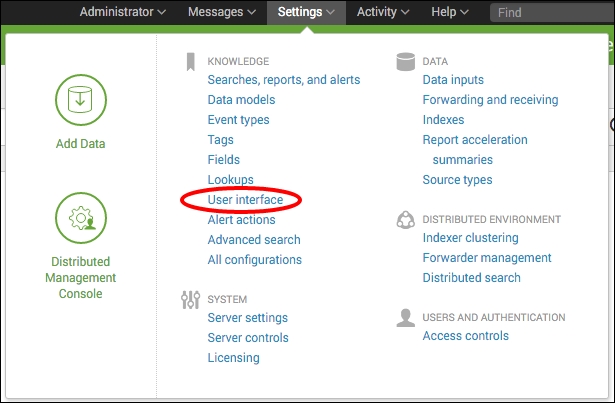
- Click on Settings and then on User interface:
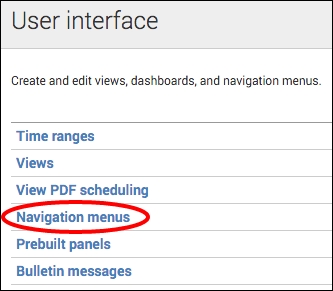
- Click on Navigation menus:
- You should see one item in the list named default. Click on it.
- You should see some existing code, as follows:
<nav search_view="search" color="#65A637">
  <view name="search" default='true' />
  <view name="data_models" />
  <view name="reports" />
  <view name="alerts" />
  <view name="dashboards" />
</nav>
- Modify the code like this:
<nav search_view="search" color="#999999">
  <view name="search" default='true' />
<!--
  <view name="data_models" />
  <view name="reports" />
  <view name="alerts" />
-->
  <collection label="Sales">
    <view name="product_monitoring" />
    <view name="purchase_volumes" />
  </collection>
  <collection label="Performance">
    <view name="operational_monitoring" />
    <view name="website_monitoring" />
    <view name="session_monitoring" />
    <view name="predictive_analytics" />
  </collection>
    <collection label="Operations">
    <view name="session_and_purchase_trends" />
    <view name="web_hits" />
  </collection>
  <collection label="Visitors">
    <view name="visitor_monitoring" />
  </collection>
  <collection label="Saved Reports">
    <collection label="Chapter 1 - Play Time">
         <saved source="unclassified" match="cp01" />
     </collection>
    <collection label="Chapter 2 - Diving into Data">
         <saved source="unclassified" match="cp02" />
     </collection>
        <collection label="Chapter 3 - Dashboards Visualizations">
         <saved source="unclassified" match="cp03" />
    </collection>
    <collection label="Chapter 4 - Building an App">
         <saved source="unclassified" match="cp04" />
     </collection>
    <collection label="Chapter 5 - Extending Intelligence">
         <saved source="unclassified" match="cp05" />
     </collection>
      <collection label="Chapter 6 - Advanced Searching">
         <saved source="unclassified" match="cp06" />
     </collection>
    <collection label="Chapter 7 - Enriching Data">
         <saved source="unclassified" match="cp07" />
     </collection>
    <collection label="Chapter 8 - Being Proactive">
         <saved source="unclassified" match="cp08" />
     </collection>
    <collection label="Chapter 9 - Speed Up Intelligence">
         <saved source="unclassified" match="cp09" />
     </collection>
    <collection label="Chapter 10 - Above and Beyond">
         <saved source="unclassified" match="cp10" />
     </collection>
    </collection>
    <collection label="Administration">
       <a href="http://docs.splunk.com">Splunk
         Documentation</a>
       <a href="http://apps.splunk.com">Splunk Apps</a>
       <a href="http://discoveredintelligence.ca/getting-started-with-splunk/">Splunk Help</a>
 <view name="dashboards" />
    </collection>
</nav>
- Once the edits have been made, click on Save and then select the Operational Intelligence app as you did in step 2. You should now see that you have fully customized the menus of the application and also changed the navigation toolbar color to gray:
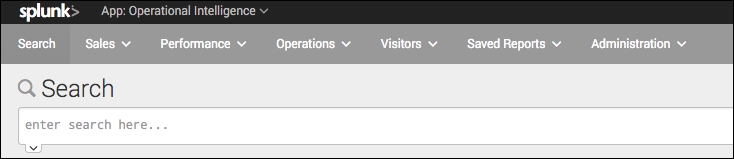
In this recipe, you edited the navigation of the Operational Intelligence application to better organize the dashboards and reports. You also changed the color of the navigation bar from the default green to gray. Let's break down the code a bit to explain a few things:
|
Search fragment |
Description |
|---|---|
<nav search_view="search" color="#999999"> |
This is where the color of the navigation menu bar was changed using the HEX color value for gray. |
<!-- <view name="data_models" /> <view name="reports" /> <view name="alerts" /> --> |
These default views were commented out such that they do not display in the application. You can also simply delete the lines instead. |
<collection label="Sales">
    <view name="product_monitoring" />
    <view name="purchase_volumes" />
</collection> |
Next, you added a series of |
<collection label="Saved Reports">
    <collection label="Chapter 1 - Play Time">
         <saved source="unclassified" match="cp01" />
     </collection>
...
</collection> |
You then added a series of nested Note that to display searches, we use the |
<collection label="Administration">
       <a href="http://docs.splunk.com">Splunk Documentation</a>
       <a href="http://apps.splunk.com">Splunk Apps</a>
       <a href="http://discoveredintelligence.ca/getting-started-with-splunk/">Splunk Help</a>
<view name="dashboards" />
</collection> |
Finally, you added an admin menu that lists a number of resources. To do this, you simply added the familiar HTML |
This just skims the surface of some of the customization that can be applied to a Splunk application. For example, you can implement your own CSS for the app or even use your own icons and graphics.
Note
Splunk has a detailed manual on advanced development, including how to modify the CSS for an app, how to change the icons and images, and how to package your application to upload it to the Splunk app store. For more information, see the documentation at http://docs.splunk.com/Documentation/Splunk/latest/AdvancedDev.