
As you can see, performing a SharePoint installation manually is quite a lot of work. In addition, as servers and farms are added, there is always the risk of missing or misconfiguring a step. Having automated scripts guarantees consistency in each farm you build. Therefore, if you expect to build farms on a regular basis, it is essential to have a set of automation scripts in your toolkit.
Fortunately, the SharePoint community has come to the rescue by providing an excellent package that automates nearly every detail, including the provisioning of many services. It also supports single- or multiserver farms. The package is called AutoSPInstaller and can be downloaded from CodePlex at http://autospinstaller.codeplex.com.
Configuring AutoSPInstaller
While AutoSPInstaller is easy to use and can be adapted to specific needs, it does help to understand the installation process. This section provides an overview of how to use AutoSPInstaller. More details can be found on the AutoSPInstaller page on CodePlex. This package is regularly updated, so the features may vary from what is covered in this section.
Here are the steps to use AutoSPInstaller to automate the creation of a farm:
1. Create a new installation folder to hold all files used for installation.
2. Copy the contents of the SharePoint ISO or actual disc into this new folder. If you just have an EXE, you can extract it using this syntax:
SharePoint.exe /extract:E:SP.Install
3. Download and unzip AutoSPInstaller into your installation folder (e.g., E:SP.Install).
4. Inside the SP.Install folder, edit the config.xml file and add your SharePoint Server Product Key. This is the line that begins with <PIDKEY.
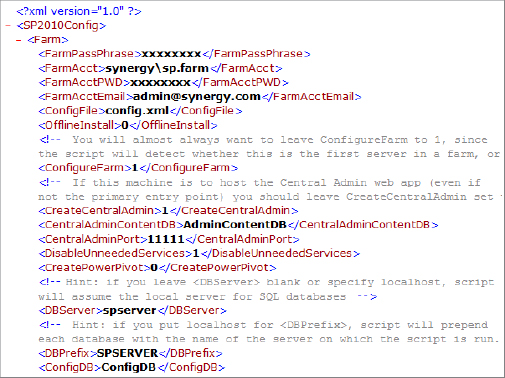
5. Inside the SP.Install folder, edit the SetInputs.xml file. This file provides detailed instructions on how the automated installation works. Among other settings, you must provide the name of your SQL server, database names, and the farm account. The farm account’s password and farm passphrase are optional—if they are not specified, you will be prompted for them during the installation. In this file, you also have the option of installing many service accounts such as Search or Managed Metadata. See Figure 1.19 for a snapshot of just a few of these settings.
Figure 1.19: AutoSPInstaller configuration settings
6. Optionally, add any SPs and/or CUs that you want to have automatically applied (slipstreamed) into the Updates folder. When adding, be sure to manually extract the contents of each update.
7. Optionally, add any language packs into the LanguagePacks folder.
8. Log into the server using your SharePoint install account.
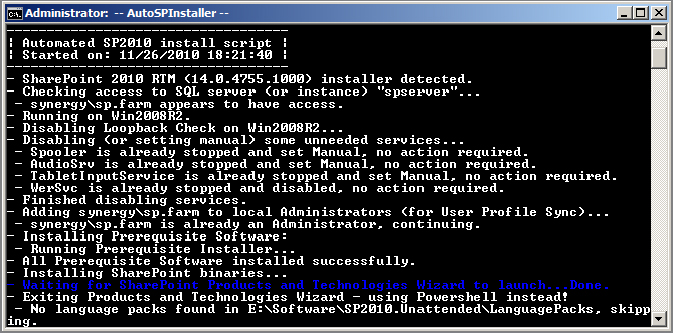
9. From the AutoSPInstaller folder, run the Launch.bat file to begin. As it runs, AutoSPInstaller will log all of its activities into RTF-formatted files that it places on the desktop. It also logs output into the console window, as shown in Figure 1.20.
Figure 1.20: Initial console output from AutoSPInstaller
Here are a few limitations with AutoSPInstaller and other issues that you should be aware of:
- AutoSPInstaller does not currently automate the installation of Office Web Apps.
- All service accounts will use the same application pool identity.
- AutoSPInstaller is designed to work with SharePoint Server. To fully automate the installation of SharePoint Foundation, the script needs to be modified.
Installing Prerequisites Without Internet Access
An automated installation, just like a manual one, attempts to download the prerequisite files from the Internet during installation. If the server does not have Internet access, the install will fail. The workaround for this is to predownload these files and tell the installer to use these predownloaded files instead. Here are the steps:
1. Download all prerequisites using a PowerShell script located at http://autospinstaller.codeplex.com/releases/view/44442.
2. Store these files these in the PrerequisiteInstallerFiles folder.
3. In your installer folder (e.g., E:SP.Install), create a text file named PrerequisiteInstaller.Arguments.txt with the following values on one long line:
/SQLNCli:PrerequisiteInstallerFilessqlncli.msi/ChartControl:PrerequisiteInstallerFilesMSChart.exe
NOTE This arguments file will vary slightly depending on whether you are using Windows Server 2008 or 2008 R2. This example assumes you are using 2008 R2. It also assumes you are using US English for the base language. For details on how to adjust these values, see http://technet.microsoft.com/en-us/library/ff686793.aspx.