
A content database is the storage container for site collections. As covered in Chapter 3, a site collection is stored in its entirety within a single content database. A content database can hold one or more site collections.
Content databases are powerful, but managing them is easy. All the main operations, such as adding, removing, and configuring content databases, are possible using both Central Administration and PowerShell.
Adding a Content Database
Here are reasons for needing to add a new content database:
- Creating a new web application
- Scaling out to a new SQL server, as covered in Chapter 5, “Scaling and High Availability”
- Segregating certain site collections for organizational, security, or regulation purposes
- Controlling the size of content databases
NOTE When you’re creating a new content database from Central Administration, it is the farm account that issues the create database request to the SQL server. When creating a content database on a different SQL server, be sure that the farm account (described in Chapter 1, “Installing SharePoint 2010”) has both the dbcreator and the securityadmin server role permissions on the SQL server.
Creating a Content Database Using Central Administration
Creating a content database from Central Administration is a simple process. Here are the steps:
1. Start Central Administration (Start ⇒ All Programs ⇒ Microsoft SharePoint 2010 Products ⇒ SharePoint 2010 Central Administration).
2. In the Application Management section, click Manage Content Databases.
3. Select the web application to which you want to add a content database.
4. The list of content databases for this web application appears. Click Add A Content Database.
The interface for creating a content database, shown in Figure 6.1, should look familiar. It’s almost exactly the same as the one you use when you’re creating a new web application, as covered in Chapter 2, “Creating and Managing Web Applications.”
Figure 6.1: Creating a content database
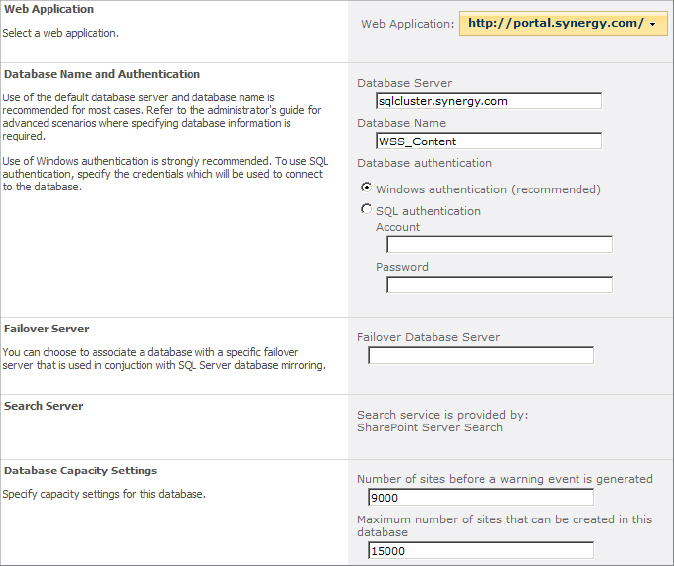
5. Specify the name of the database server or the name of a SQL alias that has been created. Any name that can resolve to the correct IP address can be used. If you are connecting to a named SQL instance, specify the name using the servernameinstance name syntax.
6. Provide the database name. It’s best to consistently follow an intuitive database naming convention for all content databases. If the database name does not exist, it will be created. If the database already exists, SharePoint attempts to mount it.
NOTE Using this process to mount an existing content database can be useful, but there are caveats. The database must be for SharePoint 2010 and should match the build (the full version of the farm, e.g., 14.0.4762.1000) of the current farm. If the database build is newer than the current farm, the database cannot be mounted. If the database is older, it is best to mount using PowerShell, as covered later in this section.
7. Choose the database authentication method that the application pool account should use when it connects to this SQL server.
8. If you plan to configure this database for database mirroring, enter the name of the failover database server. (Mirroring is covered in Chapter 5.)
9. Optionally, adjust the database capacity settings. These numbers set limits on the number of site collections that can be stored in this content database and are also used to determine which content database will be used when creating a new site collection.
10. Click OK to create the content database.
Creating a Content Database Using PowerShell
To create a content database using PowerShell, use the New-SPContentDatabase cmdlet. Here is the basic syntax:
New-SPContentDatabase -Name <DatabaseName>-WebApplication <URL> -DatabaseServer <ServerName>
Here is an example:
New-SPContentDatabase -Name IT_Content -WebApplication
http://intranet -DatabaseServer sqlcluster.acme.org
NOTE When you’re creating a content database using PowerShell, the Windows account you've logged in as is connecting to the SQL server and creating the database. Be sure this account has dbcreator and securityadmin server role permissions on the SQL server.
To mount an existing database, use the Mount-SPContentDatabase cmdlet. This is the preferred form to use if the database is from an older build or version (including SharePoint 2007 SP2 or later) and needs to be upgraded.
Removing a Content Database
Removing a content database dismounts or disconnects it from a web application. When using Central Administration to remove, the database is simply dismounted from SharePoint but remains online and intact inside SQL server. This allows you to mount the database again using the steps just covered in the previous section.
When a content database is removed, all site collections inside the database become inaccessible.
Here are the steps to dismount a content database using Central Administration:
1. In the Application Management section, click Manage Content Databases.
2. Select the correct web application.
3. The list of content databases for this web application appears. Click the database you wish to dismount.
4. Details for this content database are shown. Near the bottom of the window, click Remove Content Database.
5. Click OK.
Content databases can be removed using PowerShell in two ways:
- To just dismount the database from SharePoint, keeping the database intact, use the Dismount-SPContentDatabase cmdlet.
- To dismount and delete the content database from the SQL server, use Remove-SPContentDatabase.
Configuring a Content Database
To configure the settings of a content database using Central Administration, follow these steps:
1. In the Application Management section, click Manage Content Databases.
2. Select the correct web application.
3. The list of content databases for this web application appears. Click the database you want to configure.
4. View and change configuration options as desired. Click OK to save your changes.
The information and settings in the configuration dialog box are as follows:
Database Information This section shows the database server, name, and authentication type. It also specifies whether the database is read-only. The only setting you can change is database status. This setting controls whether this content database can be used when storing new or restored site collections. The status of Ready means that this database can be used to store new or restored site collections. The status of Offline means that it cannot be used when storing new or restored site collections. More details on how you can use the database status setting to manage your site collection placement are covered in Chapter 3.
NOTE Adjusting the database status is a useful feature, but the on-screen wording here is confusing. Contrary to how it sounds, Offline does not mean to disconnect or take the database down. Furthermore, the Ready and Offline terms are not used consistently. When you are viewing the list of content databases for a web application, a database that is ready is displayed as Started; a database that is offline is displayed as Stopped. Remember the concept and don’t let these terms confuse you.
Database Versioning And Upgrade Note the details on the database version and build. Although there is nothing to adjust here, knowing this build is useful when you are performing an upgrade from SharePoint 2007. The Current SharePoint Database Schema is the current build for this content database. The Maximum SharePoint Database Schema version is the current build for the farm. When these numbers match, you know that your content database build matches the farm build, which is what you want. More details are covered in the next section.
Failover Server Set the server name for an alternate SQL server if you are mirroring this database. If SharePoint cannot connect to the primary server, it will attempt to connect to this failover server. For more details on this topic, see Chapter 5.
Database Capacity Settings This controls how many site collections can be stored in this content database. You can adjust both the warning and maximum levels. These numbers are also used to determine which content database to use when creating a new site collection.
Search Server This setting is only applicable if you are using the SharePoint Foundation (SPF) Search service. If you are using SharePoint Server (SPS) and are using a Search service application, this setting does not apply.
Preferred Server For Timer Jobs If you are running timer jobs associated with this content database, specify the WFE or application server in the Preferred Server For Timer Jobs drop-down menu.
A content database’s settings can also be adjusted using PowerShell. The primary command is Set-SPContentDatabase. Here is the basic syntax:
Set-SPContentDatabase <DatabaseName>
TIP To learn more about the different parameter values that you can employ, use the following PowerShell cmdlet: Get-Help Set-SPContentDatabase -detailed
This example adjusts the warning and maximum site collection counts for all online content databases for a web application:
Get-SPContentDatabase -WebApplication http://intranet |
Set-SPContentDatabase -WarningSiteCount 5 -MaxSiteCount 10
WARNING You will encounter a bug in the release-to-manufacturing (RTM) version of SharePoint 2010 when adjusting the database status to offline using PowerShell. When you use this command, the status correctly goes to offline. But when viewing the status from Central Administration, it shows Error. The database is completely healthy and properly offline, so the display is incorrect. However, it is disconcerting, so you may prefer to use Central Administration when adjusting this setting.
Moving a Content Database
A content database can be moved from one SQL server to another, but there is not a single operation in SharePoint to do this. Here is an overview of the steps you must perform:
1. Disable scheduled timer jobs or search crawls associated with the web application in which the content database is used.
2. Dismount the content database from SharePoint, as covered previously in the “Removing a Content Database” section.
3. Back up the content database from the source SQL server and restore it on the destination SQL server.
A faster but more complex alternative is to detach the database from the SQL server, manually copy over all database files (MDF, LDF, NDF) to the destination SQL server, and then reattach.
4. Mount the content database to SharePoint using the new SQL server name, as explained earlier in the “Adding a Content Database” section.
5. Re-enable timer jobs that were disabled and resume any search crawls.
Steps 1 and 5 are optional but recommended for production environments. To simplify the effort, you can use PowerShell to script these two steps. For more information on moving content databases, see the article “Move Content Databases (SPF 2010)” at http://technet.microsoft.com/en-us/library/cc287899.aspx.