Term sets are used primarily to populate the values in Managed Metadata columns in lists, libraries, and content types. The Managed Metadata column is new to SharePoint 2010 and is part of the feature set provided by the Managed Metadata Service. A Managed Metadata column provides users with choices derived from a single term set and supports multiselect values and user-defined values. The Managed Metadata column provides an alternative to the Choice column and the Lookup column by allowing users to pick values from a set of options. But, in this case, the values are selected from a term set that is managed independently from any of the columns.
NOTE Because Managed Metadata is a new type of column, it will not be recognized by Office applications earlier than Office 2010. The column values can still be edited through the website but not through the Document Information Panel in the Office application.
Troubleshoot Managed Metadata: Activate the Taxonomy Feature
For you to make full use of the Managed Metadata column, the Taxonomy feature must be activated. This is a hidden feature—there is no option to activate it manually through the Site Settings page. It is automatically activated through most site templates, with the exception of the Blank Site template.
If you encounter an error when trying to add a Managed Metadata column to a site collection, the fix may be to activate this feature through the command line. To activate the feature, do the following:
1. From the Start menu on the SharePoint server, select All Programs ⇒ Microsoft SharePoint 2010 Products ⇒ SharePoint 2010 Management Shell.
2. Enter the following command at the command prompt, replacing sitecollectionurl with the URL of the site collection where you want the feature activated:
Enable-SPFeature -Identity
73EF14B1-13A9-416b-A9B5-ECECA2B0604C -Url
http://sitecollectionurl
Creating a Managed Metadata Column
To create a Managed Metadata column, follow these steps:
1. In any site, from the Site Actions menu, select Site Settings.
2. Under Galleries, click Site Columns.
3. On the Site Columns page, click Create.
4. On the Create Column page, enter a name for the column, and then select Managed Metadata as the type.
5. Select a group to save the column under and configure additional column settings as required. These settings operate the same as they do under the Choice column type.
6. In the Multiple Value Field section, check Allow Multiple Values if you want to allow users to enter more than one value in the property when they edit.
7. The Display Format area determines how hierarchical values are displayed. The default option, Display Term Label In The Field, displays only the value selected in the text field. If you want to allow users to see the hierarchical path of parent terms to the selected value, select Display The Entire Path To The Term In The Field.
8. Determine how to populate values for this column as follows:
- To have values populated from an existing term set, select Use A Managed Term Set, as shown in Figure 11.12. Then select the term set to use as the source of values. To find a term set, you can enter a term in the search box and click the find icon. Note that the find function searches only terms, not the names of the term set group or term sets themselves.
Figure 11.12: Setting up a managed term set

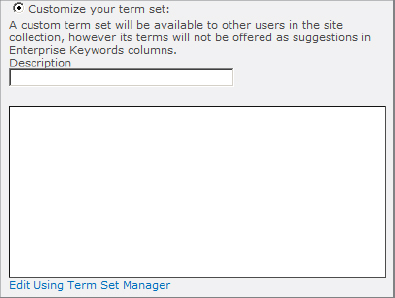
- To populate values manually, select Customize Your Term Set, as shown in Figure 11.13, and then enter a description and add terms.
Figure 11.13: Click the Customize Your Term Set radio button.
9. If the term set was configured as an open term set and you want to allow users to enter values that are not in the term set, then under the Allow Fill-In Choices setting, you can select the Yes option.
10. In the Default Value setting, provide a default value for the column. If you don’t, the column will be blank.
11. Click OK.
Using a Managed Metadata Column
The Managed Metadata column is designed to work with large value sets and can be used in lists, libraries, and content types throughout SharePoint 2010. To use a Managed Metadata column in a content type, do the following:
1. Open the root site in a site collection.
2. From the Site Actions menu, select Site Settings.
3. Under the Galleries section, click Site Content Types.
4. On the Site Content Types page, click the content type you want to modify.
5. Under Columns, click Add From Existing Site Columns.
6. Locate the Managed Metadata column in the list and click Add. You will see a message warning you that this column cannot be used in older applications. Click OK to dismiss the message.
7. Click OK to add the column.
NOTE If this content type is in a syndicated hub, then you will need to republish the content type to propagate the new column to all subscribing site collections.
Once the column has been added and the content type associated with a list or library, then users can edit the properties of the document or item and fill in the value of the Managed Metadata column. To do so:
1. From the item’s context menu, choose the Edit Properties command.
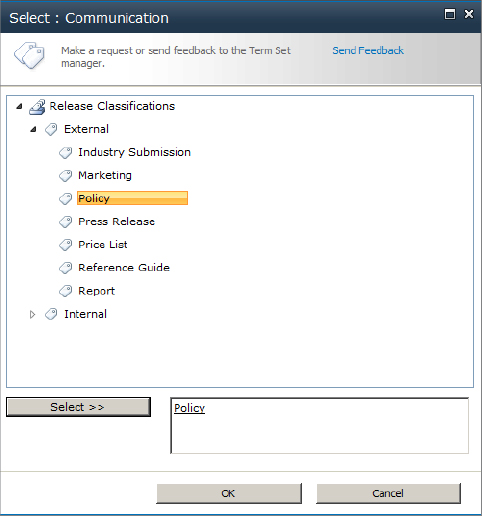
2. On the Edit Properties page, type the value that you want to select from the term set or click the browse button on the right side of the Managed Metadata column text box and select the value from the term set, as shown in Figure 11.14.
Figure 11.14: Adding metadata to a document
Configuring Metadata Navigation
The Managed Metadata column and its structured set of terms allow you to use the Metadata Navigation feature to easily locate documents and items. Metadata Navigation provides a list of values that users can click on to quickly filter the contents of a list or library. Metadata Navigation supports both a list of fixed values drawn from a term set and a key filter option, which allows users to easily filter on nonmanaged columns.
To configure Metadata Navigation, you first must ensure that the appropriate site feature has been enabled. The Metadata Navigation and Filtering feature is enabled automatically in most cases. To check this feature, browse to the Site Settings page in a site and click Manage Site Features. If the Metadata Navigation and Filtering feature is not enabled, click Activate to enable it.
By default, the Metadata Navigation and Filtering feature also generates indices automatically for all columns that it manages. These indices are separate from the indexing conducted by the search crawler and are created to allow SharePoint to quickly generate filtered views. SharePoint analyzes the query that will be required to retrieve content filtered on each column and determines whether an artificial index would improve the query time and then creates the index for the appropriate column. Indexes can also be created manually, but we recommend that you let SharePoint create them in most cases.
To configure Metadata Navigation on a list or library, follow these steps:
1. Browse to the list or library and, on the ribbon, click the List or Library tab, and then click the List Settings or Library Settings button.
2. Under General Settings, click Metadata Navigation Settings.
3. In the Configure Navigation Hierarchies section, shown in Figure 11.15, select the columns that will be enabled for one-click navigation. (To do so, select the column on the left and click Add to move it to the list of navigation columns.) Note that only columns based on fixed lists of values are available in this section.
Figure 11.15: Configuring Metadata Navigation settings
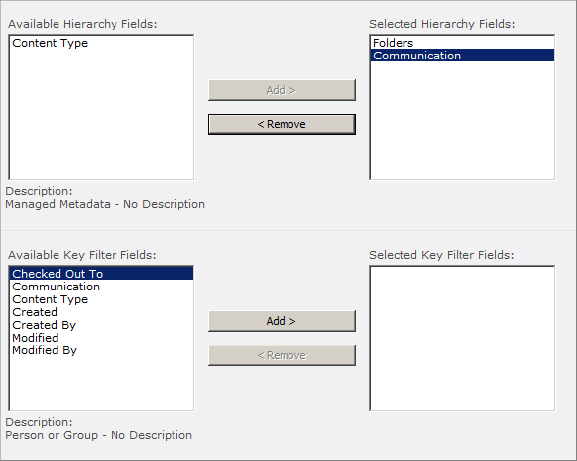
4. In the Configure Key Filters section, add to the Selected Key Filter Fields those columns that you want users to be able to navigate with but that aren’t supported under the Navigation Hierarchies section. (To do so, select an item in Available Key Filter Fields and click Add.)
5. In the Configure Automatic Column Indexing For This List section, you can disable the automatic index creation if you have alternative optimization planned. However, we generally recommend that you allow SharePoint to build the indices.
6. Click OK.
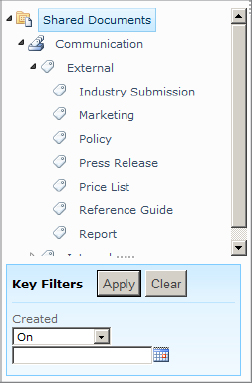
With Metadata Navigation configured, the user will see a new set of controls on the left side of the list or library page, as shown in Figure 11.16. Clicking on a metadata value will filter the list, as will entering a key value in the Key Filters section and clicking Apply.
Figure 11.16: Metadata Navigation controls