
Figure 17-9: A bookmark inserted into the text.
Marking the Spot with Bookmarks
Want to mark a spot within your manuscript to make it easy to find again? Try a bookmark. A bookmark is basically an inline annotation starting with an asterisk and a space that marks a place in your text for easy navigation.
Adding a bookmark
Follow these steps to add a bookmark to a document:
1. Place your cursor in the paragraph that you want to mark.
2. Choose Edit⇒Insert⇒Bookmark Annotation.
Or you can press Shift+⌘+B.
The marker is inserted at the front of the current paragraph, as shown in Figure 17-9. By default, Scrivener uses the first few words of the line to label the bookmark in the Bookmarks list (see the “Navigating to bookmarks” section, later in this chapter, for more about this list), but you can override that behavior by adding a space after the asterisk and text to create a custom label, as shown in Figure 17-10. In this instance, TNR3 is the bookmark label.
 You can also add a bookmark by placing an inline annotation containing an asterisk followed by a space at the beginning of a paragraph. If desired, add the custom label after the space.
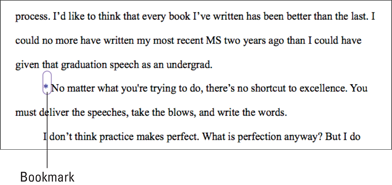
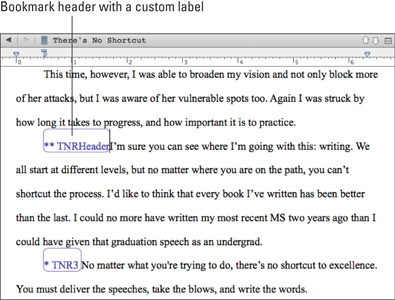
Figure 17-10: A bookmark with a custom label.

Removing a bookmark is as simple as deleting the annotation from the document.
Adding a bookmark header
A bookmark header is a special kind of bookmark that helps you keep your bookmarks organized. It works just like a bookmark but creates a hierarchical heading in the Bookmarks list for easier reading. (See the following section for details on the Bookmarks list.)
All bookmarks that fall after a header are considered children until the next bookmark header appears.
Add a bookmark header by following these steps:
1. Place the cursor within the paragraph that you want to mark.
2. Choose Edit⇒Insert⇒Bookmark Header Annotation.
The bookmark appears at the front of the current paragraph as an annotation with two asterisks followed by a space, as shown in Figure 17-11. Just like with a bookmark, the first few words are used as the label, but you can add your own by typing the desired label text after the asterisks and space.
You can also add a bookmark header by placing an inline annotation that contains two asterisks followed by a space at the beginning of a paragraph.
Figure 17-11: A bookmark header with a custom label.
Navigating to bookmarks
After you embed the bookmarks in your document, you can navigate to them in two ways. (Only those bookmarks in the current document or Scrivenings session are accessible.)
The following methods let you navigate to a bookmark:
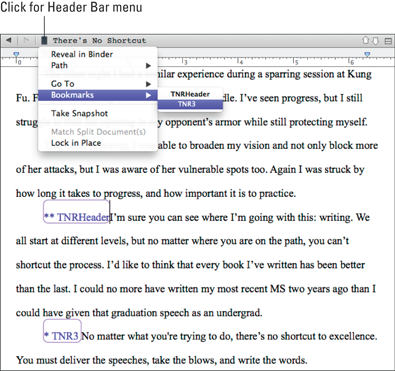
![]() Click the Document icon in the Header bar, choose Bookmarks from the menu that appears, and select the desired bookmark. In Figure 17-12, the bookmark header and bookmark created in the preceding sections are displayed in a hierarchical list.
Click the Document icon in the Header bar, choose Bookmarks from the menu that appears, and select the desired bookmark. In Figure 17-12, the bookmark header and bookmark created in the preceding sections are displayed in a hierarchical list.
![]() Choose View⇒Text Bookmarks, and then choose the desired bookmark from the submenu that appears. After you choose a bookmark from the submenu, Scrivener jumps to the bookmarked paragraph.
Choose View⇒Text Bookmarks, and then choose the desired bookmark from the submenu that appears. After you choose a bookmark from the submenu, Scrivener jumps to the bookmarked paragraph.
Inline annotations that appear on a line by themselves also appear in the Bookmarks list, whether they contain an asterisk or not.
Figure 17-12: Choosing a bookmark from the Header Bar menu.
..................Content has been hidden....................
You can't read the all page of ebook, please click here login for view all page.