
Figure 5-8: Click the Add button to create an internal reference.
Linking to Reference Material
Do you keep referring to a file in your project while writing a certain scene? Instead of hunting for it in the Binder each time you need it, you can create an internal reference.
Or maybe you’ve been scouring the Internet and finally found the elusive website that has everything you ever needed to know about green sea turtles. It’s far more information than you could possibly store, and you want to save the link for future reference and for your bibliography. What to do? Create an external reference!
 If the References pane isn’t visible, click the References button at the bottom of the Inspector. The References pane appears in the lower half of the Inspector.
Adding an internal reference
Internal references link to files stored within your project. Follow these steps to create one:
1. Click the References header to open a drop-down list, and then choose either Document References or Project References.
2. Click the Add button to the right of the header.
As shown in Figure 5-8, a menu pops up with options for adding a reference.
3. Point to Add Internal Reference on the menu.
4. In the submenu that appears, follow the hierarchy and click the desired item.
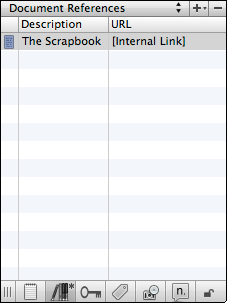
The link appears in the References pane (see Figure 5-9).
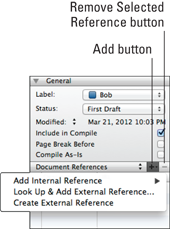
Figure 5-9: A new internal reference in the References pane.
You can also drag an item from the Binder and drop it on the References pane to create an internal reference.
Adding an external reference
External references are links to files outside of your project. They’re handy for oversized files or when you want to always have access to the most up-to-date version of a file or website. You can link to most common file types with an external reference.
To add an external reference, you can look it up, type it in, or drag and drop. You start the first two methods by following these steps:
1. Click the References header to open a drop-down list, and then select either Document References or Project References.
2. Click the Add button, and then select the appropriate option.
The following sections outline how to use both methods.
Looking up to add an external reference
You can use this method for files stored on your computer or on a drive that you can access from Finder (or Windows Explorer), such as an online storage site or external drive. After completing the steps in the preceding section, follow these steps to look up a reference and then link up:
1. Select Look Up & Add External Reference from the Add drop-down list.
The Add References window appears.
2. Select the file that you want to link, and then click Open.
The link appears in the References pane.
When you create a document reference, an asterisk appears in the References pane to denote that the current item has a reference.
Manually creating an external reference
This method is best for web pages, but also works for files stored on your computer if you know the file path. You need to know the URL (web address) of the page that you want, so if you don’t know it by heart, pull up the page in your browser and copy the URL before following these steps:
1. Select Create External Reference from the Add drop-down list.
A line appears in the References pane with New Reference selected in the Description field.
2. Type the name of the reference in the Description field.
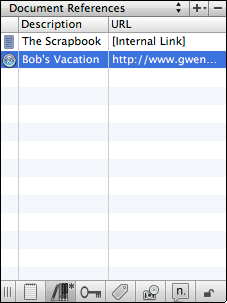
For example, you might enter Bob’s Vacation.
3. Press the Tab key to move to the URL field.
4. Type, or paste in, the resource URL, and then press Return.
The external reference you created now appears in the References pane. See the example in Figure 5-10.
Figure 5-10: A new external reference created manually.
Dragging and dropping to create a reference
To add any kind of external reference, you can drag the file from Finder (or Windows Explorer) or your Internet browser’s address bar (drag the icon just to the left of the URL, or the URL itself if there’s no icon) directly to the References pane.
Just make sure you’ve selected either Document or Project References in the References header first.
Determining when to use external references
If you read about importing files in Chapter 2, you might be wondering how to decide whether to import your research or use an external reference.
Here’s a list of things to consider when choosing between importing and referencing a file or website (for ease of reading, I use the term file, but the questions also apply to websites, images, and media):
![]() How large is the file? Every file you import to Scrivener adds to the project size. Although you shouldn’t notice a slowdown while working in the project, file size impacts how quickly the project is backed up (more on backups in Chapter 21) and how much space it takes up on your hard drive.
How large is the file? Every file you import to Scrivener adds to the project size. Although you shouldn’t notice a slowdown while working in the project, file size impacts how quickly the project is backed up (more on backups in Chapter 21) and how much space it takes up on your hard drive.
If the file is more than 1MB or you have a lot of files to add, consider using external references.
![]() How often will you need to access the file? If you plan to refer to a file frequently, it might be better to import it for quicker viewing.
How often will you need to access the file? If you plan to refer to a file frequently, it might be better to import it for quicker viewing.
![]() Will the file’s contents or location change? If you don’t need access to a file’s updates or you’re worried that it might change or move, you should import it. On the other hand, if you want to have access to the latest version at all times, use an external reference.
Will the file’s contents or location change? If you don’t need access to a file’s updates or you’re worried that it might change or move, you should import it. On the other hand, if you want to have access to the latest version at all times, use an external reference.
![]() Will you work on your project on more than one computer? If you open the same Scrivener project on multiple computers, external references to files on one computer don’t work on another. For research files that you need to access from all computers, importing makes more sense because imported files are saved with the project and therefore always available.
Will you work on your project on more than one computer? If you open the same Scrivener project on multiple computers, external references to files on one computer don’t work on another. For research files that you need to access from all computers, importing makes more sense because imported files are saved with the project and therefore always available.
Editing and deleting a reference
If you give a reference the wrong name or need to edit the location, you can do so anytime by double-clicking the part you need to change in the References pane and entering the new info.
On the other hand, you might add the wrong link or find one that no longer works. Or maybe you changed your topic from raccoons to giraffes, and you need to clean out the old research.
Follow these steps to delete an unwanted reference:
1. Click the References header, and then select either Document References or Project References from the drop-down list that appears.
2. Select the reference that you want to delete from the References pane.
You can use multiple selection (covered in Chapter 2) to select more than one reference for deletion.
3. Click the Remove Selected Reference button (refer to Figure 5-8).
The selected reference (or references) disappears.
Viewing a reference
References don’t do you any good if you can’t view them, but how Scrivener displays a reference depends on where it’s located and the type of file it is.
Viewing an internal reference
To view an internal reference, follow these steps:
1. Click the References header to view the drop-down list, and then choose either Document References or Project References.
2. Double-click the icon next to the reference you want to view.
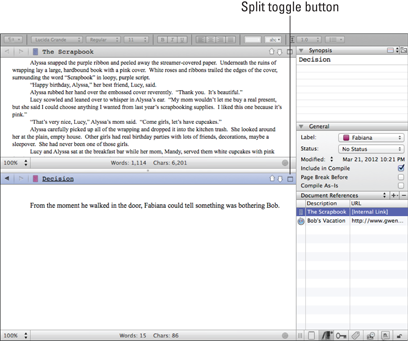
By default, the Editor pane opens to a split screen with the reference in the upper pane. This setup lets you refer to your research while you write.
3. If you don’t want to work in Split Screen view, click the Split toggle button (shown in Figure 5-11) to exit that view.
I talk about Split Screen view in Chapter 6.
Figure 5-11: An internal reference open in Split Screen view.
Viewing an external reference
External references open in their native program (for example, Word, TextEdit, or your Internet browser). Open an external reference by following these steps:
1. Click the references header, and then select either Document References or Project References from the drop-down list that appears.
2. Double-click the icon next to the reference that you want to view.
Scrivener launches the native program and opens the reference within it.
 For more ways to open an external reference, right-click the reference. The Reveal in Finder option shows you where the file is located on your computer.
..................Content has been hidden....................
You can't read the all page of ebook, please click here login for view all page.