
Figure 18-1: The Collections pane.
Working with Standard Collections
Want to try out a new scene order without committing? Or maybe you want to set up a collection of files to quickly compile a partial manuscript. In that case, you need a standard collection.
Creating a standard collection
After you create a standard collection, that collection is static, which means the contents don’t change unless you add or remove files manually, even if the original collection was created from the results of a search.
Follow these steps to create a standard collection:
1. Select all the files that you want to include in the collection.
You can either manually select the files in the Binder or run a Project Search and select the files from the Results list, as shown in Figure 18-1.
2. Click the Collections button in the toolbar (see Figure 18-1).
Alternatively, you can choose View⇒Collections⇒Show Collections.
The Collections pane appears in the left sidebar above the Binder (or Search Results if you ran a project search), as shown in Figure 18-1.
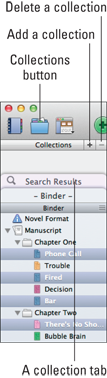
3. Click the Add a Collection button to add a new collection from the selected items.
A new tab appears in the Collections pane, ready to be named, as shown in Figure 18-2. The tab and the collection list below it are colored (the color is picked at random each time you create a collection).
4. Type the desired name for the collection in the highlighted tab, and then press Return.
The collection is now set. If you can’t see it, you may need to scroll up in the Collections pane. You can also resize the Collections pane to make more tabs visible.
5. Click the X at the bottom of the collection list to return to the Binder.
If the Collections pane is visible, another option is to click the Binder tab.
6. To close the Collections pane, as well, click the Collections button in the toolbar.
Or you can choose View⇒Collections⇒Hide Collections.
Figure 18-2: A new collection created from the selected files.

Adding an item to a standard collection
If you forget a file when you create the collection, or write a new document later and want to add it after the fact, you can add a new file in two ways: by using a contextual menu or by dragging and dropping.
 If you add the same file twice, it isn’t duplicated, so if you’re not sure whether the file is already in the collection, select that file. If it’s already there, Scrivener just ignores your attempt to add it again.
Adding by menu
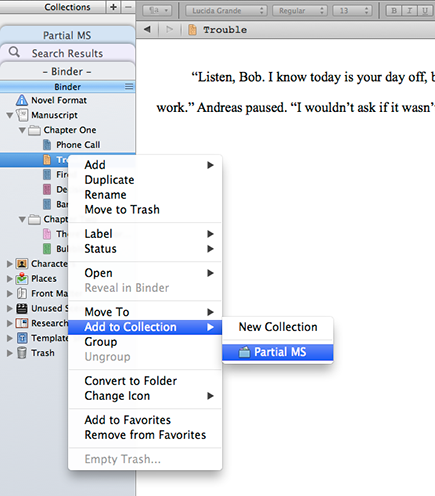
Follow these steps to add a file to an existing collection via the contextual menu:
1. Select the desired file(s) in the Binder.
2. Right-click the file(s).
3. Choose Add to Collection from the contextual menu that appears, and then choose the desired collection from the submenu, as shown in Figure 18-3.
The selection is added to the chosen collection.
Figure 18-3: Adding to a collection via contextual menu.
Adding by drag and drop
You can also drag the desired files and drop them onto the collection. To make it easy, follow these steps:
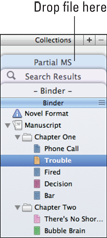
1. If the Collections pane doesn’t appear in the sidebar, click the Collections button in the toolbar.
The Collections pane appears.
2. Click the Binder tab to view the Binder below the Collections pane, as shown in Figure 18-4.
3. Drag the desired file from the Binder and drop it onto the tab of the collection to which you want to add it.
Wait for the blue box to appear around the correct tab before dropping the file.
The file is added to the collection.
To add more than one file, select the desired files first, and then drag them all onto the tab for the desired collection.
Figure 18-4: Viewing the Binder with the Collection pane open.
Removing a file from a standard collection
If for some reason a file no longer belongs in a collection, removing it is as simple as following these steps:
1. If the Collections pane isn’t visible, click the Collections button in the toolbar to view it.
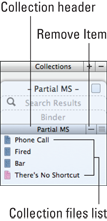
2. Click the tab for the desired collection.
The list of files within the collection appears, as shown in Figure 18-5. The collection gets its own header, colored to match.
3. Select the file(s) that you want to remove.
4. Click the Remove Item button.
Alternatively, you can press the Delete key (Windows users, press Shift+Delete).
The selection is removed from the collection (not from the project).
5. Click the Binder tab to view the Binder but leave the Collections pane open.
Figure 18-5: Removing files from a standard collection.
Reorganizing a standard collection
Because a collection is a flat list of files, you can move the files into any order you want, without affecting their position within the Binder. For that reason, it can be a great way to play with new scene arrangements, create a different compile order, or change the order in which you work on files that need to be written or revised.
To rearrange files in a collection, follow these steps:
1. Click the Collections button in the toolbar to view the collections, if necessary.
The Collections pane appears.
2. Select the tab of the desired collection.
The list of files appears below the Collections pane.
3. Drag and drop the desired files in their new positions.
Moving reordered collection items back to the Binder
What if you’ve moved your documents around in a standard collection and decide the order is perfect for your manuscript? No need to rearrange the items in the Binder to match, you can simply move the items from the collection into the Binder to overwrite the old arrangement.
Just follow these steps:
1. If necessary, click the Collections button in the toolbar to view the Collections pane.
2. Select the desired collection’s tab.
The collection’s file list appears.
3. Select the files that you want to move to the Binder.
The files still appear in the collection after you move them to the Binder. You’re really just moving their Binder location.
4. Drag the files to the Binder tab and, after the Binder opens, drop the files in the desired location.
You can also right-click the selected files in the collection, choose Move To from the contextual menu that appears, and then select a new location from the submenu.
The original files move to the new location in the Binder.
Changing the collection color
Scrivener automatically assigns a color to each collection you create, but if you’re not happy with the choice, you can change it by following these steps:
1. If the Collections pane isn’t visible, click the Collections button in the toolbar to open it.
2. Click the tab for the desired collection.
3. Double-click the Color box to the right of the collection name in the tab (refer to Figure 18-2).
The Colors window opens. Windows users get a color menu.
4. Choose the desired color from the Colors window (or menu).
The collection color changes to match your choice.
5. Close the Colors window by clicking the red X button.
The Windows color menu closes automatically after you select a color.
..................Content has been hidden....................
You can't read the all page of ebook, please click here login for view all page.