
Figure 8-9: The Print Options window.
Printing Index Cards
Did you just get a little giddy when you saw that you could print your index cards? Yes, you can print index cards, and you can even do it without leaving the Corkboard. Index cards are set up to work with Avery Perforated Index Card stock, but you can print them on plain paper or card stock, and then cut them out, if desired.
Follow these steps to move your virtual index cards into the physical world:
1. Go to File⇒Page Setup.
The Page Setup window appears.
2. In the Settings drop-down list, select Scrivener.
The window changes to a list of margin settings.
3. Click Options.
The Print Options window appears.
4. Click Index Cards in the center row of buttons.
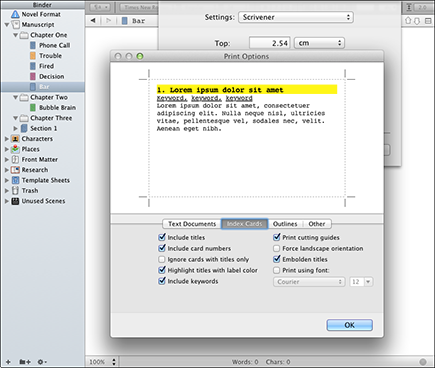
The window displays Index Card print options, as shown in Figure 8-9. The sample index card in the top half of the window reflects the options chosen in the bottom half. Here are the options:
• Include Titles: Prints the document title at the top of each card.
• Include Card Numbers: Numbers the cards by their order in the hierarchy.
• Ignore Cards with Titles Only: If this option is selected, Scrivener prints only cards that contain Synopsis text.
• Highlight Titles with Label Color: Adds the Label value color to the title of the card.
• Include Keywords: Adds underlined keywords below the title.
• Print Cutting Guides: Adds dotted lines and corner marks around each card for easier cutting.
• Force Landscape Orientation: When this option is selected, the cards print on the paper in landscape — rather than portrait — orientation, which allows you to fit more cards per sheet.
 Don’t select this option if you’re using Avery stock, which is always printed in portrait orientation.
• Embolden Titles: Makes the titles bold.
• Print Using Font: Lets you choose the desired font and font size.
5. After making your option selections, click OK to close the Print Options window, and then click OK to close the Page Setup window.
Now you’re ready to move on to the second part of the process: printing.
6. Make sure the container (or files) for which you want to print index cards is selected in the Binder.
7. Choose File⇒Print Current Document.
The Print window appears.
8. Make sure the settings are as desired (the appropriate printer and number of copies), and then click Print.
Image files and cards that are set up to display a pictorial Synopsis (such as the one shown in Figure 8-6) print as image cards.
 If you want to preview the index cards before you commit to printing them, click the PDF button at the bottom-left of the Print window, and then choose Open PDF in Preview from the drop-down list that appears before you click Print. If you like what you see, print directly from Preview, or close the Preview window by clicking the red X button and then repeat Steps 7 and 8.
..................Content has been hidden....................
You can't read the all page of ebook, please click here login for view all page.