
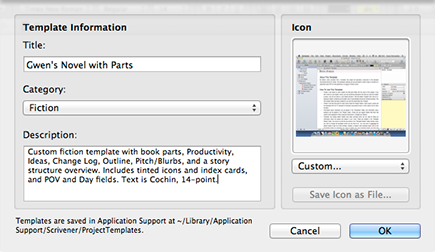
Figure 15-3: Saving a custom template.
Saving Time on Future Projects with Custom Project Templates
It wouldn’t surprise me if this section were the reason you bought this book. I get more questions about project templates than any other topic in Scrivener, by a landslide.
Why are people so interested in finding out all about project templates? Because creating your own saves time and hassle.
When you first opened Scrivener, you had to choose a project template before you could even start working. Those templates were included with Scrivener for your convenience, but while you became familiar with the program, you probably made changes to the template so that it would work better for you.
Did you add or change root folders? Include an oft-viewed writing reference? Change the Label or Status fields? Add keywords?
Wouldn’t you like to save this new, improved version of the template so that the next time you start a project, you don’t have to make all those changes again? Then you’re in the right place because creating a custom project template is what the following sections are all about.
Creating and saving a custom project template
The key thing to remember when creating a project template is that everything gets saved, including Label and Status settings, keywords, collections, initial Compile settings, initial layout, and every item in the Binder. Project-level settings such as tinted icons, text preferences, project targets, and statistics settings are included, too.
Basically, the entire project gets copied as-is, so if you don’t want an item or setting in the template, you need to strip it out or turn it off. The safest way to do that is to make a copy of your project, remove everything that doesn’t apply to all future projects of that type, and then save the template.
And don’t worry, you can create more than one template to suit all your writing needs.
You can either start with a copy of an existing project and strip everything out, or start with a new project based on an existing template and make the desired changes.
 Before making any changes to your project, save a copy of it as outlined in the following steps. Unlike a standard word processor, Scrivener auto-saves every few seconds, which means that you can’t make all your changes and then select Save As after the fact. Don’t do anything until you’ve made a copy.
Follow these steps to create your own custom template:
1. Choose File⇒Save As.
The Save As window appears.
2. Select a location from the file list, and then type a name for the project copy into the Save As text box.
If you want, you can just save it to the Desktop for easy deleting when you’re done. This is a throwaway file that you’re using to create the template. After that, you won’t need it anymore.
After the copy is saved, the original project file closes, and the copy opens in Scrivener. (You can tell because the title bar at the top of the window displays the new project name.)
3. Get the project set up exactly the way you want it for future projects of this type.
Parts II and III of this book cover most of the project customization options.
Don’t worry too much about getting everything just perfect. I show you how to modify your template in the section “Editing a project template,” later in this chapter.
4. Choose File⇒Save as Template.
If you have personal data in the project, you may get a message warning you about it. If you’re saving it only for your own use, click Continue; otherwise, click Cancel and remove any personal data before trying this step again.
The Save as Template window opens, as shown in Figure 15-3.
5. Enter the desired template name in the Title text box.
I suggest using something descriptive, maybe even including your name or initials, to differentiate your template from the built-in ones.
6. Choose a category from the Category drop-down list.
The category determines where in the Templates window your template is grouped.
7. In the Description field, provide a detailed description of the template to help you remember what’s in it.
This information is especially important if you plan to share the template with others.
8. Choose an icon from the Icon drop-down list in the Icon section.
 If you have a picture that you want to use to represent your template, you can choose Custom from the list and select the desired photo. In Figure 15-3, I used a screenshot of Scrivener in a layout similar to my template.
9. Click OK.
The template is saved.
10. Close the project copy you used to make the template by clicking the red X button.
11. If you want, locate the project copy in Finder or My Computer, and then delete it.
Working with project templates
After you create a template, you can use it to create new projects. And after you start using it, if you find the template isn’t quite to your liking, you can edit or delete it. All these actions start in the Project Templates window.
To open the Project Templates window, choose File⇒New Project. (Click Cancel to close the Project Templates window.)
Creating a new file from your project template
After you create a template (as described in the section “Creating and saving a custom project template,” earlier in this chapter), how do you use it when you’re ready to start your next project? Just follow these steps:
1. In the Project Templates window, click the category to which you saved your template.
Mine was saved under Fiction, which I’ve selected in Figure 15-4.
Figure 15-4: Using your custom project template.
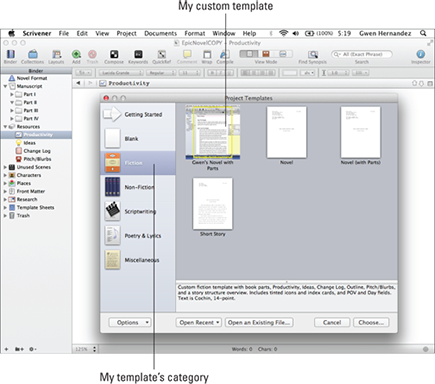
The templates in the selected category appear in alphabetical order, including the template you created.
2. Select your template.
The chosen template is highlighted, and the description appears in the box below the list of templates.
3. For Mac users only, click Choose.
The Save As window appears.
4. Enter the desired project name in the Save As text box, and then select a location for the new project from the file list.
Windows users, select a location from the Where drop-down list.
5. Click Create.
The new project opens, ready for you to write.
Setting a template as the default
Want to have the Project Templates window display your custom template as the preselected option whenever you open the window? Follow these steps to set the default template:
1. In the Project Templates window, click the category to which you saved your template.
2. Select your template.
The chosen template is highlighted.
3. Click the Options button at the bottom of the window (refer to Figure 15-4).
4. Select Set Selected Template as Default from the drop-down list that appears.
Next time you create a new project, the Project Templates window opens directly to the template you set as the default.
The preceding steps also work for setting a built-in template as the default if you don’t have — or don’t want to use — one of your own.
Editing a project template
Say you’ve been working in a project based on your custom template for a while, and you realize you want to change some things about the template before you create another project from it.
Although you can’t directly edit a template, you can replace it with a new version without having to re-enter the name, description, and other information. The easiest way is to create a throwaway project based on the template, make your changes, and save it as the new template. Follow these steps:
1. If needed, in the Project Templates window, click the category to which you saved your template.
2. Select your template.
3. Mac users only, click Choose.
Mac users, Option-click the Choose button to keep Scrivener from replacing placeholder tags with information from your address book. This leaves the placeholder tags intact, which is especially important if you plan to share the template with other users. Choose Help⇒Placeholder Tags List for more information.
The Save As window appears.
4. Enter the desired project name in the Save As text box, and then select a location for the new project from the file list.
Windows users, select a location from the Where drop-down list.
Because you’re going to delete this project when you’re done, I recommend saving it to the Desktop so that it’s easy to find and maybe naming it something like DeleteMe.
5. Click Create.
The new project opens.
6. Make the desired changes to the project.
Did you forget to empty the trash? Are there files you forgot to include, keywords you didn’t remove, or references you wanted to add? Maybe you don’t want those Chapter folders, after all. Make all your changes before moving on.
7. Choose File⇒Save as Template.
8. If necessary, click Continue to bypass the warning about personal information.
The Save As Template window opens, with the current template’s data already filled out.
9. Modify any of the settings, such as the Description, if desired.
To overwrite the existing template, keep the name the same.
 You can’t overwrite Scrivener’s built-in templates. If you chose a built-in template in Step 2, you must give the template a new name.
10. Click OK.
The old version of the template is replaced with the new one.
This process also works for creating a new template based on an existing one. To keep the original, follow the preceding steps, but in Step 9, enter a new name. (You’ll probably want to change the Description, too.)
Deleting a project template
Got a custom template you never use anymore? Annoyed by the clutter? Deleting a template is simple. Just follow these steps:
1. In the Project Templates window, click the category to which you saved your template.
2. Select your template.
3. Click the Options button at the bottom of the window.
4. Select Delete Selected Template from the pop-up menu that appears.
A window appears, warning you that this action can’t be undone.
5. Click OK.
Click Yes on a Windows PC.
The template is removed from the Project Templates window.
You can delete only templates that you’ve created or imported, not the built-in templates that came with Scrivener.
Exporting a project template
If you want to share a template with another Scrivener user or transfer it to another computer on which you use Scrivener, you can export it by following these steps:
1. In the Project Templates window, click the category to which you saved your template.
2. Select your template.
3. Click the Options button at the bottom of the Project Templates window (refer to Figure 15-4).
4. Select Export Selected Template from the pop-up menu that appears.
The Export window opens.
5. Select a location for the new project from the file list, type the template name in the Save As text box, and then click Export.
Windows users, enter the name in the File Name text box and click Save.
The file is saved with a .scrivtemplate extension.
Importing a project template
Does a friend have a really cool template you want to try? Did you create a template on a different computer, and now you want to have access on the one you’re currently using? You’re in luck. Templates can be shared across the Windows and Mac versions of Scrivener, and importing templates is as simple as following these steps:
1. Copy the .scrivtemplate
file to your computer.
Or make sure the file is accessible (for example, via a flash drive or Dropbox).
2. Click the Options button at the bottom of the Project Templates window.
3. Select Import Templates from the pop-up menu that appears.
The Import window opens.
4. Choose the template file that you want to import, and then click Import.
The new template appears in the category assigned when it was originally created, with the name it was given when created (not the name of the .scrivtemplate file).
5. Click Cancel to close the window.
Hiding the Getting Started category
If you don’t want the Getting Started category to appear when you open the Project Templates window, you can hide it. But don’t worry, you can always get it back if you want quick access to the Interactive Tutorial or the Scrivener User Manual. Plus, both features are available from the Help menu, as well.
Follow these steps to hide Getting Started:
1. Click the Options button at the bottom of the Project Templates window (refer to Figure 15-4).
2. Select Hide “Getting Started” from the pop-up menu that appears.
Getting Started disappears from the category list.
3. Click Cancel to close the window.
To show Getting Started in the category list after hiding it, follow the preceding steps, but select Show “Getting Started” in Step 2.
..................Content has been hidden....................
You can't read the all page of ebook, please click here login for view all page.