
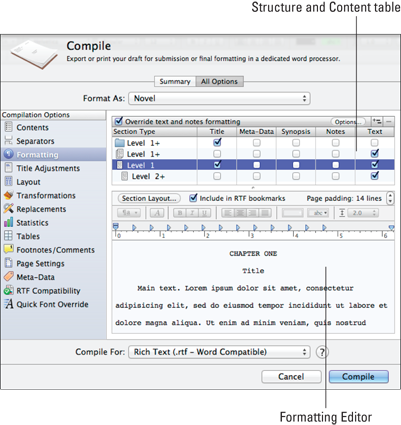
Figure 12-5: The Formatting pane.
Formatting the Compiled Output
Looking at the Formatting section often makes people cross-eyed, but it’s not as bad as it appears. I promise! Plus, if you master this section, you can fix almost anything. In the Formatting pane, you can control the font, font size, line spacing, chapter numbering, title format, and more.
Figure 12-5 points out the two sections of the Formatting pane:
![]() Structure and Content table
Structure and Content table
![]() Formatting Editor
Formatting Editor
The two sections work together. In the Structure and Content table, you choose the level that you want to work on, and you make the desired changes in the Formatting Editor.
Before getting started, think about how your project is laid out and how you want to format each level of your project. For example, do you want part numbers and part headings, or should they be left out altogether? Do you want each chapter to start a third of the way down the page and be automatically numbered? Do you need to include document titles or not?
After you have an idea of your desired layout, you can easily make the necessary styling decisions.
Understanding the Structure and Content table
In the Structure and Content table, you can choose the content elements that you want to include for each type of item in the Binder (for example, folder, subfolder, file group, document, and subdocument).
Level 1 items are those at the top of the hierarchy. Level 2 items are those contained within Level 1 items. Level 3 items are contained within Level 2 items, and so on.
The elements selected for inclusion — and the formatting set up in the Formatting Editor — can be different for each hierarchy level. So Level 1 folders might include only a title, whereas Level 2 folders could include a title and any text within the folder that serves to introduce the section.
You also use the Structure and Content table to select items whose formatting you want to customize in the Formatting Editor (in the lower half of the pane).
The following list explains the levels in the Structure and Content table that appears in Figure 12-6:
Figure 12-6: Item type levels in the Structure and Content table.
![]() Level 1+ folder: Represents all folders at the top level or lower. So, if your book had Part folders and Chapter folders, this option applies to all of them unless you create a lower level (which I cover in the following section).
Level 1+ folder: Represents all folders at the top level or lower. So, if your book had Part folders and Chapter folders, this option applies to all of them unless you create a lower level (which I cover in the following section).
![]() Level 1+ file group: Represents all file groups (text files that have subdocuments) at or below the top level.
Level 1+ file group: Represents all file groups (text files that have subdocuments) at or below the top level.
![]() Level 1 text document: Applies to all text documents at the top level of the hierarchy (just below the Manuscript or Draft folder).
Level 1 text document: Applies to all text documents at the top level of the hierarchy (just below the Manuscript or Draft folder).
![]() Level 2+ text document: Applies to all text documents at level 2 or lower.
Level 2+ text document: Applies to all text documents at level 2 or lower.
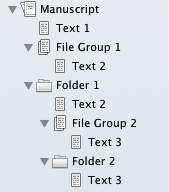
Figure 12-7 shows how Binder items match up with the levels in the table. Level numbers are relative to the root (Manuscript) folder, which you can think of as level 0.
Figure 12-7: Hierarchy levels.
For each item type, you can choose to include one or more elements of content. In the final output, each element is included in the order listed. When you make changes, the Format Editor at the bottom of the Formatting pane shows an example of the final output for the level selected in the table. Here are the elements you can include:
![]() Title: Displays the title of the item. If only this option is selected, the compiled output is a list of titles. Note that certain templates are set up to automatically number the folders
Title: Displays the title of the item. If only this option is selected, the compiled output is a list of titles. Note that certain templates are set up to automatically number the folders CHAPTER ONE and so on, which is added separately from the title. For more on auto-numbered chapters, see the section “Working with chapter titles and subtitles,” later in this chapter.
![]() Meta-Data: Displays the Created date/time, Modified date/time, Status and Label values, keywords, and custom metadata.
Meta-Data: Displays the Created date/time, Modified date/time, Status and Label values, keywords, and custom metadata.
![]() Synopsis: Adds the Synopsis. For a printable Synopsis list, select Title and Synopsis in the table for text file types.
Synopsis: Adds the Synopsis. For a printable Synopsis list, select Title and Synopsis in the table for text file types.
![]() Notes: Adds notes from the Document Notes pane.
Notes: Adds notes from the Document Notes pane.
![]() Text: Includes the text of the item (what’s in the Editor pane when the item is selected in the Binder).
Text: Includes the text of the item (what’s in the Editor pane when the item is selected in the Binder).
 Want to include chapter or section headings, subheadings, or introductions? No problem. Folders and file groups can contain text just like a text document. Simply add the desired text to the folder or file group in the Editor. Then, in the Structure and Content table on the Formatting tab of the Compile window, select the Text element for the appropriate level. Scrivener then includes the heading, subheading, or introduction in the final output.
Adding and deleting levels
If you have a project that has several layers for the same item type — for example, part, chapter, and section folders — creating additional levels in the Structure and Content table allows you to format each level differently. For example, your manuscript could have part headings centered in all caps and 16-point font, chapter headings centered in title case with 12-point bold font, and section headings left aligned and italicized in 12-point font.
Add a level by following these steps:
1. Select the row of the desired item type (folder, file group, or text file) in the Structure and Content table.
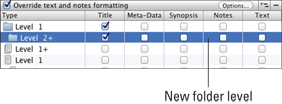
2. Click the Add Another Formatting Level button.
A new row appears, as shown in Figure 12-8. The higher-level folder no longer has a plus sign (+) next to it, which means the settings for that row apply only to that level in the hierarchy. (Settings applied to the Level 2+ item affect all items at level 2 and below.)
The new item has the same settings as the original item. If the levels will be fairly similar in format, save time by formatting the top-level item before adding lower levels.
Figure 12-8: A new folder level.
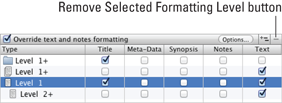
If all levels of each item type have the same settings, you can delete extra levels from the table to simplify the view. Follow these steps:
1. In the Structure and Content table, select the level(s) that you want to delete.
2. Click the Remove Selected Formatting Level button.
The selected level(s) disappears from the table.
Copying settings from one level to another
If the thought of tweaking the settings for every level individually has you contemplating a nap or worse, keep your eyes open for one more second. You can adjust the settings for one level and then copy the settings to the other levels. Then, all you have to do is make a few minor changes for any differences between levels, and you’re done.
To copy all settings (from both the Structure and Content table and the Formatting Editor) from one level to another, follow these steps:
1. In the Structure and Content table, select the formatted level that you want to copy.
2. Press ⌘+C (Ctrl+C for Windows) to copy the formatting.
Alternatively, you can choose Edit⇒Copy.
3. Select the row to which you want to apply the formatting.
4. Press ⌘+V (Ctrl+V for Windows) to apply the formatting.
Choosing Edit⇒Paste works, too.
5. Repeat Steps 3 and 4 until you’ve applied formatting to all desired levels.
After you apply the formatting, you can tweak that formatting for each level, as needed (covered in the following section).
Changing the final format with the Formatting Editor
No matter what font and layout you’ve been using to write, you can change the appearance of the compiled output to something entirely different in the Formatting Editor. You can also set up the format for headings, titles, and subtitles.
The Formatting Editor is directly tied to the Structure and Content table. (See the section “Understanding the Structure and Content Table,” earlier in this chapter.) When a row is selected in the table, a sample appears in the Formatting Editor that shows how the format and contents of items of the selected type and level will look. (Windows users, click the Modify button to access the Editor.)
The Notes and Text sections in the Formatting Editor may be grayed out and inaccessible, but the other elements selected in the Structure and Content table can still be modified in the Editor. (See the following section for how to make the grayed-out sections accessible.)
To adjust the appearance of each type of content, click in that area within the Editor and use the Format bar and ruler (covered in Chapter 6) to adjust font settings, alignment, color, line spacing, tab stops, and indents.
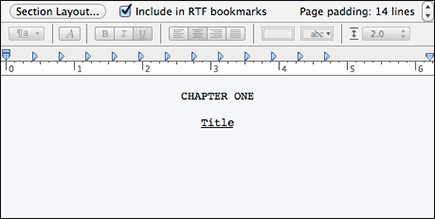
For example, to underline the title, as shown in Figure 12-9, you click the word Title and then click the Underline button in the Format bar.
 To exempt a specific Binder item from global formatting, select the As-Is check box in the Contents pane (see the “Preserving the format of a document” section, later in this chapter) or select Compile As-Is in the general Meta-Data section of the Inspector (covered in Chapter 4).
Figure 12-9: Use the Format bar to modify element formats.
Several options may appear in the header of the Formatting Editor, depending on the chosen output type:
![]() Include in RTF Bookmarks: This option appears when you’re exporting to RTF, and it’s turned on for every level by default. If it’s selected for a certain level, every item at that level in the Binder is given a bookmark (using the title for a name), which you can use in compatible word processors and to create a table of contents.
Include in RTF Bookmarks: This option appears when you’re exporting to RTF, and it’s turned on for every level by default. If it’s selected for a certain level, every item at that level in the Binder is given a bookmark (using the title for a name), which you can use in compatible word processors and to create a table of contents.
If you add a table of contents to your project by choosing Edit⇒Copy Special⇒Copy Documents as ToC (covered in Chapter 22), be sure this option is selected for every item level included in the table of contents.
If you prefer not to have every level bookmarked, uncheck the Include in RTF Bookmarks box for each level that you want to exclude.
![]() HTML Elements: When outputting to an HTML format (including e-books), a drop-down list appears next to the Section Layout button in the header of the Formatting Editor.
HTML Elements: When outputting to an HTML format (including e-books), a drop-down list appears next to the Section Layout button in the header of the Formatting Editor.
For each level in the Structure and Content table, you can assign an HTML heading style from this drop-down list.
![]() Page Padding: This option, located at the right of the Formatting Editor header, lets you designate how many lines to insert at the top of a new page following a page break.
Page Padding: This option, located at the right of the Formatting Editor header, lets you designate how many lines to insert at the top of a new page following a page break.
In most books and manuscript submissions, it’s standard for each chapter to start about a third of the way down the page. Page Padding is how you add that extra space automatically.
Windows users, click the Modify button to access the Page Padding.
This option doesn’t preview in the Formatting Editor, and it’s not available for MultiMarkdown output types.
Your output has approximately six lines per inch when you use a 12-point font size (72 points per inch divided by 12 points per line). To figure out how much page padding you need, determine how many inches down the page you want to start, subtract the top margin, and then multiply the remaining inches by the number of lines per inch.
For example, if you’re using a 12-point font and 1-inch margins, and you want your chapters to start one-third of the way down the page, choose 16 lines of padding (as shown in the following list):
• 72 points per inch ÷ 12 points per line = 6 lines per inch
• 11 inches per page ÷ 3 = 3.7 inches (dividing by 3 to start 1⁄3 of the way down the page)
• 3.7 inches – 1 inch top margin = 2.7 inches
• 2.7 inches × 6 lines per inch = 16.2 lines, rounded to 16
Overriding text and notes formatting
If you’ve been writing in pink Comic Sans 16-point font but want the final manuscript in black Times New Roman 12-point, you can override the format you’ve been using.
To enable the Editor so that you can format the Text and Notes elements, select the Override Text and Notes Formatting check box in the Structure and Content table; otherwise, the text area of the Editor is inaccessible (although the other fields are always accessible in the Formatting Editor).
For Windows users, all elements are accessible in the Editor pane; however, changes to the Text and Notes formatting aren’t applied unless the Override Text and Notes Formatting check box is selected.
After you select the override option, simply click in the Text or Notes area of the Formatting Editor and make your changes by using the Format bar.
 If you’re outputting to e-book format, the font you choose may not appear on an e-reader because each reader has its own preferred font settings.
Inserting subtitles between elements
If you select more than one element — other than the Title — for a level in the Structure and Content table, you can add predetermined subtitles before each text-type element selected (for example, Synopsis, Notes, or Text).
This option operates on all levels in the Structure and Content table, regardless of which level is currently selected. To insert subtitles, click the Options button on the Formatting tab, and then select Insert Subtitles between Text Elements from the menu that appears. The subtitles are visible in the Formatting Editor and can be formatted like any other element.
This function is most useful for rough drafts where you want to see extra elements alongside the title and text of your scenes or chapters.
Displaying notes after the main text
By default, when you choose to include notes for an item type, they appear before the main document text. This option allows you to move the notes text below the main text. Click the Options button on the Formatting tab, and then select Place Notes after Main Text from the menu that appears.
Removing first paragraph indents
Book formatting often has the first paragraph after a title or subheading not indented. To remove first paragraph indents from your manuscript, click the Options button on the Formatting tab, and then select Remove First Paragraph Indents from in the menu that appears. These three options are enabled:
![]() On New Pages Only: When a page break has been forced either in the Contents pane or the Separators pane.
On New Pages Only: When a page break has been forced either in the Contents pane or the Separators pane.
Choose this option when you want to remove the indent from the first paragraph of a chapter.
![]() At the Start of Each Document: On the transition to a new document.
At the Start of Each Document: On the transition to a new document.
If you’re using titles at the beginning of each scene — or prefer not to indent the first scene paragraph — choose this option to remove the first paragraph indent for each document.
![]() After Empty Lines and Centered Text: This option works within a document, stripping the paragraph indent after a blank line or after centered text, such as a heading or the # separator.
After Empty Lines and Centered Text: This option works within a document, stripping the paragraph indent after a blank line or after centered text, such as a heading or the # separator.
Use this option if you have large documents that contain multiple scenes or sections separated by a blank line or by centered text on its own line.
Working with chapter titles and subtitles
Many Compile presets, such as Standard Manuscript Format, are set up to number your chapters automatically. But what if you want to use chapter names rather than numbers? Or you want to add subtitles? Or part numbers?
In the Formatting Editor header, the Section Layout button (formerly Level Settings on the Mac and Title Settings in Windows) provides options for changing the text and appearance of headings. You can create auto-numbered sections, add prefixes or suffixes to a heading, and change the formatting.
The Section Layout menu has three tabs:
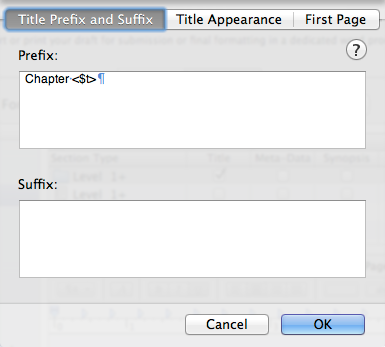
![]() Title Prefix and Suffix: Shown in Figure 12-9, this tab lets you designate text to appear before or after the Binder item title. You can customize the text for every level, which allows different prefixes for parts, chapters, and sections.
Title Prefix and Suffix: Shown in Figure 12-9, this tab lets you designate text to appear before or after the Binder item title. You can customize the text for every level, which allows different prefixes for parts, chapters, and sections.
![]() Title Appearance: Called Case in Windows, this tab provides options for changing the case of the title elements.
Title Appearance: Called Case in Windows, this tab provides options for changing the case of the title elements.
![]() First Page: Formerly called Text, this tab lets you designate a number of words to make uppercase at the beginning of a new section.
First Page: Formerly called Text, this tab lets you designate a number of words to make uppercase at the beginning of a new section.
If you’re getting strange output — such as two titles for each chapter or chapter numbers for each scene — check the settings for each level. Even if you have Title turned off for a level, a prefix or suffix designated for that level still appears in the compilation.
If a paragraph (carriage return) character is present in the Prefix text box on the Title Prefix and Suffix tab of the Section Layout menu (see Figure 12-10), the prefix text appears on the line above the item title in your compiled output. To put the chapter number and title on the same line, delete the paragraph mark. You can also add tabs, and you must include any spacing desired between the prefix or suffix, and the title.
Figure 12-10: Setting up prefixes and suffixes.
Auto-numbering chapters, parts, and sections
To auto-number your items, you can use placeholder tags such as <$n> (for Arabic numbers, such as Chapter 1) or <$t> (for words, such as Chapter One). So, if you wanted output like Chapter One: Perfect Title (where Perfect Title is the title of the chapter in the Binder), type Chapter <$t>: (with a space after it) into the Prefix text box on the Title Prefix and Suffix tab of the Section Layout menu.
Auto-numbering is done sequentially by tag, so if you’re trying to auto-number two different levels (for example, parts and chapters), you can either use a different tag type for each or refer to Help⇒Placeholder Tags List for more options. The list also has options for restarting chapter numbering at the beginning of each book part.
Windows users can visit https://scrivener.tenderapp.com/help/kb/windows/placeholder-tags-list
if the Placeholder Tags List doesn’t appear in the Help menu.
To use auto-numbering, but not item titles, deselect Title for that level in the Structure and Content table.
Removing auto-numbered chapters, parts, and sections
By default, certain templates come preloaded with compile settings that add auto-numbered chapter titles to the compiled output.
If you want to use only the item titles you’ve used in the Binder — for example, because you have Prologue and Epilogue chapters — delete any text or characters in the Prefix or Suffix text box on the Title Prefix and Suffix tab of the Section Layout menu.
You can also exclude the prefix or suffix from specific documents, which I talk about in the “Excluding the prefix or suffix from the header of specific documents” section, later in this chapter.
Changing the letter case of titles
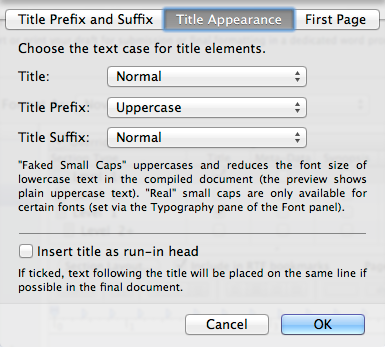
The Title Appearance tab (the Case tab in Windows), illustrated in Figure 12-11, lets you specify the case of each element of the title by selecting an option from the drop-down list next to each. Setting the letter case here means that you can use whatever case you want in the Binder.
You can choose from four case options:
![]() Normal: Uses the title as it appears in the Binder
Normal: Uses the title as it appears in the Binder
![]() Uppercase: All capital letters
Uppercase: All capital letters
![]() Faked Small Caps: Mimics the look of small caps
Faked Small Caps: Mimics the look of small caps
![]() Lowercase: All lowercase letters
Lowercase: All lowercase letters
If you choose the Fake Small Caps option, the title appears in the Formatting Editor as full caps. Because many fonts don’t have a small caps option, this setting mimics the look by reducing font size and capitalizing the text.
Figure 12-11: Choosing the case for titles.
Creating run-in headings
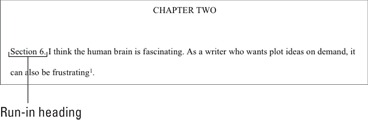
It might sound like a nasty collision, but a run-in heading is simply a heading that’s on the same line as the main text, like the example shown in Figure 12-12. To create a run-in heading, follow these steps:
1. Click the Section Layout button in the Formatting tab to open the Section Layout window.
2. Click the Title Appearance tab at the top of the window.
3. Select Insert Title as Run-In Head at the bottom of the window.
When the Insert Title as Run-In Head option is checked, any text immediately following the title (in Text, Notes, or Synopsis elements only) appears on the same line — unless the heading is too long — with a space between the title and text.
The title retains all its character attributes, but the Text settings are used for paragraph-level settings such as indents and alignment.
Run-in headings don’t appear in the Formatting Editor.
Figure 12-12: A run-in heading.
Adding uppercase words at the beginning of a new section
Many novels capitalize the first word — or several words — of a new chapter or section. You can get the same effect in your compiled output. To start off each new section of text after a page break (for example, a new chapter) with uppercase words, follow these steps:
1. From the Formatting tab of the Compile menu, click the Section Layout button.
The Section Layout window appears.
2. Click the First Page tab at the top of the window.
3. In the Number of Words to Make Uppercase text box, type the number of words you want to capitalize.
For example, if you type 3 in the text box, the first sentence of a new section appears like THE SHRILL RING of the phone woke Bob from a deep sleep.
Excluding the prefix or suffix from the header of specific documents
Certain documents or folders might work best without the defined prefix or suffix. For example, if you have a Prologue or Epilogue chapter, you might want to forgo the auto-numbering and use just the document title for that chapter.
To leave off the prefix or suffix for one or more items, follow these steps:
1. Click the Title Adjustments tab in the Compile window.
This tab is available only if at least one of your levels in the Formatting tab has a title prefix or suffix specified.
2. Click the Choose button next to Do Not Add Title Prefix or Suffix to Documents.
3. From the drop-down list that appears, select the item to which you don’t want the prefix or suffix to apply.
4. To pick more than one item, repeat Steps 2 and 3.
To deselect a file, click the Choose button and click the item to remove the check mark.
..................Content has been hidden....................
You can't read the all page of ebook, please click here login for view all page.