
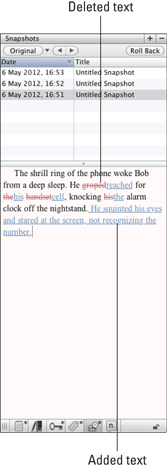
Figure 19-4: A snapshot comparison in the sidebar.
Comparing Snapshots
Not only can you view the text of snapshots to review and pilfer from your old versions, you can compare a snapshot to the current version of your document.
Viewing comparisons in the sidebar
You can view the differences between a snapshot and the current version of the document in the Snapshots pane by following these steps:
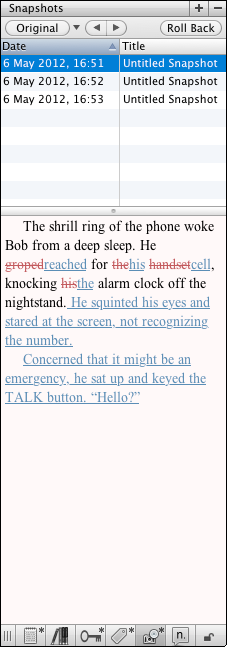
1. If needed, open the Snapshots pane in the Inspector by clicking the Snapshots button.
2. From the list of snapshots, select the one that you want to compare.
3. Click the Compare button, which changes to Original when clicked.
The text differences are highlighted in the lower portion of the right sidebar, as shown in Figure 19-4. Red struck-through text shows deleted words (those that aren’t in the current version of the document), and blue underlined text shows what’s been added (text that exists in the current document but not the snapshot).
4. To view the snapshot text without markups, click Original.
 To compare two snapshots to each other, ⌘-click to select both of them in the Snapshots pane. The differences are highlighted in the lower portion of the Snapshots pane.
Viewing comparisons in a split screen without markups
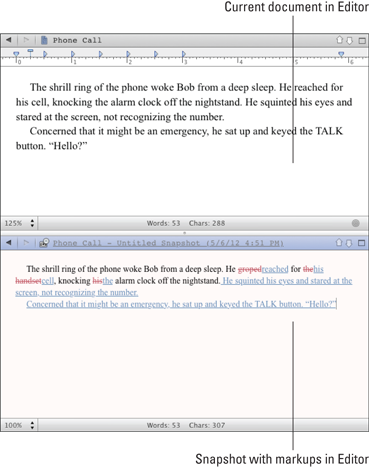
If you don’t like the small format of the Snapshots pane, you can compare your current document and the snapshot in Split Screen mode. This method doesn’t highlight changes, it merely puts the snapshot in an Editor pane, where you can view or copy text. Follow these steps to open a snapshot in Split Screen mode:
1. Click the Snapshots button to open the Snapshots pane in the Inspector, if necessary.
2. Click the Split toggle button to split the Editor pane.
For more on using Split Screen mode, see Chapter 6.
3. Drag the desired snapshot from the list in the Snapshots pane to the Header bar of one of the Editors.
As shown in Figure 19-5, the snapshot text appears in the Editor, but without the markups to show the changes.
Want to view a second snapshot rather than the current document? Simply drag another snapshot to the other Editor pane’s Header bar.
You can’t make changes to a snapshot, even when it’s in the Editor.
4. Click the Split toggle button in the header of the current document to return to a single Editor.
Figure 19-5: A Split Screen comparison without markups.

Viewing comparisons in a split screen with markups
To clearly see the changes you’ve made when viewing a snapshot in Split Screen mode, follow these steps:
1. If it’s not already, open the Snapshots pane in the Inspector by clicking the Snapshots button.
2. Click the Split toggle button to split the Editor pane.
3. Hold down the Option key while dragging the desired snapshot to the header of one of the Editor panes.
The snapshot appears in the Editor with differences from the current document highlighted, as shown in Figure 19-6. Remember, you can’t edit a snapshot, even in the Editor pane.
Figure 19-6: A Split Screen comparison with changes highlighted.
You can view a second snapshot comparison by dragging another snapshot to the other Editor pane’s header bar. The markups in each pane show the differences between the snapshot and the current document.
4. Click the Split toggle button in the header of the current document pane to return to single Editor view.
Changing Compare settings
When comparing a snapshot to the current version of your document, you can adjust how the markup appears. Click the arrow next to the Compare button to open a drop-down list, as shown in Figure 19-7.
Figure 19-7: The Compare Options drop-down list.

When more than one option is selected — the default is all three — Scrivener runs through the comparison process at the broadest level first, then moves to the next level of detail. However, you can choose to focus your comparison at only one or two levels:
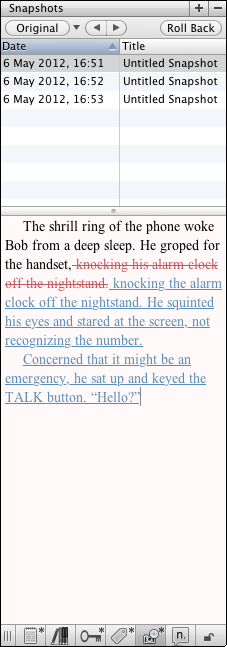
![]() By Paragraph: This is the highest-level view. If only this option is selected, Scrivener makes markups at the paragraph level only. That means if you deleted a word from a paragraph in the current version, the markup shows the entire paragraph as deleted, and then the current paragraph as a new addition, as displayed in Figure 19-8.
By Paragraph: This is the highest-level view. If only this option is selected, Scrivener makes markups at the paragraph level only. That means if you deleted a word from a paragraph in the current version, the markup shows the entire paragraph as deleted, and then the current paragraph as a new addition, as displayed in Figure 19-8.
This option is useful if you’ve made a lot of edits since the snapshot was taken, and the word or clause level is too hard to read.
![]() By Clause: Choosing this option means that markups are shown at the clause level or sentence level. So, if a word has been added or deleted in the current version, the whole clause is shown as modified. Figure 19-9 shows an example of comparisons at the clause level, using the same snapshot and current document as in Figure 19-8.
By Clause: Choosing this option means that markups are shown at the clause level or sentence level. So, if a word has been added or deleted in the current version, the whole clause is shown as modified. Figure 19-9 shows an example of comparisons at the clause level, using the same snapshot and current document as in Figure 19-8.
Figure 19-8: Comparison by paragraph.
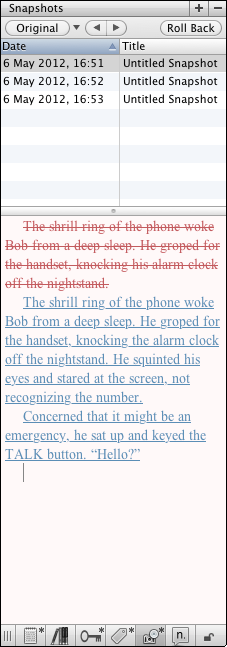
Figure 19-9: Comparison by clause.
If word-by-word analysis is too messy but the paragraph level doesn’t provide enough detail, choose this option.
![]() By Word: Choosing this option forces the markups to go word by word, showing exactly which words were deleted or added to the document, as depicted in Figure 19-10. Again, the example in Figure 19-10 uses the same snapshot and current document for comparison as in Figures 19-8 and 19-9. Entire sentences, clauses or paragraphs are highlighted only if they’re entirely new or were wholly deleted.
By Word: Choosing this option forces the markups to go word by word, showing exactly which words were deleted or added to the document, as depicted in Figure 19-10. Again, the example in Figure 19-10 uses the same snapshot and current document for comparison as in Figures 19-8 and 19-9. Entire sentences, clauses or paragraphs are highlighted only if they’re entirely new or were wholly deleted.
Figure 19-10: Comparison by word.
..................Content has been hidden....................
You can't read the all page of ebook, please click here login for view all page.