
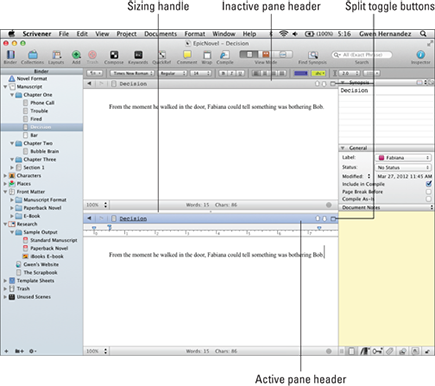
Figure 6-10: Split Screen mode.
Seeing Double with Split Screen Mode
In addition to the basic Editor layout (discussed in the preceding sections), Scrivener offers an über-fabulous option called a split screen. Just like it sounds, Split Screen mode lets you divide the Editor screen into two separate panes. After you divide the screen, each Editor pane works just like a full-size Editor, with all the same features and functions, including Header and Footer bars.
The two Editors function independently, so if you change settings in one pane, they aren’t reflected in the other. For example, if you change the text scale or container view mode in the top pane, that setting doesn’t change in the bottom pane.
In addition, Scrivener remembers your preferences for each pane and uses them next time you split the screen, regardless of the contents. However, if you have the same file open in both panes, changes to the text are applied in both panes because you’re simply viewing the same file from two places at the same time.
Why on Earth might you want to split screens? I’m glad you asked. Here’s a short list of possible reasons:
![]() To refer to another section, piece of research, or image in one Editor pane while working in the other. Also, you can copy and paste from one to the other.
To refer to another section, piece of research, or image in one Editor pane while working in the other. Also, you can copy and paste from one to the other.
![]() To view another part of the same document you’re working on (viewing the same document in both panes). You can refer to something you wrote earlier in the document or copy part of the document without losing your current place.
To view another part of the same document you’re working on (viewing the same document in both panes). You can refer to something you wrote earlier in the document or copy part of the document without losing your current place.
 When the same document is open in both split panes, changes made to the text in one are immediately reflected in the other.
![]() To compare snapshot versions (see Chapter 19 for more on snapshots).
To compare snapshot versions (see Chapter 19 for more on snapshots).
![]() To view the ending of the previous scene or chapter while writing the opening of the next one. Using the split screen in this way helps you maintain the tone of the piece and ensure that your transition makes sense.
To view the ending of the previous scene or chapter while writing the opening of the next one. Using the split screen in this way helps you maintain the tone of the piece and ensure that your transition makes sense.
![]() To view the Corkboard or Outliner while working on a document.
To view the Corkboard or Outliner while working on a document.
 Which of the two split screens is active determines which file’s attributes appear in the Inspector and which text is affected if you invoke any menu commands.
You can tell which pane is active by its underlined title, and by the color of its Header bar:
![]() Gray: The pane is inactive.
Gray: The pane is inactive.
![]() Blue: The pane is active.
Blue: The pane is active.
![]() Red: If the Header bar is light red, almost pink, it indicates that the Editor is locked (see the section “Locking the Editor,” later in this chapter).
Red: If the Header bar is light red, almost pink, it indicates that the Editor is locked (see the section “Locking the Editor,” later in this chapter).
Drag the sizing handle between the two panes to adjust the amount of real estate allocated to each one.
Figure 6-10 shows an example of a split screen. The Header bars have different colors — the top pane is inactive (gray), and the bottom pane is active (blue). Because the preferences can be different between panes, the Ruler is visible in the lower pane but not the upper one.
Splitting the screen
Ready to split? You can cleave your Editor in two by following these steps (no axe required):
1. (Optional) In the Binder, select one of the files that you want to work with.
The file appears in the Editor.
Although you don’t have to start with either file selected, it’s helpful to have one already open in the Editor before you split the screen so that you don’t have to add both of them to the Editor.
2. On a Mac, click the Split toggle button in the Editor’s Header bar (refer to Figure 6-10).
Windows users, choose either the vertical or horizontal split button to split the Editor.
The screen splits into two Editor panes, both containing the document that had the focus in the Editor before the split. The following section explains how to open a different file in the second Editor.
To return to Single Screen view, click the Split toggle button in the Header bar of whichever pane you want to continue working with.
By default Scrivener (for Mac) splits the Editor horizontally (from left to right), but it splits vertically if that’s the setting you used most recently. For more on vertical split, see the section “Splitting the Editor vertically,” later in this chapter.
Adding a file to the split screen
When you first split the Editor, whatever document was active in the single pane appears in both. If you want to view something different in either of the panes (or both), use one of the methods described in the following sections.
Selecting an item
It’s easy to add an item to one of the Editors by selecting that item in the Binder. Just follow these steps:
1. Click anywhere in the desired Editor pane to activate it.
The Header bar turns blue to show that it’s now active.
2. In the Binder, select the item that you want to display.
The active pane now displays the selected file.
If you selected a container, the pane displays the last mode you used for a container. To change the view mode, choose View, and then select the desired view from the submenu that appears.
Dragging and dropping an item
Probably the quickest way to add an item to a split pane is to drag it from the Binder and drop it on the desired Header bar.
 Be sure you drop the item on the Header bar of the pane — otherwise, Scrivener inserts the contents of the file into whatever you were viewing in the Editor pane. If you do insert the contents of the file by mistake, click in the affected Editor pane, and then choose Edit⇒Undo.
Locking the Editor
The ability to change the focus of a split pane by selecting an item in the Binder is great until you accidentally click something else and switch files. Locking the Editor pane — which you can do in Single Pane view, as well — prevents Binder selections from affecting the locked pane.
Locking the Editor doesn’t affect the Inspector. The Inspector continues to display the information for whichever pane is active.
Follow these steps to lock down an Editor pane:
1. Click the Item icon in the Header bar of the pane that you want to lock.
A menu appears.
2. Choose Lock in Place.
The Header bar turns dusty red (think 1980s wedding-napkin pink) to indicate that it’s locked.
Unlocking the Editor is as simple as following the preceding steps, choosing Lock in Place again to deselect it.
If you lock both panes, the Header bars don’t change color to indicate which one is active. However, you can still tell the active pane by the underlined title in the Header bar.
![]() Current Editor: The default. Selecting this option means that any item selected in the Binder appears in the active Editor pane.
Current Editor: The default. Selecting this option means that any item selected in the Binder appears in the active Editor pane.
![]() Other Editor: Choose this option to have Binder selections appear in the inactive Editor pane.
Other Editor: Choose this option to have Binder selections appear in the inactive Editor pane.
![]() Top Editor: Available in horizontal split only, selecting this option forces the item selected in the Binder to appear in the upper Editor pane.
Top Editor: Available in horizontal split only, selecting this option forces the item selected in the Binder to appear in the upper Editor pane.
![]() Bottom Editor: Available in horizontal split only, selecting this option forces the item selected in the Binder to appear in the lower Editor pane.
Bottom Editor: Available in horizontal split only, selecting this option forces the item selected in the Binder to appear in the lower Editor pane.
![]() Left Editor: Available in vertical split only, choosing this option forces the item selected in the Binder to appear in the left Editor pane.
Left Editor: Available in vertical split only, choosing this option forces the item selected in the Binder to appear in the left Editor pane.
![]() Right Editor: Available in vertical split only, choosing this option forces the item selected in the Binder to appear in the right Editor pane.
Right Editor: Available in vertical split only, choosing this option forces the item selected in the Binder to appear in the right Editor pane.
To cycle between the Editor panes and the Binder without using the mouse, press Control+Tab (Ctrl+Tab in Windows).
Selecting the active document in the Binder
If you lock one or both of the Editor panes and then start selecting items in the Binder, the Binder selection no longer matches the active pane. It might not match either one of the panes.
To match the Binder selection to the active document, click the Item icon button in the Header bar of the active Editor pane and choose Reveal in Binder from the menu that appears.
Locking the Inspector pane
In addition to locking the Editor, you can lock the Inspector, which forces the Inspector to continue displaying the data for the Editor pane that’s selected at the time you lock the Inspector, even if you move the focus to the other pane. Think of it like handcuffing the Inspector to one Editor pane so that it can’t run off with the other pane.
Locking the Inspector doesn’t tie it to a specific file; rather, it’s tied to the specific pane (upper or lower, left or right).
Lock the Inspector by following these steps:
1. Activate the desired Editor pane by clicking in it.
The Inspector reflects the data for the active file.
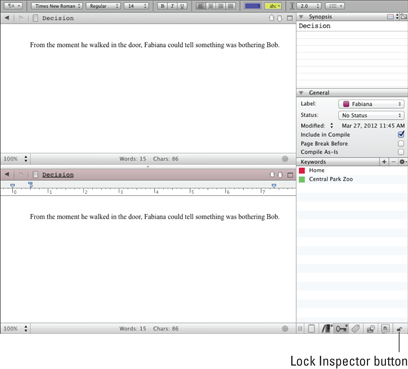
2. Click the Lock Inspector button at the bottom-right of the Inspector (see Figure 6-11).
Before you click the Lock Inspector button, it displays an image of an open padlock. After you click it, it displays a closed padlock.
To unlock the Inspector, click the Lock Inspector button again so that it appears unlocked.
Figure 6-11: The Lock Inspector button.
Splitting the Editor vertically
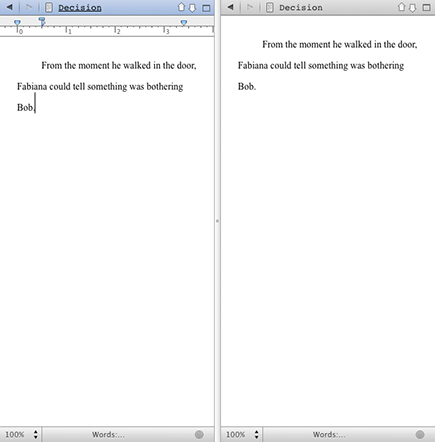
You’re not just stuck with a horizontal split option: You can also split the Editor vertically into left and right panes (see Figure 6-12).
To activate a vertical split on a Mac, press and hold the Option key while clicking the Split toggle button in the Header bar. If you’re in Split Screen view already, it doesn’t matter which Header bar’s button you click. (Windows users have a separate Vertical Split button that appears just to the left of the Horizontal Split button in the Header bar.)
Use the same method to switch back to a horizontal split when in a vertical split or to choose a split type other than what’s displayed on the button when in single pane view.
Figure 6-12: A vertically split Editor.
You can also access the split options by choosing View⇒Layout.
Click the Split toggle button again to return to single pane view.
..................Content has been hidden....................
You can't read the all page of ebook, please click here login for view all page.