
Figure 1-4: The Scrivener workspace.
Understanding the Scrivener Interface
When Scrivener first opens your new project, you can immediately see that this program is more than a word processor. Don’t be alarmed by all the stuff that appears. Hopefully, after you understand what all these pieces and parts can do for you, you think of them merely as more to love.
The following sections provide an overview of the major elements of the Scrivener workspace, and the remaining chapters in this part and all the chapters in Part II are devoted to explaining each element in more detail.
Figure 1-4 names the major components for you. Don’t worry about what they all mean. Unless you have a photographic memory, just keep a thumb, or maybe a sticky note, tucked into this page so that you can refer to it, as needed.
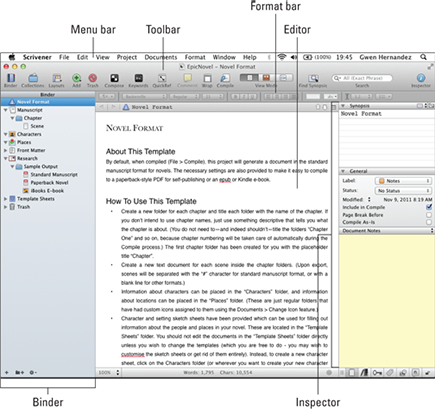
Menu bar
Across the top of your window is the menu bar. The menu bar, aptly named as it is, provides an organized menu of the program’s commands. Although many of the menu commands have shortcuts, via keyboard or button, almost anything you need to do is available in one of the menus.
 If you’re using the Windows version, the menu bar looks a bit different, but most commands are still there somewhere. And if they’re not now, they will be.
Each menu is organized into groups of menus and submenus that, mostly, make sense. So, commands that relate to working with a project file in a generic sense — such as opening a new project or saving the current one — are listed in the File menu.
Toolbar
The toolbar lives below the menu bar. At the top-center of the toolbar, Scrivener displays the project title followed by the active document name. (The Windows version doesn’t display the project name in the toolbar, only the project title in the title bar, which appears above the menu bar.) Beneath the title, you find a row of colorful buttons for some of the most commonly used menu commands. To see the name of each button, hover your pointer over it for a second. A small tooltip pops up with the button name.
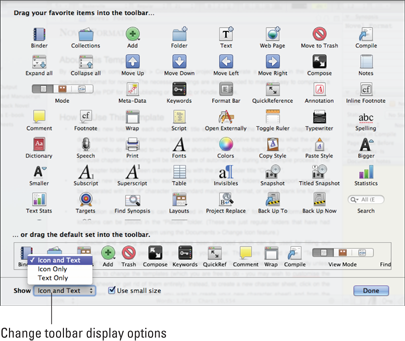
If you find hovering tiresome, Mac users can turn on text for the button icons by going to View⇒Customize Toolbar. At the bottom-left of the Customize Toolbar window that appears, select Icons and Text from the Show drop-down list, as shown in Figure 1-5. In this window, you can also decide which buttons to display in the toolbar by dragging them from the field of buttons into the toolbar.
Figure 1-5: The Customize Toolbar window provides toolbar display options.
Binder
The purpose of the Binder is to help you navigate and organize your documents. If it’s not visible, go to View⇒Layout⇒Show Binder or click the Binder button in the toolbar.
Much like Finder (or Windows Explorer) does for your computer, the Binder provides access to all the files located within your project and keeps those files organized in an easy-to-see, hierarchical fashion. But even more, the Binder gives you an outline view of your manuscript.
Documents can be organized into folders (which may have a folder icon or some other icon) and multiple levels of subfolders, if desired.
For example, in the Manuscript folder (which is called Draft in the Scrivener User Manual and goes by other names, depending on which template you choose), you store all the documents you want to include in your final manuscript. If you want, you can break up your project into four parts in the Manuscript folder, with chapter folders within each part that contain the scene documents for each chapter. Try finding an easy way to do that in a word processor!
Or, within the Research folder, you might add subfolders to help further classify your research by type (for example, firearms, weather, period costumes, police procedure, plants). You can store photos, PDFs, and website archives in the Research (or another) folder, but not in the Manuscript folder, which is for text only.
The beauty is that you choose how to set up your project. You can rearrange items in the Binder at any time to change their levels, or assign them to different folders. You can collapse and expand files for an outline-like view of your project, easily move items around, rename them, group them into folders and subfolders, and even color-code them. The Binder can also be hidden if you find it distracting.
Chapter 2 provides a full explanation of the Binder.
Editor
The Editor sits at center stage in Scrivener, and it’s the part that probably seems the most familiar to you. It’s the text-editing part of Scrivener — the part where you do the actual writing. Just like a word processor, it contains a formatting bar at the top, a ruler (which may or may not be visible initially), and a blank space for adding your words.
If you chose a template other than Blank, your new project displays a description of the template and how it’s set up. This is a handy reference that sits at the top of the Binder unless you delete it, so you may want to keep it until you get the hang of things.
 If the Editor looks like a corkboard or a series of horizontal lines, choose View⇒Document (called Scrivenings when multiple files — or a container — are selected).
Within the Editor pane, you have access to several views: Document/Scrivenings (which displays the text editor), Corkboard (index cards), and Outliner.
The Editor has plenty of tricks up its virtual sleeve, which are covered in Part III of this book.
Inspector
The Inspector isn’t a police detective — but for many new users, it’s a bit of a mystery. Located at the far-right of the Scrivener window, the Inspector is a common feature in Mac-based programs, but exists in the Windows version, as well. If it’s not visible, choose View⇒Layout⇒Show Inspector or click the Inspector button in the toolbar.
The Inspector displays all sorts of extra information — known as metadata — about the items in your Binder and allows you to modify a lot of that information. If each scene, chapter, or section within your project were a cereal box, your written text would be the chocolaty rice puffs inside, and the Inspector would be all the information on the outside of the box. (Anyone else hungry?)
When you first start Scrivener, the Inspector displays the Synopsis, general metadata, and notes for whichever document is selected in the Binder:
![]() Synopsis: The top portion of the pane. You can type a brief summary or outline of that scene, chapter, part, image, or whatever can help remind you what it’s about. When you work with the Corkboard (which I describe in Chapter 8), you can see that the index card contents are pulled from the Synopsis section.
Synopsis: The top portion of the pane. You can type a brief summary or outline of that scene, chapter, part, image, or whatever can help remind you what it’s about. When you work with the Corkboard (which I describe in Chapter 8), you can see that the index card contents are pulled from the Synopsis section.
![]() General: Located in the middle of the Inspector pane, you store other information about the file here.
General: Located in the middle of the Inspector pane, you store other information about the file here.
![]() Document/Project Notes: This bottom section of the Inspector pane lets you record notes or reminders about the document.
Document/Project Notes: This bottom section of the Inspector pane lets you record notes or reminders about the document.
If you want more room to write, or just less clutter in general, you can hide the Inspector by clicking the Inspector button in the toolbar or choosing View⇒Layout⇒Hide Inspector.
Want to investigate the Inspector’s many secrets? Part II of this book is devoted entirely to solving the puzzle of the Inspector.
..................Content has been hidden....................
You can't read the all page of ebook, please click here login for view all page.