
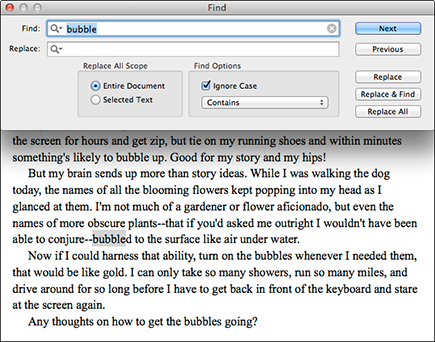
Figure 17-6: Performing a Document Find search.
Running Document Find and Replace
Document Find and Document Replace work much like Project Search and Project Replace, but they narrow the search to a single document or Scrivenings session. (Check out the sections “Working with Project Search” and “Using Project Replace,” both earlier in this chapter.)
Using Document Find
Document Find searches within the document(s) active in the Editor pane. It’s especially handy if you’ve done a Project Search and the document you’re looking at has a lot of highlighted results or is really long. Instead of scrolling through looking for highlights, you can perform a Document Find and have it step through the results one at a time.
Document Find even automatically loads the search string from the current Search text box in the toolbar. So you can run Project Search, select a document from the Results list, and then run Document Find to locate the text within that document.
Follow these steps to conduct a Document Find search:
1. Select the document(s) that you want to view in the Editor.
If you select multiple documents and they appear in the Corkboard or Outliner, choose View⇒Scrivenings to return to the Editor.
2. Choose Edit⇒Find⇒Find.
Alternatively, you can press ⌘+F (Ctrl+F in Windows).
The Find window appears, as shown in Figure 17-6.
3. Type the word(s) that you want to search for in the Find text box.
If you’ve run a Project Search, the text box is prefilled from that search.
4. In the Find Options section, select Ignore Case if you don’t care about the letter case.
If the case matters, deselect this option.
5. Click the drop-down list below Ignore Case and make a selection.
What you choose changes how the Find looks for text matches:
• Contains: Finds any text that contains the letters entered in the Find text box.
• Starts With: Highlights only text that starts with the letters entered in the Find text box.
• Whole Word: Finds text that matches the word in the Find text box, but not text that contains the letters as part of a larger word.
For example, if the search text is ed, the Whole Word option returns ed or Ed, but not bed, Edward, or redder.
• Ends With: Matches only words that end with the letters entered in the Find text box.
6. Click Next.
Scrivener moves to the first match. As shown in Figure 17-6, Scrivener highlights the match.
7. Continue to click Next until you locate the instance of the search term you were looking for.
If you click Next and don’t see anything, you may have to move the Find window out of the way. If there’s no match, Scrivener makes an error noise and displays Not Found in the space below the Replace text box.
 Mac users, if you press Return instead of clicking Next, the Find panel finds the next match (if any) and then closes. To run the search again (or run your last Project Search for the document) without opening the Find window, press ⌘+G.
8. Click the red X button to close the Find window.
Viewing recent searches
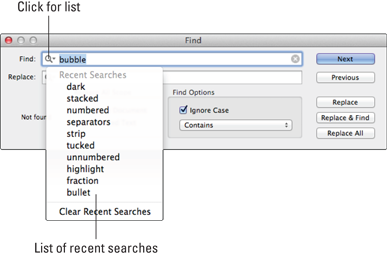
A magnifying glass icon appears in the Find and Replace text boxes of the Document Find window. As detailed in Figure 17-7, clicking the magnifying glass provides a list of Recent Searches and Recent Replacements, respectively.
Here’s how to work with this drop-down list:
![]() Click a word on the list to insert it into the text box.
Click a word on the list to insert it into the text box.
![]() Clear the list by choosing Clear Recent Searches or Clear Recent Replacements from the appropriate list.
Clear the list by choosing Clear Recent Searches or Clear Recent Replacements from the appropriate list.
Figure 17-7: A list of recent searches.
Working with Document Replace
To replace all instances of a word, but only within the document(s) you’re viewing in the Editor, use the Document Replace option. Follow these steps:
1. Select the document(s) that you want to view in the Editor.
2. Choose Edit⇒Find⇒Find.
The Find window appears (refer to Figure 17-6).
3. Type the word(s) that you want to search for in the Find text box.
4. Type the word(s) with which you want to replace the Find word in the Replace text box.
5. In the Replace All Scope section, select either the Entire Document radio button or the Selected Text radio button.
Entire Document replaces all instances within the document(s) being viewed in the Editor. Selected Text replaces only matches found in text that you select within the Editor.
6. In the Find Options section, select Ignore Case to replace all instances, regardless of case.
Otherwise, leave this option unchecked.
7. Make a selection from the Contains drop-down list to change how the Find looks for text matches.
Here are your options:
• Contains: Finds any text that contains the letters entered in the Find text box.
• Starts With: Highlights only text that starts with the letters entered in the Find text box.
• Whole Word: Finds text that matches the word in the Find text box, but not text that contains the letters as part of a larger word.
For example, if the search text is ed, the Whole Word option returns ed or Ed, but not bed, Edward, or redder.
• Ends With: Matches only words that end with the letters entered in the Find text box.
8. Click the Next button to find a match that you want to replace.
9. Click Replace, Replace & Find, or Replace All.
 If you click Replace before finding a match, Scrivener inserts the replacement text wherever your cursor is.
The three Replace alternatives behave differently:
• Replace: Inserts the replacement word at the cursor’s location in the document. Because you clicked Next in Step 8, the highlighted match is overwritten.
• Replace & Find: Replaces the current instance and finds the next match.
• Replace All: To replace all instances of the matching text in your document, skip Step 8 and simply choose Replace All.
10. Close the Find window by clicking the red X button.
To approve each match before replacing it, start by clicking the Next button. For each match that you want to replace, click the Replace & Find button. If you get to a match that you don’t want to replace, click the Next button to move to the next match without making a replacement.
..................Content has been hidden....................
You can't read the all page of ebook, please click here login for view all page.