
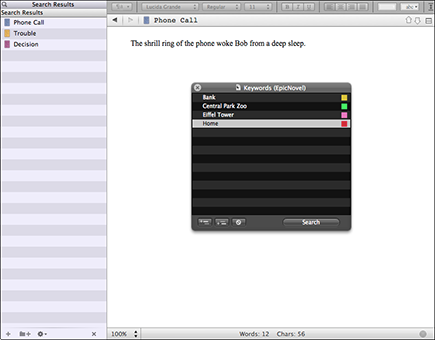
Figure 5-14: The Project Keywords window.
Working with the Project Keywords Window
The Project Keywords window floats over the Scrivener project window and lets you easily change keyword colors or delete keywords from the entire project.
Open the Keywords window by clicking the Keywords button in the Scrivener toolbar or choosing Project⇒Show Project Keywords. You can also click the gear button in the Keywords header of the Inspector pane, and then choose Show Project Keywords from the drop-down list that appears. The Project Keywords window shows all keywords available in the project. (To close the window, click the X in the upper-left corner.)
Figure 5-14 provides an overview of the Project Keywords window.

Applying keywords
You can apply existing keywords to an item from the Project Keywords window easily. Just drag and drop the desired keyword from the window onto the item name in the Binder or into the Keywords pane in the Inspector.
 If you want to add the same keyword to more than one file, select all the desired items in the Binder, and then drag the keyword from the window onto any one of the selected filenames.
Finding items by keyword
Want to know which documents have a keyword applied? Follow these steps to find out:
1. In the Project Keywords window, select the keyword for which you want to search.
2. Click the Search button at the bottom of the window (refer to Figure 5-14).
A list of documents that contain the selected keyword appears in the Binder pane. You can choose any item from the list to view it in the Editor.
3. Click the X at the bottom of the Search Results list (see Figure 5-15) to close the list and return to the Binder.
Figure 5-15: Searching by keyword returns all items with the selected keyword applied.
Adding a keyword to the project
If you’re really organized, you can add a keyword to the project before you ever apply it to an item. You can even organize keywords into hierarchical groups, much like your documents are organized in the Binder.
To add a keyword to the project, follow these steps:
1. In the Project Keywords window, click the Add New Keyword as Sibling button (refer to Figure 5-14) to add a keyword to the top level (or at the same level as a selected keyword).
A text box appears in the Project Keywords window.
2. Type the desired keyword name, and then press Return.
The keyword is added to the list in alphabetical order.
To add a child keyword (one at a lower level than the selected keyword), click the Add New Keyword as Child button. (See Figure 5-14.)
Changing the keyword color
If the keyword colors chosen by Scrivener aren’t to your taste, you can change them in the Project Keywords window by following these steps:
1. Double-click the color square to the right of the keyword whose color you want to change.
The Colors window appears.
2. (Mac only) Click the button for your favorite palette at the top of the window.
3. Select the desired color from the palette.
The color square in the window changes to the new color.
4. Repeat Steps 1 through 3 until all the colors are to your liking.
5. Click the red X button to close the Colors window.
On a Windows PC, you click OK.
Modifying a keyword
Did you rename a character? Wrongly classify an item in your dissertation? Conjure up a new name for your species of alien? No problem. Just follow these steps to modify a keyword:
1. Double-click the text of the keyword that you want to edit.
The keyword text is selected and ready to change.
2. Type the new text, and then press Return.
Deleting a keyword
What if you kill off a character, remove a breed from your paper on the grooming habits of feral cattle, or eliminate a setting? Just follow these steps to delete a keyword:
1. Select the keyword that you want to delete.
2. Click the Delete button in the Keywords panel (refer to Figure 5-14).
If the keyword is in use, a pop-up window warns you of the consequences and asks you to confirm deletion.
3. If the pop-up window appears, read it, and then click OK.
 Deleting a keyword applies to the whole project. After you delete a keyword, that keyword is no longer available in the Keywords panel, and it’s removed from all documents to which you’ve already applied it.
..................Content has been hidden....................
You can't read the all page of ebook, please click here login for view all page.