
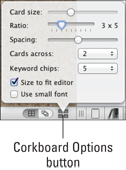
Figure 8-4: The Corkboard Options menu.
Modifying the Corkboard Layout
When you first open the Corkboard, it displays three columns of cards, ordered from left to right. Depending on your screen size and resolution, the cards might by tiny or huge. No worries. You can adjust the size and spacing of the cards in the Corkboard by clicking the Corkboard Options button. A small menu pops up, shown in Figure 8-4.
 Changes made with the Corkboard Options menu apply only to the current project.
Here’s a description of each option:
![]() Card Size: This slider resizes the index cards, but it works only if the Size to Fit Editor check box is deselected.
Card Size: This slider resizes the index cards, but it works only if the Size to Fit Editor check box is deselected.
If you make the cards large, some of them may “disappear” off the edge of the screen. You can fix this problem by adjusting the Cards Across setting.
![]() Ratio: The Ratio slider changes the shape of the cards (not the size). The 3x5 setting provides the standard index-card look, but if you prefer another rectangular shape, this setting is for you.
Ratio: The Ratio slider changes the shape of the cards (not the size). The 3x5 setting provides the standard index-card look, but if you prefer another rectangular shape, this setting is for you.
![]() Spacing: The Spacing slider adjusts the amount of space around each card.
Spacing: The Spacing slider adjusts the amount of space around each card.
![]() Cards Across: This option determines how many cards appear in each row.
Cards Across: This option determines how many cards appear in each row.
If you choose Auto, Scrivener selects the number needed to display all cards in the Corkboard at their current size.
![]() Keyword Chips: Choose how many keyword colors to display on each card. If you set it to three but a document has five keywords attached, only the first three keyword colors appear.
Keyword Chips: Choose how many keyword colors to display on each card. If you set it to three but a document has five keywords attached, only the first three keyword colors appear.
Show Keyword Colors must be turned on, as outlined in the “Understanding Index Card Elements” section, earlier in this chapter.
![]() Size to Fit: Selecting this check box overrides the Card Size setting to ensure that all cards appear on the Corkboard. This option isn’t available if the Cards Across option is set to Auto.
Size to Fit: Selecting this check box overrides the Card Size setting to ensure that all cards appear on the Corkboard. This option isn’t available if the Cards Across option is set to Auto.
![]() Use Small Font: Applies the small font designated in the Corkboard Preferences (which are covered in the “Modifying the Corkboard Preferences” section, later in this chapter).
Use Small Font: Applies the small font designated in the Corkboard Preferences (which are covered in the “Modifying the Corkboard Preferences” section, later in this chapter).
To close the Corkboard Options menu, click anywhere outside of it. (Windows users, click the X button at the top-right of the menu.)
..................Content has been hidden....................
You can't read the all page of ebook, please click here login for view all page.