
Figure 12-13: Specifing transition types in the Separators tab.
Working with Some Helpful Format Options
You can find a nearly endless list of formatting options in the Compile window. The following sections highlight some of the commonly sought or misunderstood features.
Forcing one font for the entire compilation
Want to quickly change the entire compilation to a single font family (for example, Times New Roman) when you export? The quick font override lets you do just that, applying the chosen font to every element and level in the Formatting tab, the header and footer settings, footnotes, and even those documents marked to compile As-Is (which I talk about in the section “Preserving the format of a document,” later in this chapter).
Overriding the font is especially useful if you like nearly everything about a Compile preset except for the font. Using this option saves you from having to make adjustments in the Formatting Editor and Page Settings just to change the font family.
Only blocks of preserved formatting remain unaffected. (I talk about preserving formatting in Chapter 6.)
The quick font override does not affect the font size or typeface (for example, italic or bold); therefore you may still have to adjust font size and typeface in the Formatting tab (see the section “Formatting the compiled output,” earlier in this chapter).
To globally change the font for your final output, select Override All Fonts with Face in the Quick Font Override tab, and then select the desired font family from the drop-down list that appears.
Forcing a page break before a document
For non-repeating items that need to start on their own page, such as a title page, table of contents, or other front matter, follow these steps to insert a page break before the document:
1. Click the Contents tab.
2. Select the Pg Break Before check box for the desired list item.
To control the behavior for recurring items, such as chapter folders and text documents, use the Separators Option tab (covered in the “Customizing the transitions between Binder items with separators” section, later in this chapter).
 It’s best to force the page break only if you can’t get results by using the Separators options (covered in the “Customizing the transitions between Binder items with separators” section, later in this chapter). If you save your compile format for use with other projects, the Pg Break Before settings aren’t included.
Preserving the format of a document
If you have special formats applied to a document — for example, a table of contents or title page — selecting the As-Is check box on the Contents tab prevents the formatting in that item from being changed when you compile.
The one exception is if you override the font by using the Quick Font Override option (see the “Forcing one font for the entire compilation” section, earlier in this chapter).
This option tells Scrivener to ignore all the settings in the Formatting tab, so it’s not intended for the entire manuscript.
 You don’t have to use this method for documents that have Preserve Formatting applied to a section. Scrivener doesn’t override preserved formatting when you compile (see Chapter 6 for more on preserving formatting), even if you choose the Quick Font Override option.
Customizing the transitions between Binder items with separators
The Separators tab lets you choose what type of separator to include when your project transitions from one item to the next. By making selections in this tab, you only need to use the Pg Break Before option in the Contents pane for exceptions to these rules (see the “Choosing which Documents to Export” section, earlier in this chapter, for more information).
The Separators tab offers four transition types, depicted in Figure 12-13:
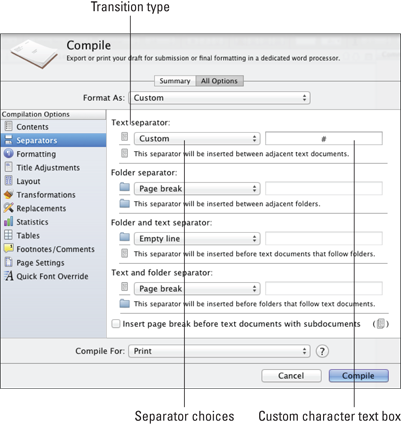
![]() Text Separator: Specifies the separator for a text-type file (including file groups — text files with subdocuments) followed by another text item. For example, two scene documents in a row might require a custom character between them.
Text Separator: Specifies the separator for a text-type file (including file groups — text files with subdocuments) followed by another text item. For example, two scene documents in a row might require a custom character between them.
![]() Folder Separator: Designates the separator for a folder followed by another folder. A project might have a part folder followed by a chapter folder, which you want to separate with a page break.
Folder Separator: Designates the separator for a folder followed by another folder. A project might have a part folder followed by a chapter folder, which you want to separate with a page break.
![]() Folder and Text Separator: Lets you choose the separator for a folder followed by a text-type item. For example, a chapter folder followed by the first scene might require the seamless transition of only a single return.
Folder and Text Separator: Lets you choose the separator for a folder followed by a text-type item. For example, a chapter folder followed by the first scene might require the seamless transition of only a single return.
![]() Text and Folder Separator: Sets up the separator for a text-type file followed by a folder. For example, the last scene in a chapter, followed by the next chapter folder, is often separated by a page break.
Text and Folder Separator: Sets up the separator for a text-type file followed by a folder. For example, the last scene in a chapter, followed by the next chapter folder, is often separated by a page break.
Each of the four transitions lets you choose the separator type from their drop-down lists. The drop-down lists offer four options:
![]() Single Return: Adds a single paragraph return, which provides a seamless transition from one item to the next with no visual break of any kind.
Single Return: Adds a single paragraph return, which provides a seamless transition from one item to the next with no visual break of any kind.
![]() Empty Line: Adds two paragraph returns, adding one blank line between the two items.
Empty Line: Adds two paragraph returns, adding one blank line between the two items.
If Remove First Paragraph Indents after Empty Lines and Centered Text is chosen in the Formatting options (see the “Removing first paragraph indents” section, earlier in this chapter), this option starts the second item with a non-indented paragraph.
![]() Page Break: Inserts a page break between the two items so that the following item starts on a new page.
Page Break: Inserts a page break between the two items so that the following item starts on a new page.
![]() Custom: Centers the chosen character(s) on its own line between the two items.
Custom: Centers the chosen character(s) on its own line between the two items.
To add the # symbol between scenes of a book, select the Custom transition for the Text Separator, and then type # in the text box.
If you select the Insert Page Break Before Text Documents With Subdocuments check box at the bottom of the Separators pane, Scrivener inserts a page break before all file group items (meaning text-type files with subdocuments). This option is handy if you’re using file groups for sections within a chapter because it allows you to force each section to start on its own page. You can also select this option if you’re using file groups, rather than folders, to organize chapters or book parts, because it allows you to treat the file groups as folders, forcing a page break before each new file group.
Inserting a separator when an empty line falls on a page break
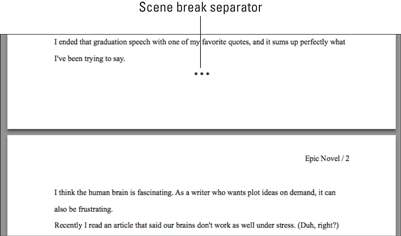
Sometimes, a scene separator falls on a page break, making it difficult to distinguish the scene break when you’re using an empty line. For PDF and Print output, you can set up Scrivener to automatically insert characters on the empty line to make the scene break obvious (as shown in Figure 12-14). In the Layout tab, select Replace Empty Line Separators that Fall across Pages, and then change the characters in the text box, if you want.
Figure 12-14: Three asterisks indicate a scene break that falls on a page break.
Adding an end-of-text marker
It’s common practice to add some kind of marker to the end of your output. For a magazine article, you might use Ends. Scrivener’s Novel format adds <<<<>>>> to the end of a manuscript.
If you want to use a character or set of characters to denote the end of the exported file, click the Layout tab (Transformations in Windows), select Mark End of Text With, and then enter the desired character(s) in the text box.
To remove an existing marker, deselect the Mark End of Text With check box.
Formatting your output into columns
Want your compiled document to be displayed in columns, much like a newspaper or magazine? If you’re exporting to Rich Text (.rtf – Word Compatible) or Microsoft Word 97–2004 (.doc) output types, you can add columns by following these steps:
1. Click the Layout tab, and then select Use Columns.
2. Click the Start Columns drop-down list and select where to start columns within your compilation.
You can choose from one of the following options:
• On First Page: Start columns from the very first document.
• After First Document: If your first document is a title page or other text that shouldn’t be in columns, select this option.
• After Front Matter: Select this option to start columns after the items in your Front Matter folder.
3. Click the Number of Columns drop-down list, and then select the desired number of columns.
4. Click the Space between Columns drop-down list, and then select the desired amount of spacing between each column.
Removing footnotes from compiled output
To remove footnotes (covered in Chapter 11) when compiling your manuscript, click the Footnotes/Comments tab (Footnotes/Annotations in Windows), and then select Remove Footnotes.
For output types that don’t support footnotes, footnotes are converted to endnotes — or something approximating endnotes — when you compile, unless you remove them first.
Converting footnotes to endnotes
For output types that support it, you can convert footnotes of either type (inline or linked) to endnotes during the compile process. In fact, because they’re treated separately, you can convert one type to endnotes and leave the other as footnotes (see Chapter 11 for more on footnotes). You might want to convert footnotes to endnotes if you want to use a word processor that doesn’t support footnotes.
Converting footnotes affects only the compilation, not the footnotes within your Scrivener project. Convert them by following these steps:
1. Click the Footnotes/Comments tab.
You click the Footnotes/Annotations tab in Windows.
2. If necessary, deselect Remove Footnotes to enable the footnote options.
3. Choose an option, depending on which type of footnotes you used and what operating system you use.
Here are your options:
• Export Inspector Footnotes as Endnotes: Mac only. For linked footnotes (those appearing in the Comments & Footnotes pane of the Inspector).
• Export Inline Footnotes as Endnotes: Mac only. For inline footnotes (those embedded in the text in gray bubbles).
• Endnotes: In Windows, select Endnotes in the Export to RTF drop-down list.
Exporting comments and annotations for use in Word
If compiling to Rich Text (.rtf – Word Compatible) or Microsoft Word 97–2004 (.doc) output types, you can turn linked comments and inline annotations into comments that are visible when in Microsoft Word. (See Chapter 10 for more about comments and annotations.)
 For this conversion to work properly with the Microsoft Word 97–2004 (.doc) output type, the Microsoft .doc setting in the Scrivener Preferences Import/Export pane must be set to Export as RTF-Based .doc File, which is the default.
Make comments and annotations — which can be treated separately — compatible by following these steps:
1. Click the Footnotes/Comments tab.
Windows users, click the Footnotes/Annotations tab.
2. In the Comments and Annotations section, deselect the check boxes for the items that you want to retain.
Deselecting these options prevents the comments or annotations from being deleted from the final output during the compile process:
• Remove Inspector Comments: Mac only
• Remove Inline Annotations: Mac only
• Remove Annotations: Windows only
3. From the Export To RTF As drop-down list, select Margin Comments.
This option appears as simply Comments in Windows.
If for some reason the preceding steps don’t work for you, try exporting as inline comments, as described in the following section.
Exporting comments and annotations as inline comments
Generally, you want Scrivener to strip the inline comments and annotations from your final output, especially for submissions, but if you want to include them, you can embed them directly into the text, surrounded by your choice of characters to set them off from the rest of the text.
For output types that support text color, the comments are colored to match the annotation or comment color in the manuscript.
To export inline comments and annotations, follow these steps:
1. Click the Footnotes/Comments tab.
Windows users, select the Footnotes/Annotations tab.
2. Deselect the check boxes for the items that you want to retain.
Deselecting these options prevents the comments or annotations from being deleted from the final output during the compile process:
• Remove Inspector Comments: Mac only
• Remove Inline Annotations: Mac only
• Remove Annotations: Windows only
3. From the Export to RTF As drop-down list, choose Inline Comments.
Windows users, choose Comments.
Don’t want comments and annotations inline with the text or in the margin, but still want them in your final output? Export them as footnotes or endnotes by choosing either Footnotes or Endnotes from the drop-down list.
4. In the Enclosing Markers text boxes, enter the characters that you want to use to enclose the comments.
Windows users don’t have this option. The comments are surrounded by square brackets and colored, if color is supported.
If you’re using Web Page (.html) or MultiMarkdown⇒LaTeX output types, you can insert open and close syntax for HTML comments as the enclosing characters.
Setting the margins
You can set the compilation’s page margins as part of the compile settings if you’re using one of the following output types: Print, PDF, either of the Rich Text options, both Microsoft Word options, or Open Office (.odt). Follow these steps:
1. Click the Page Settings tab.
2. If necessary, deselect Use Project Page Setup Settings.
This option appears only in the Mac version. When you deselect it, the Margins section is enabled.
3. Enter the desired value for each margin in the corresponding text boxes: Top, Bottom, Left, and Right.
4. Select your measurement type from the drop-down list next to each margin text box.
In Windows, select from the Units list at the bottom of the Margins section.
You can choose from centimeters, inches, or points.
Adjusting how word and character counts are calculated
Some project templates include a title page with a placeholder tag (see the following section for more on placeholder tags) that tallies the manuscript’s word count when you compile. To adjust the text elements that are included in the word count, click the Statistics tab, and then select accordingly from the menu of elements to include.
..................Content has been hidden....................
You can't read the all page of ebook, please click here login for view all page.