
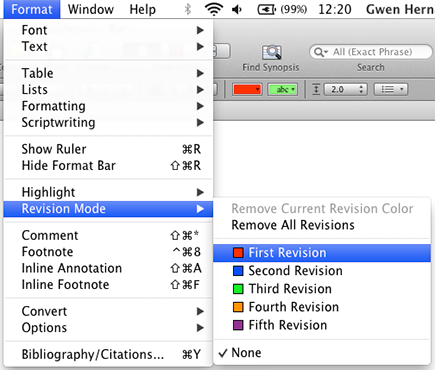
Figure 20-1: The Revision Mode submenu.
Marking Text
When the Revision mode is on, all new text added is in the selected revision color until you turn it off.
To turn on Revision mode, choose Format⇒Revision Mode, and then choose the desired revision level/color from the submenu that appears, as shown in Figure 20-1.
A small window appears to let you know you’re about to enter Revision mode. Click OK to continue. The cursor changes color to match the selected revision level color and to remind you that you’re in Revision mode.
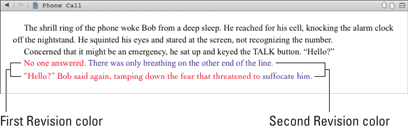
All text you add until you exit Revision mode is in the selected color. In Figure 20-2, I chose First Revision, so the new text shows up red.
 If you copy and paste text, instead of typing it in, the text doesn’t get marked. To get around this omission, choose Edit⇒Paste and Match Style rather than the standard Paste command. Just be aware that Paste and Match Style drops formatting such as italics and bold.
Figure 20-2: Added text marked in Revision mode.

If you want to turn off Revision mode, choose Format⇒Revision Mode, and then choose the current revision level from the submenu that appears or choose None. (The current revision level is designated with a checkmark.)
Marking text with a new level
When you’re done with one round of edits but don’t want to get rid of the color denoting your previous changes, you can move to a new level — and color — of revisions. Choose Format⇒Revision Mode, and then choose a different revision level from the submenu that appears. The cursor changes to match the color of the level you chose.
Any text you add now appears in the new color, as shown in Figure 20-3. In the last sentence, where I replaced the last three words with suffocate him — don’t judge! — you can’t tell what was there before. For that reason, it’s still a good idea to take a snapshot before you make any changes to a document. (I cover snapshots in Chapter 19.)
Figure 20-3: An additional level of revisions.
Marking existing text
If you changed text before you remembered to turn on revision marking, or you pasted in text without using Paste and Match Style, you can go back and mark it up. Just select the text to mark, and then choose Format⇒Revision Mode⇒Mark Revised. The text changes to the current revision level color.
Marking text for deletion
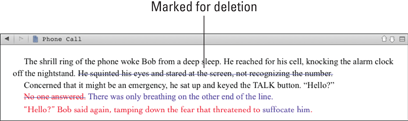
Revision mode doesn’t keep track of deleted text, but you can mark the text for deletion by applying strikethrough formatting while in Revision mode. Select the text that you want to mark for deletion, and then choose Format⇒Font⇒Strikethrough.
A line is drawn through the text, colored to match the current revision level, as shown in Figure 20-4. Only the line is colored to match, not the text, which makes sense when you consider that the text might be in one revision color, and the strikethrough in another, as is the case in the second sentence marked for deletion in Figure 20-4.
You can leave strikethrough-formatted text in your project but omit it when you export your manuscript. The “Compiling with Marked Revisions” section, later in this chapter, talks about handling revisions during the Compile process.
Figure 20-4: Text marked for deletion in Revision mode.
..................Content has been hidden....................
You can't read the all page of ebook, please click here login for view all page.