
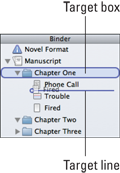
Figure 2-5: When dragging and dropping an item in the Binder, look for the target line and box.
Working with Scrivener Items
After you populate your project with documents and folders (as discussed in the preceding sections), you may eventually want to change things: names, locations, and the organizational hierarchy. This section shows you how to rename, move, group, split, and merge items, as well as change their icons.
Renaming an item
Anything in the Binder can be renamed, regardless of level or type. You have three simple options for renaming an item:
![]() Right-click the item and select Rename from the contextual menu that appears. Type the desired name when the current name is highlighted.
Right-click the item and select Rename from the contextual menu that appears. Type the desired name when the current name is highlighted.
![]() Select the item to rename, and then press the Esc key (on a Mac) or the F2 key (for Windows). The current name is highlighted, ready for you to type over it.
Select the item to rename, and then press the Esc key (on a Mac) or the F2 key (for Windows). The current name is highlighted, ready for you to type over it.
![]() Double-click the item to select the title, and then type the desired name.
Double-click the item to select the title, and then type the desired name.
Moving Binder items
Part of the power of Scrivener is that it gives you the ability to easily rearrange your documents and folders. You can either drag and drop an item or use the contextual menu to choose a new location.
Dragging and dropping
Dragging and dropping is probably the quickest and most common method for moving items in the Binder. Simply click and hold the item, and then drag it to the new location, releasing the mouse button to drop the item.
 Watch for the blue line that tells you where the item will drop and the blue box that shows which container it’ll end up in. Figure 2-5 shows the target line and box, which designate where the item will drop.
When moving a container, you can collapse it first so that you don’t have to deal with all its files. Collapsing subfolders of other containers in the Binder can also prevent you from dropping the item at the wrong level.
Collapse or expand a container in the Binder by clicking the triangle next to its icon. When the triangle points down, the container is expanded, meaning its contents are fully visible.
When the triangle points to the right, the container is collapsed, so its contents are hidden.
To expand or collapse all containers in the Binder, go to View⇒Outline⇒Expand All/Collapse All.
To expand or collapse all the subfolders within a container, Option-click (Alt-click in Windows) the triangle next to the item.
Using the contextual menu
If the drag-and-drop method is dragging you down (see the preceding section), or you have more levels and subfolders than you want to wade through, you can move your item by using the contextual menu. The catch is that you have to know your destination. After you know where you want to place your item, follow these steps:
1. Right-click the item you want to move.
The contextual menu appears.
2. Select Move To, and then select the location from the submenus.
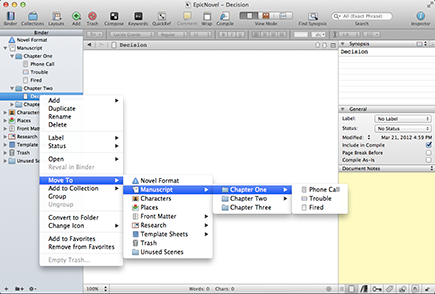
Just follow the subfolders path until you get to the container you’re looking for. Figure 2-6 shows a file being moved several levels deep in the Manuscript.
The item moves to the new location. If you choose a text document, the selected document becomes a file group, and the moved item appears in that file group.
Figure 2-6: You can move Binder items via the contextual menu.
Grouping items
What if you have all your scenes written and you want to organize them into chapters after the fact? Or maybe you have all your chapter folders but want to organize them into parts of the book.
You don’t have to create the folders first and then drag the documents or subfolders into those folders. Instead, you can use grouping, which organizes the selected items into a new folder.
Whatever organizational strategy you use, follow these simple steps to get it done:
1. Select the items that you want to group.
 Shift-click for contiguous items and ⌘-click (Ctrl-click in Windows) for noncontiguous items.
2. Right-click any of the selected items to open the contextual menu.
3. Select Group.
A new folder appears, ready to be named, and the selected items are moved into the folder.
4. Type the name for the folder and press Return.
5. If the items in your new folder aren’t visible (meaning they’re not expanded), click the triangle next to the folder icon to display the items inside.
Changing folder and file icons
You can change the icon of any folder, even a root folder. In fact, the same method works to change a file icon, as well.
I love picking icons that convey the purpose of the item. For example, my Productivity file sports a chart icon. My Ideas folder icon is a light bulb. Very original, right?
Procrastinate the day away playing with icons by following these steps for all the items you want to personalize:
1. Right-click the desired item.
The contextual menu appears.
2. Point to Change Icon, and then choose the desired icon from the submenu that appears.
Figure 2-7 shows the submenu.
The icon changes to reflect your choice.
Splitting and merging documents
Working with a bunch of individual documents in Scrivener is great, right? But what if you were on a roll and you just kept writing without giving thought to scenes or chapters? Or you imported that 90,000-word tome you wrote in another program, and now it’s one long document just sitting in your Binder like a useless lump?
No worries. Splitting a document is dead easy by using either of the methods in the following sections.
Figure 2-7: You can change any item’s icon by selecting from the contextual menu.

Splitting manually
Splitting a document manually gives you total control over how you break it up, but can also be time consuming if the document requires a lot of divisions. Follow these steps to split a document manually:
1. Select the document to be split.
The text appears in the Editor pane. If it doesn’t, choose View⇒Document.
2. Click to insert your cursor at the exact spot where you want to break up the file.
For example, you can create a split at the beginning of a new paragraph.
3. Choose Documents⇒Split⇒At Selection.
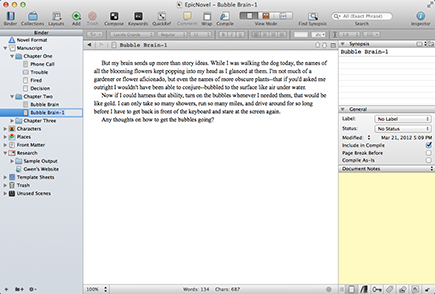
A new document that has the original name with a number added is created, as shown in Figure 2-8. The new file contains everything after the point at which you chose to split.
The keyboard shortcut for this menu item might be worth memorizing if you have a lot of splits to make: ⌘+K (Ctrl+K in Windows).
4. Type the new name and press Return.
5. Select the new document and follow Steps 2 through 4 for each split you need to make.
You can keep splitting the most recently created document until you’ve broken the work into the desired number of files.
If you select a few words of text and choose Documents⇒Split⇒With Selection as Title, the file splits at the beginning of the selection and uses the selected text as the document title. This option is especially handy if you have headings already entered in your document but no separators. By using the Find by Format feature (covered in Chapter 17), you can search for a heading, and then split the document with the selection as the title, find the next heading, and so on.
 When you split a document, all metadata is retained by both documents, but any snapshots (covered in Chapter 19) stay only with the original document (the one that contains all text prior to the split).
Figure 2-8: The new document created from the split, ready to be named.
Using the Import and Split feature
The Import and Split feature lets you import a file and split it automatically. What’s the catch? The file already has to have a separator character — on its own line — to designate the division between each document. Every time Scrivener encounters the separator character, it removes the character and the blank line, and then splits the file at that point to create a new document.
Follow these steps to import and split a file:
1. Select the desired location for the imported file.
2. Choose File⇒Import⇒Import and Split.
The Import and Split window opens.
3. Navigate to the desired file to import.
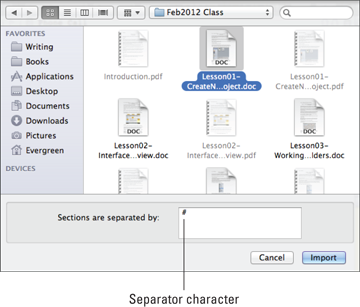
4. (Optional) Change the scene divider, if necessary, by entering the divider you used in the file into the Sections Are Separated By text box.
The # is a common scene divider in the publishing world. Figure 2-9 shows the # as the separator character. But if you used another character or set of characters to separate the file, such as * or ###, enter it in this text box.
5. Click Import.
The imported file is split into individual text documents at each separator and added to the Binder.
Figure 2-9: Specifying a separator character in the Import and Split dialog box.
Merging documents
Like a deadbeat boyfriend, you’re an expert at splitting if you’ve read the preceding sections, but what about when you want to join two or more files together? Scrivener’s got you covered.
Follow these steps to get your files on their way to wedded bliss:
1. In the Binder, select the files that you want to merge.
Press Shift-click to select contiguous files. ⌘-click (Ctrl-click in Windows) for noncontiguous files.
2. Choose Documents⇒Merge.
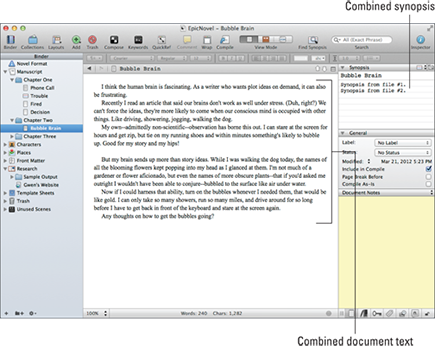
All the selected files merge into one document, retaining the name of the topmost file, as shown in Figure 2-10.
When you merge files, the Synopses, notes, keywords, references, and snapshots also combine, but the resulting document has the Label, Status, and other metadata settings of the topmost file.
Figure 2-10: The original two files merged into one, with a combined Synopsis.
By default, Scrivener inserts an empty line between the text of merged documents. To change the merged documents separator, follow these steps:
1. Choose Scrivener⇒Preferences.
Windows users, choose Tools⇒Options.
The Preferences (or Options) window appears.
2. Select General.
3. In the Separators section, select the desired separator from the Merged Documents drop-down list.
Deleting files and folders
I never delete any of my words, even if they won’t end up in the final manuscript. I’ve pillaged old scenes for text and ideas too many times to risk permanent deletion. That said, you may really want to delete an item at one time or another.
Maybe you created a file or folder by mistake. Or you made a copy. Or you’ve decided to store links to your research, rather than the research text. For any number of reasons, you might choose to delete an item from the Binder.
If you want to go that route, follow these steps to wield the axe of death:
1. Select the offending item(s) in the Binder.
Press Shift-click to select contiguous files; ⌘-click (Ctrl-click in Windows) for noncontiguous files.
2. Right-click, and then select Delete from the contextual menu that appears.
As a last-ditch effort to save you from yourself, the selected items move to the Trash folder.
You can also select and drag items directly to the Trash.
3. If you’re really, really sure that you don’t want the items anymore, right-click the Trash folder and select Empty Trash from the contextual menu that appears.
A warning window appears.
4. Click OK.
The files are permanently removed from the project. This step can’t be undone.
..................Content has been hidden....................
You can't read the all page of ebook, please click here login for view all page.