
Figure 2-2: A new text document in the Chapter One folder, ready to be named.
Building Your Scrivener Project
Before you can start writing, you need a document to write in. The following sections show you how to create new documents, add folders to keep them organized, and import existing writing and documentation into your project.
Adding a text document
So, you’re sick of staring at a blank screen, and you’re ready to start writing? First, you need to add a text document to your Scrivener project (see Chapter 1 for more on creating a project). Just follow these steps:
1. In the Binder, select the folder to which you want to add the document.
The folder can be at any level, in or out of the Manuscript root folder.
 If you want the document included in the final exported manuscript, put it in the Manuscript folder.
2. Click the Add button in the toolbar.
A new file displaying the text document icon and the word Untitled appears below the folder, as shown in Figure 2-2.
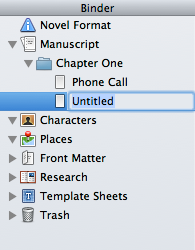
3. Type the name of the document and press Return.
Your new document has been added to the selected folder.
 You can add a new text document in a number of ways, in addition to the method in the preceding step list. Select the folder to which you want to add a document, and then do one of the following:
![]() Click the Create New Document button (the plus sign [+]) at the bottom-left of the Binder (refer to Figure 2-1).
Click the Create New Document button (the plus sign [+]) at the bottom-left of the Binder (refer to Figure 2-1).
![]() Choose Project⇒New Text.
Choose Project⇒New Text.
![]() Right-click the folder and select Add⇒New Text from the contextual menu that appears.
Right-click the folder and select Add⇒New Text from the contextual menu that appears.
When selecting the location for a new document, you don’t have to choose a folder. You can instead select another document within the folder. In fact, you can select an existing document and simply press Return to create a new one, which appears below the existing one.
Understanding document icons
The Binder icons aren’t there just to look pretty. They actually give you a lot of information. Scrivener uses at least three variations of the text document icon:
![]() Blank sheet of paper: Text has not been added to this document.
Blank sheet of paper: Text has not been added to this document.
![]() Paper with lines of text: The document contains text.
Paper with lines of text: The document contains text.
![]() Index card: The document has no text, but it does have a Synopsis. You see this icon a lot if you start your manuscript by storyboarding in the Corkboard or Outliner. Synopses are covered in Chapter 3.
Index card: The document has no text, but it does have a Synopsis. You see this icon a lot if you start your manuscript by storyboarding in the Corkboard or Outliner. Synopses are covered in Chapter 3.
![]() Other icons: You may also encounter other icons for specialty file types, such as PDFs.
Other icons: You may also encounter other icons for specialty file types, such as PDFs.
If a text document has a folded upper-right corner, that means it has an associated snapshot (Chapter 19 covers snapshots in detail).
Adding a folder
You can organize your folders into as many levels as you can handle. The methods for adding a folder are similar to those for adding a file (as discussed in the preceding section), but depending on what’s selected in the Binder, the new folder may end up as either a root-level folder or a subfolder.
If you select the Manuscript or Research folder, the new folder is added as a subfolder (child) of the root. If you select any other folder or file, the new folder is added at the same level (making it a sibling) of the selected item.
Creating a subfolder
To create a subfolder — a child-level folder — follow these steps:
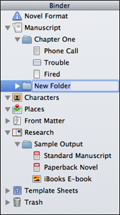
1. In the Binder, right-click either Manuscript or Research.
2. From the contextual menu that appears, select Add⇒New Folder.
A new folder appears with the words New Folder highlighted, as shown in Figure 2-3.
3. Type the name of the folder and press Return.
Figure 2-3: A new folder appears, ready to be named.
Creating a sibling folder
To add a folder at the same level as another item in the Binder — except for the Manuscript or Research folders — follow these steps:
1. Select the Binder item, either folder or document, that’s at the same hierarchy level as the folder you want to add.
If you want to place the new folder at a lower level than anything existing in your Binder, you can create it and then drag it into another container, as outlined in the section “Moving Binder items,” later in this chapter.
2. Click and hold the Add button in the toolbar to make the Add submenu appear.
3. Choose New Folder from the submenu.
A new folder appears with the words New Folder highlighted.
4. Type the name of the folder and press Return.
Creating a folder at the root level
Although the Manuscript, Research, and Trash folders can’t be deleted or moved from the root level, there’s nothing to stop you from adding your own folders at the root level. In fact, several templates include additional top-level folders, such as Characters, Places, Front Matter, and Template Sheets.
I also like to add a few folders of my own. Some folders that pop up regularly in my work include
![]() Unused Scenes: Stores all scenes that I removed from the manuscript. I frequently rummage through this folder for snippets of text or dialogue to add to a scene I’m writing or revising. You can also use such a folder to store unwritten scenes that are only in the idea stage, or those that have been written but don’t have a place yet. You may have to kill your darlings, but you never have to delete them.
Unused Scenes: Stores all scenes that I removed from the manuscript. I frequently rummage through this folder for snippets of text or dialogue to add to a scene I’m writing or revising. You can also use such a folder to store unwritten scenes that are only in the idea stage, or those that have been written but don’t have a place yet. You may have to kill your darlings, but you never have to delete them.
![]() Outlines: Holds the various incarnations of my attempts to herd my ideas into something resembling a story.
Outlines: Holds the various incarnations of my attempts to herd my ideas into something resembling a story.
![]() Ideas: A place to add notes about storyline changes, future scene ideas, and so on.
Ideas: A place to add notes about storyline changes, future scene ideas, and so on.
I sometimes keep a file in the Ideas folder called a Change Log, in which I list any revisions I think I need to make to the manuscript. Instead of making the edits as I’m writing, I just make a note and continue writing as if I’d already made the change. This keeps me in the writing frame of mind, and saves me time in case I change my mind again or come up with an even better idea down the road.
Follow these steps to actually create one of these root-level folders:
1. Click in the empty area of the Binder below the Trash.
If you have so many items that you can’t see the empty space, try collapsing some folders first.
At this point, nothing in the Binder should be highlighted (selected).
2. Right-click and, in the contextual menu that appears, select Add⇒New Folder.
A new folder appears with the words New Folder highlighted.
3. Type the name of the folder and press Return.
Importing files
In Scrivener, you can store your research right within your project. Importing is one of the best ways to bring it in.
You can import text files, web pages, photos, and even videos. Not only that, you can also import work done in another Scrivener project — handy if you want to move a project from one template to another or transfer relevant research and notes from another project.
And, of course, if you started — or even completed — a manuscript in a word processor, you can import that file into Scrivener, as well.
Imported files, especially media files, add to your project file size. If you have a lot of research to keep track of but don’t need to view it regularly, consider creating references, instead (covered in Chapter 5).
When you import, Scrivener makes a copy of the file so that the original remains untouched. It doesn’t create a link between the original and the imported copy, so changes in one don’t affect the other.
Supported file types
Scrivener supports the following text-type file types for import:
![]() RTF (Rich Text Format): RTF is usually the best format for importing from a word processor because Scrivener can convert the footnotes, comments, and images from this file type. Most common word processors can save a file as RTF.
RTF (Rich Text Format): RTF is usually the best format for importing from a word processor because Scrivener can convert the footnotes, comments, and images from this file type. Most common word processors can save a file as RTF.
![]() RTFD (Rich Text Format Directory): A proprietary Apple format used for Mac Cocoa applications such as Pages and TextEdit. (Not to be confused with the chocolate stuff, Mac Cocoa is a programming tool for Mac OS X and iOS software developers.)
RTFD (Rich Text Format Directory): A proprietary Apple format used for Mac Cocoa applications such as Pages and TextEdit. (Not to be confused with the chocolate stuff, Mac Cocoa is a programming tool for Mac OS X and iOS software developers.)
![]() DOC/DOCX: Microsoft Word format. If you have any format issues when importing a Word document that contains footnotes, comments, or images, try saving it as an RTF file before importing. (In Word, choose File⇒Save As, and then select Rich Text Format from the Format As drop-down list of the Save As dialog box that appears.)
DOC/DOCX: Microsoft Word format. If you have any format issues when importing a Word document that contains footnotes, comments, or images, try saving it as an RTF file before importing. (In Word, choose File⇒Save As, and then select Rich Text Format from the Format As drop-down list of the Save As dialog box that appears.)
DOCX is compatible only with Mac OS X Leopard or newer.
![]() ODT (Open Document Text): File created in Writer, the word processor component of OpenOffice (formerly knows as StarOffice). Supported by Mac OS X Leopard and newer.
ODT (Open Document Text): File created in Writer, the word processor component of OpenOffice (formerly knows as StarOffice). Supported by Mac OS X Leopard and newer.
![]() TXT: Plain text format. This type of file contains little to no formatting and is compatible with even the most basic word processors.
TXT: Plain text format. This type of file contains little to no formatting and is compatible with even the most basic word processors.
![]() FDX: A file created in Final Draft screenwriting software version 8 or newer.
FDX: A file created in Final Draft screenwriting software version 8 or newer.
![]() FCF: A file created in Final Draft screenwriting software versions 5 to 7.
FCF: A file created in Final Draft screenwriting software versions 5 to 7.
![]() OPML (Outline Processor Markup Language): Used by outlining applications. Scrivener can import the outline tree into the Binder, with attached notes added to the main text of each item.
OPML (Outline Processor Markup Language): Used by outlining applications. Scrivener can import the outline tree into the Binder, with attached notes added to the main text of each item.
![]()
.indexcard
: Index Card for iPad format. If you’re using Index Card but not keeping it synced with Scrivener, you can import cards directly into the Binder.
![]() Other text-type extensions: Files with no extension, or with the XML, TEX, MMD, MD, or
Other text-type extensions: Files with no extension, or with the XML, TEX, MMD, MD, or .markdown extensions, are imported as text files.
You can also import other types of files:
![]() Images: TIF, JPG, JPEG, GIF, PNG, BMP
Images: TIF, JPG, JPEG, GIF, PNG, BMP
![]() Videos: MOV, MPG, WAV, MP3
Videos: MOV, MPG, WAV, MP3
![]() Web pages: HTML,
Web pages: HTML, .webarchive
![]() PDF: Portable Document Format. Created by Adobe to produce a file that’s consistent in appearance, regardless of the operating system or application used to view it.
PDF: Portable Document Format. Created by Adobe to produce a file that’s consistent in appearance, regardless of the operating system or application used to view it.
 If Scrivener doesn’t support a file type, you can still import that file type by disabling Import Supported File Types Only in the Import & Export Preferences tab. When you select the item in the Binder, the file appears in the Editor as an icon, which you can click to open the file’s native program.
For Mac OS X Lion or newer, if the file type supports Quick Look, the Editor displays a read-only version of the file. To view the file in its native software program, right-click the file, and then select Open⇒In External Editor from the contextual menu that appears.
How to import files
You can import a file in several ways. The File menu provides some extra import tricks, but for a super quick import, dragging and dropping is king.
The File⇒Import submenu lets you bring in not only research, media, and web pages, but also existing work from Scrivener or other sources. Here’s a quick overview of each submenu option:
![]() File: Allows you to import most file types straight into the Binder.
File: Allows you to import most file types straight into the Binder.
![]() Web Page: Lets you enter the web address (URL) of the web page you want to import. You can type it in, copy from the address bar and paste it in, or drag the URL from the address bar to the Address text box on the Import window.
Web Page: Lets you enter the web address (URL) of the web page you want to import. You can type it in, copy from the address bar and paste it in, or drag the URL from the address bar to the Address text box on the Import window.
This option is disabled if the selected folder is the Manuscript (Draft) folder.
Pages that require a login don’t work with Import. You have to copy and paste the content or save to your computer as a PDF or other file type before importing.
![]() Research Files as Aliases: Imports a file while retaining a link to the original file so that you always have the most up-to-date version.
Research Files as Aliases: Imports a file while retaining a link to the original file so that you always have the most up-to-date version.
This option works only for non-text files (PDF, multimedia, and web pages), and the link works only when both the Scrivener project and the research file are located on the same computer.
This option is disabled if the selected folder is the Manuscript (Draft) folder.
![]() MultiMarkdown File: Imports a MultiMarkdown file into the project and splits it into files based on its structure.
MultiMarkdown File: Imports a MultiMarkdown file into the project and splits it into files based on its structure.
Scrivener creates a document from the metadata block, and then uses subsequent headers to create each new document at the appropriate hierarchy level.
![]() Plain Text Formatted Screenplay: Works for importing screenplays from programs that export plain-text scripts.
Plain Text Formatted Screenplay: Works for importing screenplays from programs that export plain-text scripts.
Scrivener converts the file automatically to script format. If you’re using Final Draft, you should use the Import and Split option outlined in the “Splitting and merging documents” section, later in this chapter.
![]() Scrivener Project: Imports another Scrivener project, grouping it all into one folder called Imported Project and placing it at the bottom of the Binder.
Scrivener Project: Imports another Scrivener project, grouping it all into one folder called Imported Project and placing it at the bottom of the Binder.
Using this option also imports keywords and project references from the original project, and creates a separate document at the top of the Imported Project folder for all project notes.
If you have a project that has been corrupted and no longer opens in Scrivener, you can use this feature to retrieve whatever remains of the file. Text, Synopses, notes, and snapshots will be imported, but not the original structure.
![]() Import and Split: For regular text files (DOC, RTF, TXT), you can specify the separator at which to divide the file into separate documents in the Binder. See the “Splitting and merging documents” section, later in this chapter, for more on splitting text files.
Import and Split: For regular text files (DOC, RTF, TXT), you can specify the separator at which to divide the file into separate documents in the Binder. See the “Splitting and merging documents” section, later in this chapter, for more on splitting text files.
This option also works when you want to import files from Final Draft. You can choose a separator and format the files with Scrivener’s script formatting.
If you’re trying to import into the Manuscript folder, not all options in the Import submenu are available. For non-text-based files, choose a location outside the Manuscript folder.
When importing, you may get a warning message about how Scrivener will handle the incoming file. If you don’t want to see the message every time you import, you can select the Do Not Show This Warning Again check box.
So that you can see how importing works, I explain how to import a web page. Just follow these steps:
1. Select the Research folder.
2. Choose File⇒Import⇒Web Page.
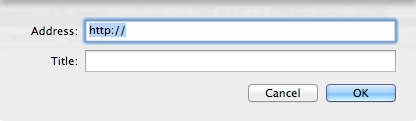
A window appears, as shown in Figure 2-4, prompting you to enter the web address.
3. In the Address box, type the address of the web page (its URL).
Be sure to include the http://.
You can also very easily copy the URL from the address bar of your Internet browser and paste it in this text box.
4. Type a title in the Title text box.
5. Click OK.
The imported page shows up in the Research folder with a web icon next to it. It may take a minute or two to import the page.
Figure 2-4: Import a web page into Scrivener.
If you have trouble getting a website to import, try opening the page in your browser first, and then follow the steps in the preceding list.
When you import, all ties to the original file or website are severed, so even if the original web page is updated, your imported page isn’t.
Another way to import a file is to simply drag it from Finder (or Windows Explorer) into the Binder. And if you have another Scrivener project open, you can drag items from one to the other.
You can also import directly from the Binder by right-clicking to open the contextual menu and then selecting Add⇒Existing Files or Add⇒Existing Web Page.
..................Content has been hidden....................
You can't read the all page of ebook, please click here login for view all page.