
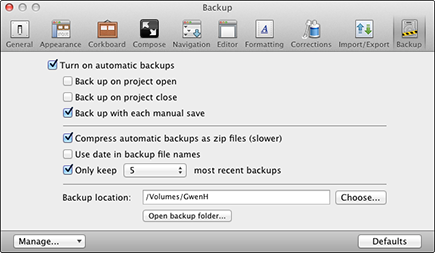
Figure 21-1: Automatic backup options.
Setting Up Automatic Backup Preferences
Scrivener is set up to save your project to your hard drive two seconds after user activity stops. So, every time you stop typing or working with a menu, Scrivener saves the project. It also automatically backs up each project to your hard drive upon closing, maintaining five versions. Although you’re unlikely to lose any work if your power goes out or you encounter a fatal error, you could very well lose your work if the hard drive starts smoking and the data can’t be recovered.
Never fear, automatic backup is here. Before I get into how to set it up, keep the following in mind:
![]() You can choose only one location for all Scrivener file backups. If you’re like me and you keep your projects organized into nice hierarchical folders, it might annoy you that your backups can’t be organized in a similar way. Just remember that all backups are in the same place, and you’ll be fine.
You can choose only one location for all Scrivener file backups. If you’re like me and you keep your projects organized into nice hierarchical folders, it might annoy you that your backups can’t be organized in a similar way. Just remember that all backups are in the same place, and you’ll be fine.
![]() If you want to backup your project to more than one location — which I highly recommend anyway — you have to find a way to schedule one of the backups to run on its own or remember to do it manually. This is where the companies that provide backup software come in handy. You can include your Scrivener files in the list of those to backup offsite automatically, then use the Scrivener backup feature for your local drive. Or backup automatically to a file-drop site and perform a manual flash-drive backup.
If you want to backup your project to more than one location — which I highly recommend anyway — you have to find a way to schedule one of the backups to run on its own or remember to do it manually. This is where the companies that provide backup software come in handy. You can include your Scrivener files in the list of those to backup offsite automatically, then use the Scrivener backup feature for your local drive. Or backup automatically to a file-drop site and perform a manual flash-drive backup.
![]() Automatic backup settings apply to all projects. This not only includes the location, but all the other settings, as well. You may override this behavior by excluding a project from automatic backup, if desired. See the following section for more information.
Automatic backup settings apply to all projects. This not only includes the location, but all the other settings, as well. You may override this behavior by excluding a project from automatic backup, if desired. See the following section for more information.
![]() The drive you plan to use must be visible as a folder when you set up and perform backups. If you’re using a flash drive, external drive, or online file-drop service, make sure it’s connected before setting up the backup preferences.
The drive you plan to use must be visible as a folder when you set up and perform backups. If you’re using a flash drive, external drive, or online file-drop service, make sure it’s connected before setting up the backup preferences.
Follow these steps to set up the backup preferences:
1. Choose Scrivener⇒Preferences.
For Windows users, choose Tools⇒Options.
The Preferences window appears.
2. Select the Backup tab.
The Backup Options window appears, as shown in Figure 21-1. The options may be initially grayed out (which shows they’re unavailable) until you complete Step 3.
3. If it’s not already, select Turn on Automatic Backups.
The Backup options become active.
4. Select the desired backup trigger.
These options aren’t mutually exclusive; you can choose more than one:
• Back Up on Project Open: Saves a backup when you open the project to ensure that you have one before you start making changes. If you had several projects open when you last closed Scrivener, it may take a few minutes to start up because it saves a backup for each file while it opens.
 I don’t recommend using this option by itself because if you close your project down at night and something happens before you open it the next morning, you lose a whole day’s work.
• Back Up on Project Close: Choosing this option saves a backup when you close the project, regardless of whether you close the project individually or quit Scrivener.
If you have several projects open in Scrivener and then close Scrivener with this option set, it may take a while to actually shut down because it has to perform backups for each file first.
This option is best if you close your project after each writing session or each day.
• Back Up with Each Manual Save: This choice creates a backup every time you choose File⇒Save or its shortcut (⌘+S [Mac] or Ctrl+S [Windows]).
I love this option because I can force a backup just by saving my file, so I don’t have to wait all day if I’ve made a lot of changes. This option also works well for me because I tend to not close my projects or Scrivener for days at a time.
The downside is that this option requires you to initiate the backup, so it’s good to use it in conjunction with one of the other choices, just to be safe. It can also slow you down if you manually save your project frequently out of habit, especially if the project file is large.
 If you want to be able to create a backup on command but don’t want it to happen every time you manually save your project, you can use the Back Up Now option covered in the “Forcing a Manual Backup” section, later in this chapter.
5. Select Compress Automatic Backups as Zip Files.
This option does slow down the backup process, but it creates smaller files that are less likely to become corrupted. Zipped files work much better for Internet transfer, so if you’re using a file-drop service or online storage, definitely choose to zip the files.
6. If desired, select Use Date in Backup File Names.
This option inserts the date right into the name of the backed up file.
7. Specify how many versions you want to keep before deleting.
The default is five. Too many versions will fill up your storage device, but sometimes it’s good to be able to go back to an earlier version. Think about how often your file gets backed up and how many versions you want to be able to access.
I recommend keeping at least two versions so that you can go back to a previous version, if necessary, but anything more than five backups starts to eat up space on your backup drive.
8. Next to the Backup Location text box, click Choose.
A file window appears.
9. Select the location where you want Scrivener to store your backup files.
If you get an error message that the backup volume isn’t available, go into your file system (Finder or Windows Explorer) and make sure it’s connected. Sometimes online storage sites get disconnected after you restart your computer, and you have to re-establish the link.
If you’re using a flash drive and it doesn’t show, it may have been ejected without being removed from the computer. Try removing it and plugging it in again. For an external drive, ensure that it’s plugged in and turned on.
10. Click the red X button to close the Preferences window.
On a Windows PC, click OK.
..................Content has been hidden....................
You can't read the all page of ebook, please click here login for view all page.