
Figure 1-2: The Project Templates window.
Creating a Project
Scrivener files are called projects. A Scrivener project is a collection of documents, some of which contain the text of your manuscript; others hold reference materials, photos, notes, and so on. Think of a project like a virtual three-ring binder: You can break up your writing into multiple documents, as well as include supporting notes, documentation, images, and website content, all under the umbrella of a single project file.
In order to get started in Scrivener, you must first create a project, in part because the program saves while you write (two seconds after every pause, by default!). To save your work automatically, it must already know the name of the file and where the file is stored on your computer.
If you’ve never used Scrivener before, or you closed all open projects last time you used it, Scrivener brings up the Project Templates window when you open it. You can also open the Project Templates window by choosing File⇒New Project.
Choosing the right template
A template is kind of like a new house purchased from a builder. You and your neighbor might buy the same model, but then you add your own paint colors, window dressing, flooring, fixtures, and landscaping. The neighbors might prefer antique furnishings, but your house is full of glass and steel. They might choose white siding, where you choose brick. They have garden gnomes, and you have a gazing ball. They . . . well, you get the idea.
Same template, different results.
The same is true in Scrivener. Each project template gives you a starting point from which to customize the project for your needs so that you don’t have to start from scratch. In fact, in Part V of this book, you can find out how to create and save your own templates for use with future projects.
The Project Templates window is organized into tabs for each template type, as shown in Figure 1-2.
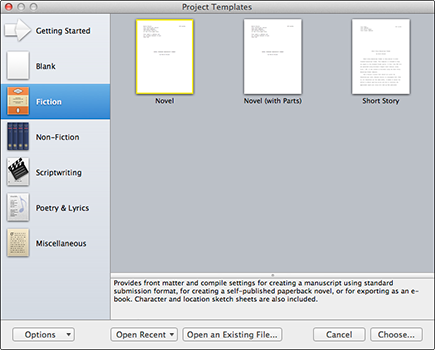
Click a tab to see the templates associated with that type. A pane at the bottom of the Project Templates window displays a short description of any template when you select it. Choose the template that most closely matches the type of project you’re working on. Then, you can mold that template to meet your needs, with the help of this book.
For the examples in this book, I use a project based on the Novel template. For those working in non-fiction, the General Non-Fiction template provides a close match to the figures in this book.
Naming your project
After you select a template, click the Choose button. Scrivener opens the Save As window and prompts you to enter a filename. (Windows users: The Save As section is in the New Project window. Select a filename, click Browse to choose a location, and then click Create.)
Consider these facts when naming your file:
![]() Scrivener uses the filename as the project name. If you select certain templates, the project name is automatically inserted into the title page and into the header when you export the project (to print the manuscript, convert it to an e-book, and so on). However, you can change the project name manually or rename the project file at a later time.
Scrivener uses the filename as the project name. If you select certain templates, the project name is automatically inserted into the title page and into the header when you export the project (to print the manuscript, convert it to an e-book, and so on). However, you can change the project name manually or rename the project file at a later time.
![]() Be sure to give the project a name that you can easily find again later. If your manuscript is a novel about a man who shape-shifts into a rabbit when he visits the planet Lotharia, you might not want to call it Project1. The working title doesn’t need to be perfect, just something that makes the file easy to locate after you let it sit for a year to work on that zombie private-investigator mash-up that was nagging at you.
Be sure to give the project a name that you can easily find again later. If your manuscript is a novel about a man who shape-shifts into a rabbit when he visits the planet Lotharia, you might not want to call it Project1. The working title doesn’t need to be perfect, just something that makes the file easy to locate after you let it sit for a year to work on that zombie private-investigator mash-up that was nagging at you.
Determining where to save your project
After you figure out the project’s name — at least, for now — you need to determine where to save your project. Because I’m excruciatingly organized — well, on my computer, anyway — I have a writing folder that contains subfolders for each major project.
Of course, the Documents folder may serve your needs just as well.
If your Save As window shows only the Save As text box and the Where drop-down list, don’t fret. You can access more locations simply by clicking the Expansion button (which displays an arrow pointing down if the window isn’t expanded) to the right of the Save As text box. Figure 1-3 shows the Expansion button after the window expands (with the arrow now pointing up). Windows users, click the Browse button in the New Project window to choose a location.
Figure 1-3: Clicking the Expansion button provides more options for locations to save your file.

Now, simply select a location by clicking the desired folder in the list on the left. If needed, choose subsequent subfolders until you reach your destination folder. Then click Create.
..................Content has been hidden....................
You can't read the all page of ebook, please click here login for view all page.