
Figure 3-2: A synopsis created by the Auto-Generate Synopsis button, with no text selected in the Editor.
Populating the Synopsis
Two parts of the Synopsis are editable:
![]() Title: The Synopsis title is the same as the item’s title in the Binder. If you rename an item, the title is updated in both places.
Title: The Synopsis title is the same as the item’s title in the Binder. If you rename an item, the title is updated in both places.
![]() Text: Below the title is the text area, where you enter whatever text you want to appear in the Synopsis.
Text: Below the title is the text area, where you enter whatever text you want to appear in the Synopsis.
In addition to text, the Synopsis can also hold an image.
Renaming an item
Just as you can rename items from the Binder (demonstrated in Chapter 2), you can also rename them from the Synopsis pane. Follow these quick and easy steps:
1. Select the title in the Synopsis pane.
2. Type the new item name.
3. Press Return.
The new name of the item appears in the Synopsis, the header of the Editor, and in the Binder.
Adding text
The main value of the Synopsis lies in the text you enter into it — especially if you plan to use the Corkboard feature, covered in Chapter 8, or the Outliner, addressed in Chapter 9. You can add text in several ways.
Manually adding text
If you have a very specific idea of what you want in the Synopsis, it’s best to add it yourself. For example, I like to use the Synopsis to track the POV character’s scene goal, the conflict that’s blocking him, and the outcome of the scene.
To add your own text to the Synopsis, follow these steps:
1. Click in the text area of the Synopsis, below the title.
Your cursor appears in the text area. If the Synopsis already contains text, you can either delete and replace it, or click at the end of the existing text to add to it.
2. Type the desired text.
 You can add, insert, delete, and select text in this area; however, the Synopsis section doesn’t support text formatting, such as italics, bold, or highlighting.
Auto-generating the synopsis
If you want just a few lines of text in the Synopsis to remind you of what the document is about when you’re in the Corkboard or Outliner, you can let Scrivener automatically populate the Synopsis for you.
 The Auto-Generate option overwrites any existing Synopsis text, so be sure you don’t want to save anything that already appears there.
The Synopsis section has an auto-fill feature that gives you one of two choices:
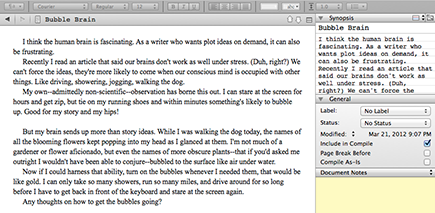
![]() If no text is selected in the Editor and you click the Auto-Generate Synopsis button (as shown in Figure 3-1), Scrivener overwrites whatever currently appears in the card with the first few lines of the document, as shown in Figure 3-2.
If no text is selected in the Editor and you click the Auto-Generate Synopsis button (as shown in Figure 3-1), Scrivener overwrites whatever currently appears in the card with the first few lines of the document, as shown in Figure 3-2.
![]() If you select lines of text from your document in the Editor before you click the Auto-Generate Synopsis button, Scrivener fills the card with the selected lines when you click the button.
If you select lines of text from your document in the Editor before you click the Auto-Generate Synopsis button, Scrivener fills the card with the selected lines when you click the button.
Adding an image
In the Synopsis section, you can add a graphical synopsis of the document. You know how “a picture is worth a thousand words”? Well, if you have a photo that perfectly represents what that document is about, then no typing is necessary.
Does the car blow up? Do the lovers kiss? If you like to storyboard in visual mode, this feature is for you. You can use an image rather than text or as a supplement to the text.
A photographic synopsis can also help you reference a photo while writing a visual description. You could even add a character photo based on whose POV the scene is in. Again, it’s up to you.
Follow these steps to add a photo to the Synopsis:
1. Click the Text/Image toggle button (refer to Figure 3-1).
2. Select the Image icon from the small menu that pops up.
The synopsis text area turns black and displays the message Drag in an Image File.
3. Drag the desired image from the Binder and drop it onto the black space in the Synopsis pane.
Alternatively, you can drag an image from Finder (on the Mac) or Windows Explorer (in Windows).
A small version of the photo appears in the black space, as shown in Figure 3-3.
Click the Text/Image toggle button (refer to Figure 3-1) to switch between viewing the image and the text in the Synopsis pane. This button affects the Synopsis view in the Inspector and the Corkboard, as well.
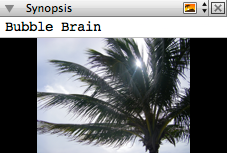
Figure 3-3: A photographic synopsis.
Deleting an image
To remove an image from the Synopsis, follow these steps:
1. If the image doesn’t appear in the Synopsis pane, click the Text/Image toggle button (see Figure 3-1) to display it.
2. Click the Clear Picture button in the upper-right corner of the pane.
The image disappears, and the Synopsis changes back to a black space, as it appeared before you originally added the image.
3. (Optional) To view the text rather than the black space, click the Text/Image toggle button.
..................Content has been hidden....................
You can't read the all page of ebook, please click here login for view all page.