
Figure 4-2: The Meta-Data Settings window.
Working with the Label and Status Fields
The Label and Status fields are the treasure in the General section. You can customize them to suit your needs by changing their names and their values. For the Label values, you can even change the colors.
Not only that, but other than the item’s title, the Label and Status fields are the most visible pieces of metadata in your project.
 The Label field is the most powerful piece of metadata because you can apply its associated color to icons in the Binder, index cards in the Corkboard (see Chapter 8), and Outliner rows (covered in Chapter 9). So save it for something that you want to be able to discern at a quick glance — for example, character point of view.
The Status field can appear in the Corkboard as a stamp — similar to a watermark — across the index cards, but you can’t use it for color-based identification. It’s also available as a column in the Outliner.
Both the Label and Status fields also show up at the top of every QuickReference pane.
Two parts of the Label and Status fields are customizable: the name of the field itself and the set of values available in the Label and Status drop-down lists.
Why would you want to customize Label and Status? Great question. Here are just a few of the ways you might want to use them:
![]() Point of view (POV): If you limit each scene/chapter to one POV, you can use the Label field to color-code your scenes by POV.
Point of view (POV): If you limit each scene/chapter to one POV, you can use the Label field to color-code your scenes by POV.
![]() Location: Specify the setting of the scene, or the blog or journal for which a piece was written.
Location: Specify the setting of the scene, or the blog or journal for which a piece was written.
![]() Day: Use Mon-1 for Monday of week 1, Tue-1 for Tuesday of that week, and so on, so that you can track your timeline in a story. Instructors writing lessons in Scrivener might use Day to keep track of when a lecture will be posted.
Day: Use Mon-1 for Monday of week 1, Tue-1 for Tuesday of that week, and so on, so that you can track your timeline in a story. Instructors writing lessons in Scrivener might use Day to keep track of when a lecture will be posted.
![]() Species: Say what? Well, I know this paranormal author who writes about shape-shifters and uses Species to keep track of the animal that the character can shift into. This option could also work for science fiction and fantasy writers who have aliens or otherworldly races to keep straight.
Species: Say what? Well, I know this paranormal author who writes about shape-shifters and uses Species to keep track of the animal that the character can shift into. This option could also work for science fiction and fantasy writers who have aliens or otherworldly races to keep straight.
![]() Storyline: If you have a complicated plot with several story lines to keep track of, the Label field makes it a cinch.
Storyline: If you have a complicated plot with several story lines to keep track of, the Label field makes it a cinch.
![]() Author: If you’re co-writing a book or academic paper with other authors, you can track which chapters or documents each person is working on.
Author: If you’re co-writing a book or academic paper with other authors, you can track which chapters or documents each person is working on.
![]() Purpose: Group scenes by their purpose (to advance the plot, expand on a character, and so on).
Purpose: Group scenes by their purpose (to advance the plot, expand on a character, and so on).
You’re limited only by your imagination and one important constraint: You can assign only one Label value and one Status value to each Binder item. For example, if Bob, Fabiana, and Nigel all get a viewpoint in the same document, POV isn’t a good field choice because you can’t assign multiple values to the document.
Never fear — if you want to apply multiple values, you can use keywords, which you get to play with in Chapter 5.
Changing the field name
The procedure for changing a field’s name is the same for both the Label and Status fields:
1. In the General section, click to open the Label (or Status) drop-down list and select Edit.
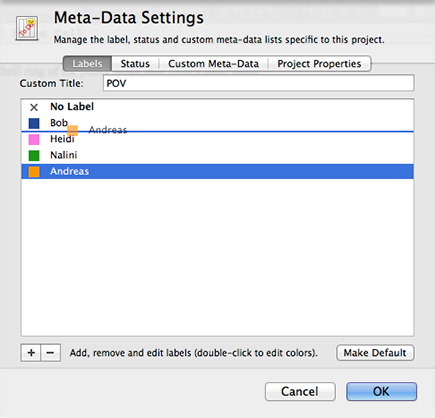
The Meta-Data Settings window opens, as shown in Figure 4-2.
You can also access the Meta-Data Settings window by choosing Project⇒Meta-Data Settings.
2. Select Label (or Status) in the Custom Title text box, and then type the desired field name.
3. Click OK to close the window.
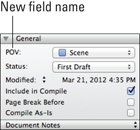
Your new field name replaces the Label (or Status) field in the General pane of the Inspector, as shown in Figure 4-3, where the Label field is renamed POV.
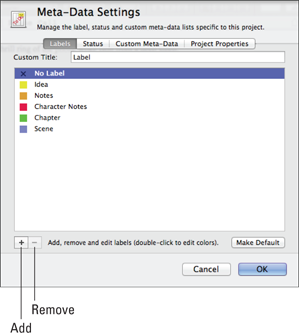
Figure 4-3: The Label field renamed to POV.
Deleting existing values
Just like Mom always said, it’s what’s on the inside that counts. In the case of the Label and Status fields, that’s the values in the drop-down lists. Even if you choose to keep the Label and Status fields as-is, you might not want all the values to appear in the lists.
One of your co-authors could back out of the project, your characters might never actually take that trip to Iceland you initially planned, or your editor could force you to leave Nina on the cutting room floor (metaphorically speaking, of course).
Anytime you want to eliminate a value from the list, just follow these steps:
1. Click to open the Label (or Status) drop-down list and select Edit.
The Meta-Data Settings window opens.
2. Select the value you want to delete.
To save time, use multiple-selection to choose all the values you want to remove from the list. Shift-click to select contiguous files, ⌘-click (or Ctrl-click in Windows) for noncontiguous files.
3. Click the Remove button at the bottom-left of the window (refer to Figure 4-2).
The selected value — or values — is removed from the list.
4. Click OK to close the window.
If you delete a value that was assigned to an item in your Binder, that item reverts to the default value. You can assign a new value to it by using the procedures outlined in the section “Assigning Label and Status Values,” later in this chapter.
You can’t delete the No Label and No Status values. However, you can rename them, as demonstrated in the “Editing existing values” section, later in this chapter.
Adding new values
Just as you can remove values, you can add new ones, as needed. You know, when Mindy strolls onstage unexpectedly and demands a role, your characters hop a plane to Morocco without telling you in advance, or you meet a new author who’s a perfect fit for the book on kindergarten classroom politics you and a friend are writing.
Follow these steps to add a value to the Label (or Status) drop-down list:
1. Click to open the Label (or Status) drop-down list and select Edit.
The Meta-Data Settings window opens.
2. Click the Add button (refer to Figure 4-2) at the bottom-left of the Meta-Data Settings window.
 A colored square appears next to a blank text box if you’re working with Label values. When you add new Status values, no colored square appears.
3. Type the desired name of the new value.
4. Click OK to close the window.
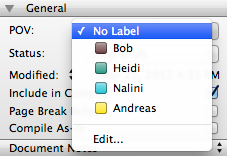
Figure 4-4 shows the Label field changed to POV, with a new list of values.
Figure 4-4: A modified Label field name and values.
Editing existing values
At some point during your writing, you’re going to change your mind about the values you chose. Well, maybe not — because writers never change their minds, right?
But just in case Bob gets renamed to Peter, your Regency-London historical relocates to India, or your editor declares that your family of shape-shifting wolves must now be panthers — who knew wolves were on the not-so-hot list? — follow these steps to edit existing list values:
1. Click to open the Label (or Status) drop-down list and select Edit.
The Meta-Data Settings window opens.
2. In the list, double-click the value that you want to change.
Be sure to choose the text, not the colored square, if you’re editing a Label value. If you accidentally double-click the colored square, just close the Colors window that appears and try again.
3. Type the new value.
4. Click OK to close the window.
Changing value colors
The Label and Status fields differ when it comes to value colors. Unlike in Status, which doesn’t use value colors, each Label field value has a color associated with it by default. If you don’t like the auto-assigned colors, you can change them by following these steps:
1. Click to open the Label drop-down list and select Edit.
The Meta-Data Settings window opens.
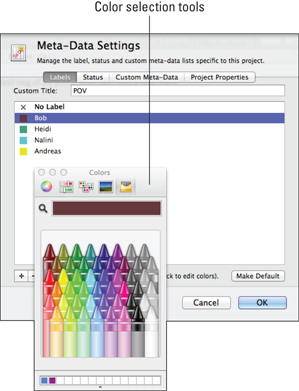
2. Double-click the colored square next to the value you want to change.
The Colors window appears, as shown in Figure 4-5.
3. Mac users, click the button at the top of the window to open the color selection tool that you want to use.
You can choose from the color wheel, color sliders, color palettes, image palettes, or crayons. I’m partial to crayons, myself.
4. Choose a new color by clicking on it.
The colored square changes to the selected color.
5. Click the red X button (Mac) to close the Colors window.
Windows users, click OK.
6. Click OK to close the Meta-Data Settings window.
Figure 4-5: Crayon choices in the color window.
Rearranging the list of values
If you use some values more often than others, you can rearrange the list for quicker selection. Just follow these steps:
1. Click to open the Label (or Status) drop-down list and select Edit.
The Meta-Data Settings window opens.
2. Click and drag the list item to the desired spot.
The blue line shows where the value will end up when you drop it (see Figure 4-6).
3. After you have your list arranged the way you want it, click OK to close the window.
Figure 4-6: You can move list values.
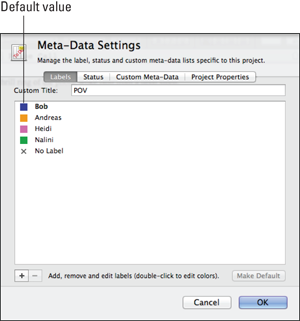
Setting a default value
The default values for the Label and Status fields appear in bold text for easy identification. Initially, the default value for the Label field is No Label. Unless you change it, every time you create a new item in your project, the Label value is automatically set to No Label. The default value for Status is No Status.
But suppose you change Label to POV, and you expect your studly hero Bob to have the most scenes. Then you can make Bob the default value. After he’s the default, even if Bob and his curvy love interest, Fabiana, have an equal number of scenes, you need to change the value of a new scene only 50 percent of the time, rather than every time.
Hey, I’m all about efficiency. Follow these steps to increase your own by changing the default value for the Label (or Status) field:
1. Click to open the Label (or Status) drop-down list and select Edit.
The Meta-Data Settings window opens.
2. Select the value that you want to set as the default.
3. Click the Make Default button at the bottom-right of the window.
The value turns bold, as you can see in Figure 4-7. (I do like a bold hero.)
4. Click OK to accept the change and close the window.
Figure 4-7: Bob as the default POV value.
..................Content has been hidden....................
You can't read the all page of ebook, please click here login for view all page.