
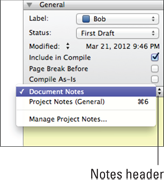
Figure 5-2: Click the Notes header to toggle between project and document notes.
Taking Notes
The Notes section is a place to jot down thoughts, ideas, items you want to reference quickly, or anything else you can imagine. Think of it like the notepad on your desk where you scribble random items to deal with later so that you don’t have to get out of the writing flow.
You can add, insert, delete, and select text in this area and — unlike the Synopsis pane — even format the text by using the Format bar (see Chapter 6 for more on the Format bar).
Comparing project and document notes
The Inspector offers two types of notes:
![]() Project notes: Apply to the entire project and are visible regardless of which item is selected in the Editor, Corkboard, or Outliner.
Project notes: Apply to the entire project and are visible regardless of which item is selected in the Editor, Corkboard, or Outliner.
![]() Document notes: Apply only to the document selected in the Editor, Corkboard, or Outliner.
Document notes: Apply only to the document selected in the Editor, Corkboard, or Outliner.
If the Notes section isn’t visible in the Inspector, click the Notes button (refer to Figure 5-1). You can toggle between the two types of notes by clicking the Notes header and selecting from the drop-down list that appears, as shown in Figure 5-2.
Entering notes
The Project Notes pane lets you capture your thoughts on the whole project: from something as simple as Look up reference to man-eating sharks, to a list of each character’s name and occupation, to ideas for plot changes.
In the Document Notes pane, you can record information that applies to one specific file, such as ideas for revisions, red herrings, or alternate endings.
Whatever you use them for, follow these steps to add notes:
1. Click the Notes header, and then select either Project Notes (General) or Document Notes from the drop-down list that appears, depending on the kind of notes you want to add.
If you select Project Notes (General), the header changes to Project Notes (General). If you select Document Notes, the header changes to Document Notes.
2. Click in the text area and type.
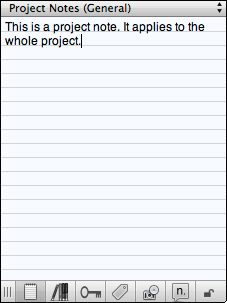
That’s it! Figure 5-3 shows an example of a project note.
Figure 5-3: Project notes are visible regardless of which item has the focus.
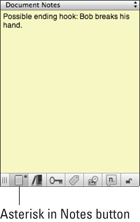
 If you add a document note to an item, an asterisk appears in the Notes button at the bottom of the Inspector (refer to Figure 5-4). The asterisk denotes that the document you’re viewing (or have selected in the Corkboard or Outliner) has a document note associated with it, so you can tell even when the Notes pane isn’t displayed in the Inspector.
Figure 5-4: The asterisk lets you know that a document has associated document notes.
Modifying notes
If you want to change or remove a project or document note, make sure the Notes pane you want to modify is visible in the Inspector. (See the preceding section for more.)
You can modify notes just like text in the Editor. Simply click in the text section of the note that you want to modify to make it editable. Now, you can delete text, insert your cursor to add text, or format text by using the Format bar’s buttons (Chapter 6 has the scoop on the Format bar).
Adding an image to notes
Not only can you add text to your notes, but you can insert an image. Why would you want to do that? Well, maybe you want to have a quick, easy reference to a photo of your character or setting. Or maybe you just want a soothing image of a waterfall to keep you happy while you type.
Either way, this ability is handy if your Synopsis image pane (covered in Chapter 3) is occupied with a visual synopsis but you want to refer to another photo.
Follow these steps to add an image to a note:
1. Make sure the Notes pane to which you want to add the image is visible in the Inspector.
You can work with either document or project notes. See the “Entering notes” section, earlier in this chapter, for more.
2. Drag the photo from the Binder and drop it in the Notes pane.
Alternatively, you can drag the photo from Finder (or Windows Explorer on a PC).
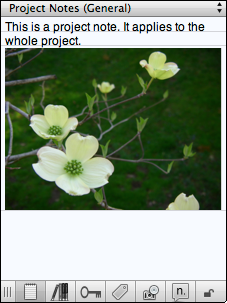
The image lands wherever you dropped it, as shown in Figure 5-5. It can be inserted above or below existing notes text.
If you need to delete a photo from a note, just click in the Notes pane to insert the cursor after the photo, and then press the Delete key (the Backspace key in Windows).
Figure 5-5: You can add an image to either the project or document Notes pane.
Managing project notes
Find yourself running out of room, but want to add more project notes? Or maybe you wish the project Notes pane was larger and easier to move around in. No worries.
You can create additional project notes, and easily edit them, by following these steps:
1. Click the Notes button in the Inspector to view the Notes pane.
2. Click the Notes header and select Manage Project Notes from the drop-down list that appears.
A small window that looks like a notepad appears.
3. If desired, drag the edges of the window to resize it.
4. Click the plus sign (+) button.
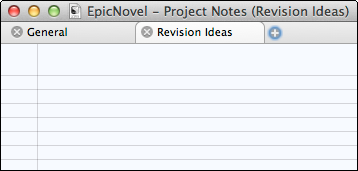
5. Enter the desired title of the new notepad in the Notepad tab.
A new tab appears with the title you provided, as shown in Figure 5-6.
To move between the notepads, click the tab of the notes that you want to work in. From the Project Notes window, you can edit, format, delete, or add text and images, just like in the Notes pane.
You can rename any project notepad — even Project Notes (General) — by double-clicking the tab to get a Note Title text box and entering the new name.
After closing the Project Notes window, you can navigate between notepads by clicking the Notes header and choosing the desired notepad from the drop-down list that appears.
Figure 5-6: Work with project notepads in the Project Notes window.
..................Content has been hidden....................
You can't read the all page of ebook, please click here login for view all page.