
Figure 5-12: The Keywords pane in the Inspector.
Assigning Keywords
Keywords allow you to add attributes to an item in your project. Keywords that have been applied to an item are visible from the Keywords pane, shown in Figure 5-12.
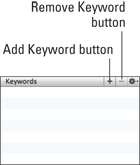
 If the Keywords pane isn’t visible, click the Keywords button at the bottom of the Inspector.
Comparing keywords to other metadata
The drawback of keywords is that you can’t use them to color code the Binder or apply watermarks to the index cards like you can with the Label and Status metadata fields (see Chapter 4 for more on metadata).
However, keywords have their own strengths:
![]() You can view keywords as color tabs on index cards in the Corkboard or as words underlined by color in the Outliner.
You can view keywords as color tabs on index cards in the Corkboard or as words underlined by color in the Outliner.
![]() You can apply more than one keyword to an item.
You can apply more than one keyword to an item.
![]() Just like with metadata, you can track point of view (POV), setting, part, characters present in a scene, the purpose of the scene, which subplot it belongs to, and more. Again, you’re only limited by your own imagination and needs. And best of all, you can have keywords for all those categories, if you want.
Just like with metadata, you can track point of view (POV), setting, part, characters present in a scene, the purpose of the scene, which subplot it belongs to, and more. Again, you’re only limited by your own imagination and needs. And best of all, you can have keywords for all those categories, if you want.
Adding a keyword to an item
When you add a keyword to a document, it automatically becomes available for use within the whole project.
The keywords you create apply to your whole project but aren’t available to other projects unless you save them into a custom project template (which you can read all about in Chapter 15).
To add a new keyword to both the selected item and the project, follow these steps:
1. In the Binder, Corkboard, or Outliner, select the document for which you want to create a keyword.
3. Click the Add Keyword button in the Keywords header (refer to Figure 5-12).
A blank text box appears in the Keywords pane.
4. Type the desired name of the keyword, and then press Return.
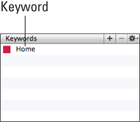
The new keyword appears with a Color box next to it, as shown in Figure 5-13. The color is now associated with that keyword and shows up on index cards when you view them in the Corkboard, if keyword colors are turned on (see Chapter 8 for more on the Corkboard).
The asterisk in the Keywords button denotes that a keyword is applied to the current item.
After you have at least one keyword in the Keywords pane, you can select any keyword and press Return to add a new one. This shortcut gives you a quick way to add several keywords quickly.
Figure 5-13: A keyword applied to the current item.
Applying an existing keyword to a file
When you add a keyword to an item, you also add it to the project as a whole for use with other items. After the keyword you want to use already exists, you only need to apply it to the desired item. Just follow these steps:
1. Select the item to which you want to add a keyword in the Binder, Corkboard, or Outliner.
2. In the Keywords header, click the gear button.
When you click the button, a pop-up menu appears.
3. Choose Add Keyword, and then select the desired keyword from the list that appears.
The selected keyword appears in the Keywords pane.
Removing a keyword from an item
What happens when you’re in revisions and you decide to kill off the hero’s girlfriend a couple of scenes early? To avoid confusion, you want to remove her keyword from scenes in which she no longer appears.
You can easily remove a keyword from an item without deleting it from the project by following these steps:
1. Select the desired item in the Binder, Corkboard, or Outliner.
2. In the Keywords pane, select the keyword(s) that you want to remove.
3. Click the Remove Keyword button in the Keywords header (refer to Figure 5-12).
Or you can just press the Delete key.
 Removing a keyword this way affects only the selected document, not the whole project.
..................Content has been hidden....................
You can't read the all page of ebook, please click here login for view all page.