
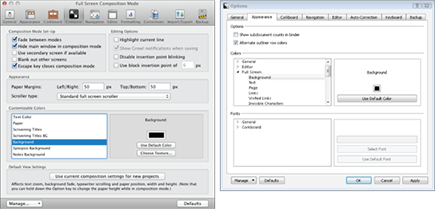
Figure 7-2: Changing the background color on a Mac (left) and in Windows (right).
Personalizing the Composition Mode Experience
Black not your color? Maybe you read about how a blue background is best for creativity and red is best for tasks such as editing. Or maybe you want a tranquil mountain scene to set the mood.
In Composition mode, you can change more than the background color; you can modify the paper color, paper width, and more. The following sections lay it all out for you.
Using the menu bar and control strip
While in Composition mode, you still have access to the menu bar (in the Mac version only), as well as another menu called the control strip, which provides options to adjust the view.
To access the menu bar, move your mouse to the top edge of the screen and wait for it to appear. Then, you can simply click the desired menu item. (Windows users don’t have access to the menu, but keyboard shortcuts still work from within Full Screen mode.)
To view the control strip, point your mouse to the bottom of the screen. The control strip pops up, as shown in Figure 7-1.
Adjusting Composition mode settings
The control strip at the bottom of the screen allows you to modify some of the settings without leaving Composition mode. It also provides access to the Inspector and Keywords panels, as well as some navigation options.
 Options that you adjust in the control strip apply only to the current project settings, not to other existing projects or any new projects you might create.
The following options are available from the control strip:
![]() Text Scale: Adjust the size of the text (not the font size, just its appearance).
Text Scale: Adjust the size of the text (not the font size, just its appearance).
This option applies only while the document is in Composition mode; it doesn’t change your settings in the standard Editor.
![]() Paper Position: Place the paper on the left, center, or right side of the screen.
Paper Position: Place the paper on the left, center, or right side of the screen.
![]() Paper Width: Use the slider to make the paper wider or narrower.
Paper Width: Use the slider to make the paper wider or narrower.
To adjust the paper height, hold the Option key (the Alt key in Windows) to change the Paper Width slider to a Paper Height slider.
![]() Keywords: Displays the Keywords panel (I cover keywords in detail in Chapter 5).
Keywords: Displays the Keywords panel (I cover keywords in detail in Chapter 5).
![]() Inspector: Displays the Inspector panel, which I talk about in the “Viewing the Inspector Panel” section, later in this chapter.
Inspector: Displays the Inspector panel, which I talk about in the “Viewing the Inspector Panel” section, later in this chapter.
![]() Go To: From this menu, you can choose a different item to view without leaving Composition mode.
Go To: From this menu, you can choose a different item to view without leaving Composition mode.
![]() Words/Chars: Displays the word and character count for the document or for a selection of text.
Words/Chars: Displays the word and character count for the document or for a selection of text.
![]() Background Fade: Use the slider to adjust the level of background color transparency.
Background Fade: Use the slider to adjust the level of background color transparency.
![]() Exit Full Screen Mode: This button exits Composition mode and returns to the standard Scrivener interface.
Exit Full Screen Mode: This button exits Composition mode and returns to the standard Scrivener interface.
Changing Composition mode settings for all projects
In addition to project-specific changes (which I discuss in the preceding section), you can modify the Composition mode settings for all projects from within the Preferences window’s Compose tab (or the Options window’s Appearance tab in Windows).
Below are some of the key Composition mode settings that you can modify:
![]() Hide Main Window in Composition Mode: The Scrivener program window doesn’t show through the background when your background is translucent. Instead, you see the other open windows on your desktop.
Hide Main Window in Composition Mode: The Scrivener program window doesn’t show through the background when your background is translucent. Instead, you see the other open windows on your desktop.
![]() Highlight Current Line: Highlights the line where your cursor is. This setting can be especially handy when you’re editing because the typewriter-scrolling default always moves the line you’re editing to the center of the window. The highlighting helps your eye follow the cursor’s jump from wherever you started typing back to the center of the screen.
Highlight Current Line: Highlights the line where your cursor is. This setting can be especially handy when you’re editing because the typewriter-scrolling default always moves the line you’re editing to the center of the window. The highlighting helps your eye follow the cursor’s jump from wherever you started typing back to the center of the screen.
![]() Scroller Type: Adjust the characteristics of the scroll bar on the right side of the Composition mode Editor so that it’s either visible, auto-hidden unless pointed to, or never shown.
Scroller Type: Adjust the characteristics of the scroll bar on the right side of the Composition mode Editor so that it’s either visible, auto-hidden unless pointed to, or never shown.
![]() Customizable Colors: Wanna recreate the old DOS terminal look with black screen and green text? Hey, it’s your computer. Here’s where you can change the colors of every element in Composition mode. You can find out more about customizing colors in the following sections. (This option appears as Colors in Windows.)
Customizable Colors: Wanna recreate the old DOS terminal look with black screen and green text? Hey, it’s your computer. Here’s where you can change the colors of every element in Composition mode. You can find out more about customizing colors in the following sections. (This option appears as Colors in Windows.)
 Changing colors in the Compose tab (or the Appearance tab, Full Screen section in Windows) applies only to Composition mode.
![]() Default Settings for New Projects: Choose to use current Composition mode settings (those that can be adjusted via the control strip) for all projects that you create in the future.
Default Settings for New Projects: Choose to use current Composition mode settings (those that can be adjusted via the control strip) for all projects that you create in the future.
Changing the background color
The background color can be anything you choose. Got a thing for orange? Go for it. Just follow these steps:
1. Choose Scrivener⇒Preferences to open the Preferences window.
Windows users, choose Tools⇒Options to open the Options window.
2. Choose Compose at the top of the window to view the Composition Mode options.
Windows users, click the Appearance tab to view the Appearance options.
3. In the Customizable Colors section of the window, select Background, as shown in Figure 7-2.
In Windows, click Full Screen in the Colors section, as shown in Figure 7-2, and then select Background from the list.
4. Click the Background color box and select your desired color from the Colors window that opens.
5. Click the red X to close the Colors window.
Windows users, click OK to close the window and apply the selected color.
6. Close the Preferences window by clicking the red X.
Windows users, click OK to close the Options window.
When you enter Composition mode, the background color reflects your choice.
Changing the paper color
In addition to the background color, which I talk about in the preceding section, you can also change the color of the paper in Composition mode. If bright white isn’t to your liking, try a hint of gray, blue, yellow, or pink for a more soothing writing experience.
Get your paper color on by following these steps:
1. Choose Scrivener⇒Preferences to open the Preferences window.
Windows users, choose Tools⇒Options to open the Options window.
2. Choose Compose at the top of the window to view the Composition Mode options.
Windows users, click the Appearance tab to view the Appearance options.
3. In the Customizable Colors section, select Paper.
Windows users, click Full Screen in the Colors section, and then select Page.
4. Click the Paper color box, and then choose your desired color from the Colors window that appears.
Ever wish you could return to the glory days of green text on a black screen or some other color combination? You can change the text color in Composition mode by choosing Text, rather than Paper, and selecting Override Text Color With Color. The text color is changed only for Composition mode. The color appears normal when you return to the standard Editor.
5. Close the Colors window by clicking the red X.
Windows users, click OK.
6. Close the Preferences window by clicking the red X.
Windows users, click OK to close the Options window.
Now, when you enter Composition mode, the paper matches your chosen color.
Adding a background image
In addition to colors, you can now add a background image to Composition mode. From an energizing display of colorful hot air balloons to a restful beach scene, as long as the picture is accessible within your project or on one of your computer’s drives, you can use it for your Composition mode background.
The following steps change only the background image for the current project, so you can use a different image for each project you’re working on.
Follow these steps to add or change the background image:
1. Choose View⇒Composition Backdrop⇒Choose.
2. In the window that opens, navigate to and select an image from your files, and then click Open.
The File Selection window closes.
Alternatively, you can choose from the list of images already in your project that appears in the Choose submenu.
When you enter Composition mode after making the changes in the preceding step list, the background displays your selected photo, as shown in Figure 7-3. The image is stretched to fill the screen either vertically or horizontally.
When you use a background image, the Background Fade option in the control strip changes to Paper Fade, allowing you to adjust the transparency of the paper.
..................Content has been hidden....................
You can't read the all page of ebook, please click here login for view all page.