
Figure 9-2: An outline with folder items.
Arranging the Outliner
The first time you use the Outliner, it displays the title and Synopsis for each item in the Binder selection. From there, you can organize and adjust the Outliner to suit your purpose: expand or collapse subfolders, add and move columns, adjust the column width, move items within the Outliner, and sort your list. The following sections explain how to customize your outline.
Expanding and collapsing items
When you choose a high-level container, such as your Manuscript folder, the Outliner displays all top-level items within that container. You can expand subfolders and file groups to show their contents or collapse them to hide those contents.
Figure 9-2 shows the Outliner with the Manuscript folder selected. If the triangle next to each folder points to the right, the folder is collapsed, so its contents are hidden. If the triangle points down, the folder is expanded, meaning its contents are visible.
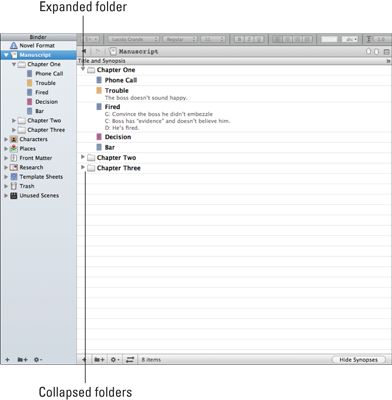
To collapse or expand a folder or subfolder, simply click the triangle.
Note: On Windows XP and older, a plus sign (+) is used for collapsed folders, and a minus sign (–) is used to designate expanded folders.
 Pressing the Option key (Alt on Windows) while expanding an item expands all its subfolders and file groups, too.
Adding and removing columns
All the metadata items you can add in the Inspector — Label, Status, keywords, custom metadata, as well as document and aggregate targets for each container (called Totals) — can be displayed in the Outliner.
Follow these steps to add or remove a column:
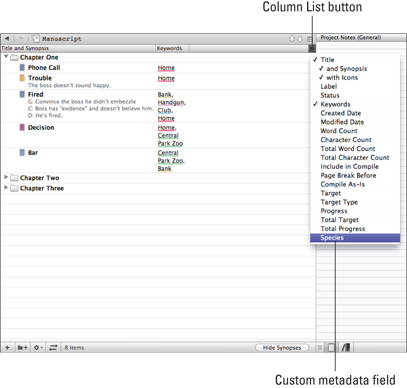
1. Click the Column List button at the right of the field headers, as shown in Figure 9-3.
Alternatively, you can go to View⇒Outliner Columns.
A list of available metadata appears. Items that have a check next to them are currently visible in the Outliner.
The Species field is a custom metadata field I added to my project (as covered in Chapter 5).
2. Select the field you want to add or remove.
If you select a field that doesn’t have a check next to it in the Column list, the new column appears in the Outliner and a check is added.
If you select a checked field, it disappears from the Outliner.
3. To add or remove additional columns, repeat Steps 1 and 2.
Figure 9-3: Adding columns to the Outliner.
Scrivener adds the columns from left to right in the order you choose them, but you can put them in any order you want by dragging and dropping the title bar of the column to the desired location.
Adjusting column width
Is your outline getting a bit crowded? Did your columns run right off the page? No problem. Adjusting the width of the columns is a piece of cake. You have two options:
![]() Manually adjust the column width. Place your cursor on the divider bar to the right of the column title. A two-sided arrow cursor appears. Click and drag to resize.
Manually adjust the column width. Place your cursor on the divider bar to the right of the column title. A two-sided arrow cursor appears. Click and drag to resize.
![]() Let Scrivener auto-fit the column width. Double-click the bar to the right of the column title. The column width resizes to fit the values in that column.
Let Scrivener auto-fit the column width. Double-click the bar to the right of the column title. The column width resizes to fit the values in that column.
Moving items within the Outliner
If you want to change the order of your documents or folders while in the Outliner, you can. Just drag the desired item to its new location and drop it like a hot potato.
The blue target lines and boxes show you where your file will land, just like when moving items in the Binder (see Chapter 2 for more on using the Binder).
 The item order is changed in the Binder, as well.
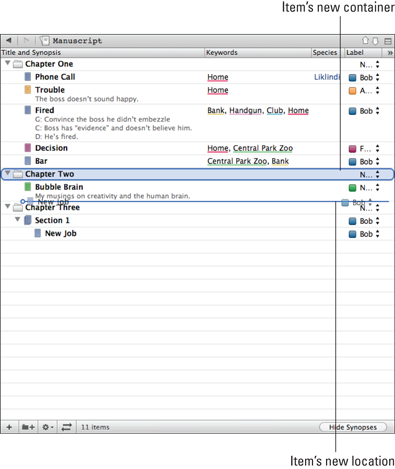
Figure 9-4 shows the New Job file being moved from Chapter Three to Chapter Two. Notice the blue target bar below Bubble Brain, which shows where in Chapter Two the file will be placed. There’s also a blue box around Chapter Two to designate it as the new container for New Job.
Sorting by column
One of the Outliner’s many useful features is the ability to sort by column. Why might you do that? Here are a few reasons off the top of my head:
![]() Sort by Progress, Word Count, or Status: See which documents need the most attention. (I talk more about document targets in Chapter 14.)
Sort by Progress, Word Count, or Status: See which documents need the most attention. (I talk more about document targets in Chapter 14.)
![]() Sort by POV: Group each character’s scenes together.
Sort by POV: Group each character’s scenes together.
![]() Sort by Day or Date: You can use this option if you’ve created a timeline-type field to make sure that your scenes are in the appropriate order.
Sort by Day or Date: You can use this option if you’ve created a timeline-type field to make sure that your scenes are in the appropriate order.
For example, you can create a custom metadata field and enter a date value in a sortable format, such as 2012-06-01. If you have documents that have the same date, add a time to the value by using the 24-hour clock, such as 2012-06-01-1830.
Figure 9-4: Moving a file in the Outliner.
The sort starts over in each container. To sort by all files, use a noncontiguous selection (⌘+click on the Mac, Ctrl+click in Windows) of items when you’re viewing more than one container. Just beware that you can’t move files within an outline that’s based on multiple selection, except to drop one file on another, which turns the dropped-on item into a file group that contains the dropped file.
Sorting by a column doesn’t change the item order in the Binder.
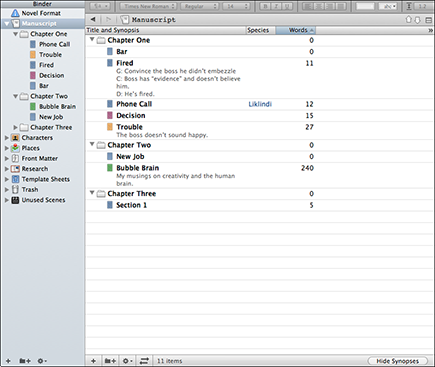
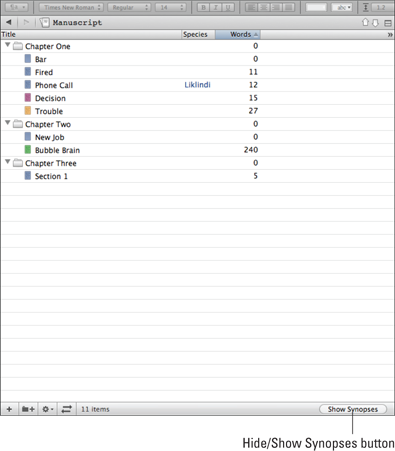
So, now do you want to know how to sort? Just click the column header box — for example, to sort by word count, click the Words column header, as shown in Figure 9-5: a small triangle appears in the Words header to designate the sort, and the header box turns blue. Each chapter is now sorted in ascending order by word count, but the order in the Binder is unchanged. Here’s what the triangles signify:
![]() A triangle pointing up denotes an ascending sort (for example, A to Z).
A triangle pointing up denotes an ascending sort (for example, A to Z).
![]() A triangle pointing down denotes a descending sort (Z to A).
A triangle pointing down denotes a descending sort (Z to A).
![]() No triangle means the items are in hierarchical order (Binder order).
No triangle means the items are in hierarchical order (Binder order).
To toggle through ascending sort, descending sort, and no sort, keep clicking the header.
Figure 9-5: Items sorted by the Words column.
Hiding and showing the Synopsis
If your outline is looking a bit cluttered, you can hide the synopses for a cleaner view. You could remove the Synopsis field through the column list (which I talk about in the “Adding and removing columns” section, earlier in this chapter), but you have a quicker option.
To remove the Synopsis with one click, click the Hide Synopses button in the Outliner footer. As shown in Figure 9-6, the Synopses disappear from the Outliner, and the button changes to Show Synopses.
To reinstate the Synopses, click the Show Synopses button.
Figure 9-6: The synopses hidden from the Outliner.
..................Content has been hidden....................
You can't read the all page of ebook, please click here login for view all page.