
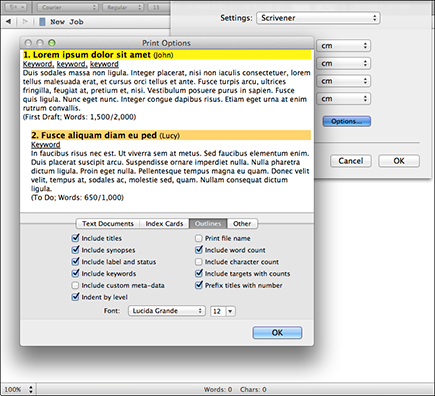
Figure 9-9: The Print Options window.
Printing Your Outline
Yep, just like with index cards (which you can read about in Chapter 8), you can print your outline. It doesn’t come out looking like the nice spreadsheet you set up on your screen (see the following section for how to export your outline for use in a spreadsheet), but you still get a hierarchical list of the items in your selected container.
Follow these steps to print your outline:
1. Choose File⇒Page Setup.
The Page Setup window appears.
2. In the Settings drop-down list, select Scrivener.
The window changes to a list of margin settings.
3. Click Options.
The Print Options window appears.
4. Click Outlines in the center row of buttons.
Figure 9-9 shows the Print Options window that appears. The sample outline at the top of the window reflects the options you can choose in the bottom.
Here are your options:
• Include Titles: Prints the document title for each item.
• Include Synopses: Prints the Synopsis text for each item.
• Include Label and Status: Adds the Label in parentheses next to the title and highlights the title in the corresponding Label color. Includes the Status value in parentheses at the bottom of the entry.
• Include Keywords: Displays keywords below the title of each item.
• Include Custom Meta-Data: Lists custom metadata items below the title and any keywords.
• Indent By Level: Indents items by hierarchy. If left unchecked, the list of items appears in order, but all are aligned to the left.
• Print File Name: Adds the name of the selected container to the header of the printout.
• Include Word Count: Includes the document word count on the last line of the item entry.
• Include Character Count: Includes the document character count on the last line of the item entry.
• Include Targets with Counts: If the target value is greater than zero, this option displays the target value with the word count as a fraction (for example, Words: 200/1000). For more on document targets, see Chapter 14.
• Prefix Titles with Number: Adds a number to each document title in order.
• Font: Click the drop-down lists to select the font and font size for printing.
5. After making your option selections, click OK in the Print Options window to close it, and then again in the Page Setup window to close it.
Now you’re ready to actually print the outline.
6. Make sure the container (or files) for which you want to print the outline is selected in the Binder.
7. Choose File⇒Print Current Document.
The Print window appears.
8. Make sure the settings are as desired (the appropriate printer and number of copies appear), and then click Print.
Figure 9-10 shows a preview of the Chapter One outline with all print options selected. The documents within each chapter are indented to indicate their lower level in the hierarchy.
Figure 9-10: A preview of a printed outline.

 If you want to preview the outline before you commit to printing it, click the PDF button at the bottom-left of the Print window and choose Open PDF in Preview before you click Print. If you like what you see, click the Print button at the bottom of the Preview window.
 For other ways to print an outline of select items within your Manuscript, check out Chapter 13.
..................Content has been hidden....................
You can't read the all page of ebook, please click here login for view all page.