
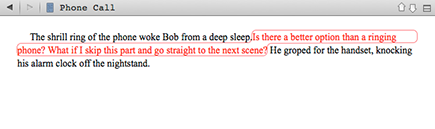
Figure 10-1: An inline annotation.
Using Inline Annotations to Insert Notes into Your Text
Inline annotations are notes inserted directly into the text of your document. You can put them anywhere, even in the middle of a sentence, if desired. You can use inline annotations when you want the notes to be highly visible, right there on the page.
Add annotations for plot notes, to mark passages for more research or consideration, to critique another person’s work, or to provide reminders.
You can even insert images and hyperlinks directly into annotations, which you can use while working on the file, and then remove them when you compile the project.
Creating an annotation
When you’re ready to unleash your inner editor, follow these steps to add an inline annotation to your work:
1. Click in the document to position your cursor where you want the inline annotation to start.
2. Choose Format⇒Inline Annotation.
 Here’s a handy keyboard shortcut: Shift+⌘+A for Mac users, Ctrl+Shift+A for Windows users.
3. Type your annotation.
Your text appears in a red bubble (unless you changed the color, which I describe how to do in the following section), as shown in Figure 10-1.
Notice the lack of spacing around the annotation. Extra spaces before or after annotations show up in your compiled manuscript after you strip out those annotations, so treat the spacing as if the annotation wasn’t there.
To add buffer spaces, make sure they’re inside the annotation bubble.
4. Click outside the color bubble.
Alternatively, you can choose Format⇒Inline Annotation.
Annotations are turned off, and you return to normal typing mode.
To create an annotation from an existing line of text, select the text that you want to convert into an annotation, and then choose Format⇒Inline Annotation. The text is encased in a colored bubble.
Changing annotation color
Not so red-hot for red? You can choose any color you want for your annotations, and even use different colors for different types of notes. Just follow these steps:
1. Click inside an existing annotation.
You don’t need to select all the text.
2. Choose Format⇒Font⇒Show Colors.
3. Choose a color that works for you from the Colors window that appears.
The annotation text and bubble change to your selected color. Until you change colors again, all future annotations use the new color.
4. Close the Colors window by clicking the red X button.
Windows users can change the default annotation color by following these steps:
1. Choose Tools⇒Options.
2. In the Options window that appears, select the Appearances tab.
3. Choose Editor in the Colors list, and then click Annotation Text.
4. Click the Color box to choose a new color from the Select Color window that appears.
5. Click OK to close the Select Color window, and then click OK again to close the Options window.
All annotations — existing and new — appear in the new color.
Splitting an annotation
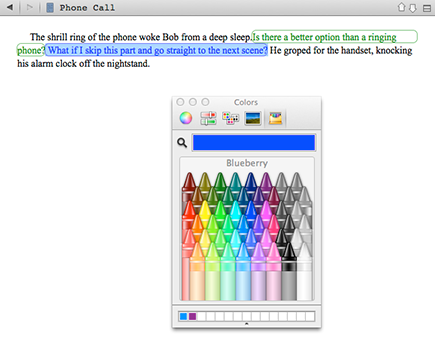
If you want to convert one note into two or more separate annotations right next to each other, you can split the original note by changing the color of the part that you want to differentiate. Split the annotation by following these steps:
1. Within an existing annotation, select the portion of text that you want to split off.
2. Choose Format⇒Font⇒Show Colors.
3. From the Colors window that appears, pick a color that’s different from the original annotation.
The selected text changes to the new color and gets its own bubble, as shown in Figure 10-2, where the text What if I skip this part and go straight to the next scene? was split from the original annotation.
4. Click the red X button to close the Colors window.
Figure 10-2: One annotation split into two.
Searching for an annotation
Having all these notes embedded in your text isn’t much good if you can’t find them again when you need them. Luckily, Scrivener includes a robust search feature.
Follow these steps to find an annotation in your manuscript:
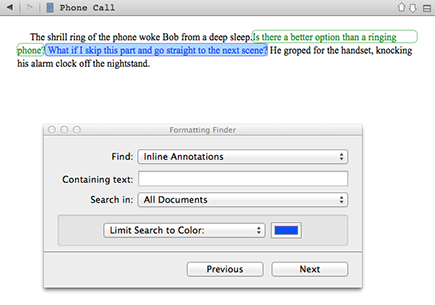
1. Choose Edit⇒Find⇒Find by Formatting.
The Formatting Finder window appears, as shown in Figure 10-3. You can search not only by type of formatting, but also by text and color.
2. In the Find drop-down list, select Inline Annotations.
3. If you’re looking for a specific string of text, enter it into the Containing text box.
For easy searching, consider adding unique strings to your annotations to help classify them, such as RRR for research, EEE for editing notes, and ZZZ for all others. Pick something that doesn’t appear in a common word.
4. In the Search drop-down list, select All Documents to search the entire manuscript.
Alternatively, you can choose Selected Documents if you want to limit your search only to documents selected in the Binder.
5. Make a selection from the Color drop-down list.
This list gives you three choices:
• Any Color: Searches for all annotations, regardless of color.
• Limit Search to Color: Searches only for annotations matching the specified color. Specify the color by clicking the Color Chooser box and then selecting a color from the Colors window that appears.
• Exclude Color from Search: Searches for all annotations except annotations of the specified color.
6. When you have all the settings to your liking, click Next.
Scrivener highlights the first annotation after the position of your cursor and goes to the next instance in the manuscript or document every time you click Next.
7. Click the red X button to close the Formatting Finder window when you’re done.
Figure 10-3: Searching for annotations.
Editing and deleting an annotation
Need to change the wording of an annotation? Or maybe you’ve handled the issue and want to delete the note.
No problem, the process is simple for both:
![]() Modifying: Simply select the annotation text that you want to modify, and then type the new text.
Modifying: Simply select the annotation text that you want to modify, and then type the new text.
![]() Deleting: Select the entire annotation text and delete it by pressing the Delete key.
Deleting: Select the entire annotation text and delete it by pressing the Delete key.
The colored box around an inline annotation is just a special type of formatting. If you paste regular text into the annotation, you split it. Likewise, if you copy text from an annotation and paste it into your regular text, you create another inline annotation. To avoid adding a new annotation, choose Edit⇒Paste and Match Style to paste text into — or copied from — an inline annotation.
Converting annotations to comments
Annotations and comments are two sides of the same coin. Whereas annotations are inserted directly into the text, comments are stored off to the side, out of the way, designated by a colorful link in the text.
If you want to keep the annotations you made, but get them out of your way, you can convert them to comments (see the section “Using Comments to Create Linked Notes in the Sidebar,” later in this chapter, for more on working with comments).
Follow these steps to make the change:
1. Select the item(s) in the Binder that you want to affect.
2. If you’re in Corkboard or Outliner view, choose View⇒Scrivenings to display the Editor pane.
3. Click anywhere within the Editor pane to activate it.
You have to activate the Editor pane to make the menu options available.
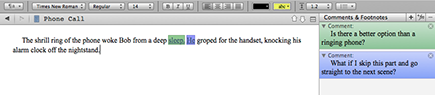
4. Choose Format⇒Convert⇒Inline Annotations to Inspector Comments.
The annotations disappear, replaced by a colored link around the nearest word, as shown in Figure 10-4. The link color matches the annotation color, as does the comment color in the sidebar.
5. Click a link to view the comments in the Comments & Footnotes pane.
Alternatively, you can click the Comments & Footnotes button at the bottom of the Inspector panel to open the Comments & Footnotes pane.
Figure 10-4: Inline annotations converted to comments.
Stripping all notations from a document
Ready to delete all the annotations or comments from a document? You don’t have to select and delete them one by one. You can strip them all at the same time — although still only one document at a time — by following these steps:
1. Select the desired document in the Binder.
2. Choose Edit⇒Select All to select the document text.
Alternatively, you can click and drag over the text you want to select.
3. Choose Edit⇒Copy Special⇒Copy Without Comments or Footnotes.
4. Choose Edit⇒Paste.
The copied text — without annotations or comments — replaces the annotated text.
 This procedure strips out not only annotations and comments, but also footnotes. Be absolutely sure you’re ready to ditch them all before following the preceding steps.
To keep a copy of the document with annotations, comments, and footnotes embedded, take a Snapshot (covered in Chapter 19) before removing the notes as outlined in the preceding steps.
..................Content has been hidden....................
You can't read the all page of ebook, please click here login for view all page.