
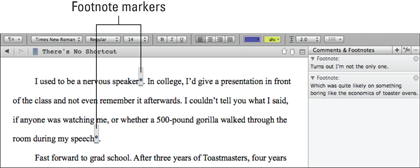
Figure 11-1: A linked footnote.
Adding a Footnote
The method for adding a footnote varies, depending on which type of footnote you choose. You can add a linked, linked with marker, inline, or referenced footnote.
Adding a linked footnote
If you’re used to creating footnotes in a standard word processor or you’re not sure where to start with footnotes, linked footnotes are probably the easiest to work with.
Linked footnotes are anchored to a word or words within the document. The anchor becomes a link that you can click to access the footnote. To add a linked footnote, follow these steps:
1. Select the position where you want the footnote number to appear in your manuscript text.
2. Choose Format⇒Footnote.
A gray box appears around the selected word (which is now underlined to denote a link) or the word preceding the location you chose, and the Comments & Footnotes pane appears. When you compile your project, the footnote number appears just after the linked word.
3. Type your footnote text in the Footnote text box that appears in the Comments & Footnotes pane.
4. To exit and save the footnote, press the Esc key to move the cursor back to your position in the Editor pane.
Alternatively, you can click outside the footnote.
Figure 11-1 shows a footnote added at the end of the first paragraph. In this example, when the manuscript is compiled, the footnote number will appear at the end of the first paragraph, after the period. If only the word speech were highlighted (and not the period), the footnote number would appear just before the period.
Note that you can also add a footnote by using the Add Footnote button in the Comments & Footnotes pane, and you can hide the footnote text by clicking the Collapse button (the small triangle at the left of each Footnote text box).
Viewing linked footnotes in the sidebar
When you add a new linked footnote, the Comments & Footnotes pane opens in the Inspector. However, if you want to view footnotes at a later time and the pane isn’t visible or the Inspector is hidden, just click the footnote’s link to open the sidebar and view all notes for the document you’re working in.
If the Inspector is visible but open to a different pane, click the Comments & Footnotes button to open the Comments & Footnotes pane.
 To navigate to a footnote anchor location within your document, click the desired footnote in the Comments & Footnotes pane.

Moving a linked footnote
Is your footnote in the wrong place? Want to temporarily move it out of the way while editing text so you don’t lose it? No need to delete the original footnote and create a new one. Simply drag the desired footnote from the Comments & Footnotes pane and drop it in the location in the Editor where you want the anchor to be.
Using footnote markers
If you like linked footnotes but prefer they be even less visible, you can designate a footnote marker — a single character that appears where the footnote number will be inserted when you compile the project.
Be sure to stick with a character after you choose it for a project. If you change the marker character part way through the writing process, footnotes created with the old marker aren’t automatically updated to use the new symbol.
Follow these steps to specify a footnote marker:
1. Choose Project⇒Text Preferences.
The Project Formatting Preferences window appears.
2. Select Use Footnote Marker.
3. (Optional) If you want to use a marker other than the default asterisk (*), enter it in the text box that’s enabled when you click the check box in Step 2.
The footnote marker settings are specific to each project.
4. (Optional) If you want to apply this marker to all new projects, click the Make Default button.
You can turn the footnote marker off in any project by deselecting Use Footnote Marker in the Project Formatting Preferences window.
4. Click OK to close the Project Formatting Preferences window.
 If you turn off footnote markers — or change the marker symbol halfway through your project — but still have them embedded in your manuscript, the markers show up when the document is compiled. However, you can mix the different types of footnotes within a single project.
After you set your footnote marker, follow these steps to add a footnote:
1. Place your cursor within the document exactly where you want the footnote number to appear.
2. Choose Format⇒Footnote.
The gray footnote bubble appears with your selected footnote marker in it, and the Comments & Footnotes pane appears in the Inspector. Figure 11-2 shows footnotes created that use a footnote marker. Note the placement of the marker and its reduced footprint on the page.
3. Type the text of your footnote in the Footnote text box in the Comments & Footnotes pane.
4. Press Esc to move your cursor back to the Editor and save the footnote.
Alternatively, you can click outside the Footnote text box to save the footnote.
Figure 11-2: You can add footnotes that use a footnote marker.
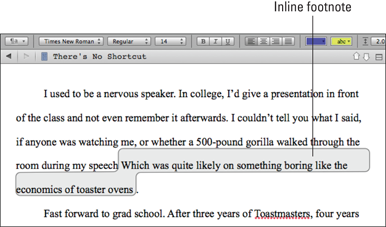
Adding an inline footnote
Inline footnotes are embedded right in the text of the manuscript for quick, easy viewing without clicking a link or using the Comments & Footnotes sidebar. Add an inline footnote by following these steps:
1. Select the desired footnote location or the text that you want to convert to a footnote.
When you compile your project, the inline footnote bubble is replaced with the footnote number, so choose your location carefully.
2. Choose Format⇒Inline Footnote.
If you selected a location but no text, nothing happens visually yet. If text was already selected, it’s surrounded by a gray box.
3. Type the desired footnote text.
The text appears in a gray box, as shown in Figure 11-3.
No corresponding entry appears in the Comments & Footnotes sidebar for an inline footnote. Also, no extra spacing appears between the text and the inline footnote. Added spacing before or after an inline footnote shows up in the final manuscript, even though the footnote text is moved to the bottom of the document. However, extra spaces before and after the footnote text within the inline footnote box are stripped out during the compile process.
Adding a referenced footnote
A referenced footnote is a type of inline footnote that uses a reference word (anchor) that’s stripped out of the manuscript when you compile. The anchor is placed where you want the footnote number to appear when the project is compiled, and also with the actual footnote text, to link the footnote location and text together.
Figure 11-3: An inline footnote.
Keep a couple of important things in mind when you use a referenced footnote so that you can avoid random words ending up in your outputted manuscript:
![]() Each footnote within a document must use a unique anchor, although you can use the same word as a referenced footnote in a separate document.
Each footnote within a document must use a unique anchor, although you can use the same word as a referenced footnote in a separate document.
![]() The anchor must match exactly in both locations.
The anchor must match exactly in both locations.
![]() The anchor and the footnote text don’t have to be located in the same document, but if they’re not, have a unique anchor for every referenced footnote in the project to avoid confusion when Scrivener compiles the project.
The anchor and the footnote text don’t have to be located in the same document, but if they’re not, have a unique anchor for every referenced footnote in the project to avoid confusion when Scrivener compiles the project.
![]() The reference anchor and footnote text must both be encased in the inline footnote formatting (surrounded by the gray bubble that denotes an inline footnote).
The reference anchor and footnote text must both be encased in the inline footnote formatting (surrounded by the gray bubble that denotes an inline footnote).
Ready to add a referenced footnote? Follow these steps:
1. Decide on a reference word or characters for the footnote anchor.
The ideal anchor is something you aren’t likely to use for another footnote. So, for a paragraph on golden retrievers, you might use dog, and twain might work for a reference to a quote by Mark Twain.
2. Place your cursor in the desired footnote location in the document text.
3. Choose Format⇒Inline Footnote.
Nothing appears until you start typing.
4. Type your anchor surrounded by square brackets, as shown in Figure 11-4.
The anchor appears in a gray bubble.
5. Reposition your cursor wherever you want to put the footnote text.
You could add the text at the bottom of the document, the end of the paragraph, in a document set aside just for footnotes, or wherever you want to put it to be out of the way.
6. Choose Format⇒Inline Footnote.
7. Type the anchor in brackets, followed by the footnote text.
The anchor and text appear in a gray bubble.
8. Choose Format⇒Inline Footnote to turn off inline footnote formatting.
Alternatively, click anywhere outside the inline footnote to turn off the formatting.
Figure 11-4 shows an example of a referenced footnote setup. The order in which the footnotes appear doesn’t matter, only that the reference words match and are unique for each footnote within the document. During the compile process, the footnotes are added in the order the anchors appear within the text.
Figure 11-4: Referenced footnotes.
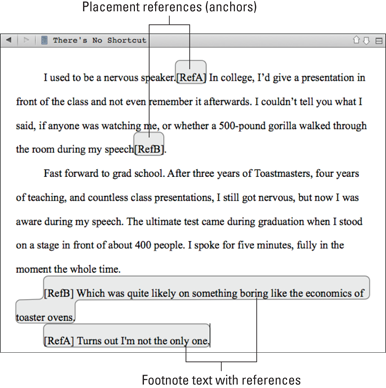
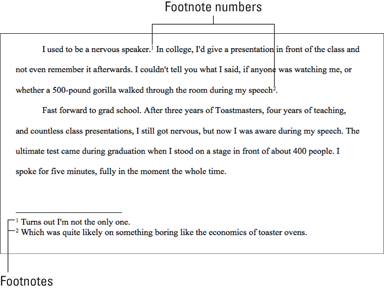
Figure 11-5 shows the compiled output with footnotes included. You can see that the footnote number is placed exactly where the anchor bubble used to be, so in Footnote 1, it appears after the period, but Footnote 2 occurs before the period. For more on footnote settings during the compile process, see Chapter 12.
Figure 11-5: Footnotes in a compiled manuscript.
..................Content has been hidden....................
You can't read the all page of ebook, please click here login for view all page.