
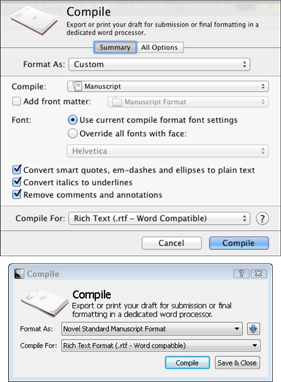
Figure 12-1: The Compile window in Summary mode on the Mac (top) and in Windows (bottom).
Deciding on a Format and Output Type
Open the Compile window by choosing File⇒Compile. Scrivener provides two compile options:
![]() Summary: Shown in Figure 12-1. Provides a quick, easy way to compile your project without worrying about all the extra options.
Summary: Shown in Figure 12-1. Provides a quick, easy way to compile your project without worrying about all the extra options.
![]() All Options: Presents a series of options tabs that changes based on which output type you choose. Options within the tabs allow you to customize exactly how Scrivener compiles your project. You can change the font, auto-number chapters, add a header or footer, modify the format, add a book cover, choose only a portion of your project to export, and so much more.
All Options: Presents a series of options tabs that changes based on which output type you choose. Options within the tabs allow you to customize exactly how Scrivener compiles your project. You can change the font, auto-number chapters, add a header or footer, modify the format, add a book cover, choose only a portion of your project to export, and so much more.
 If you don’t want to deal with all the nitty-gritty details of formatting within Scrivener — or you’d rather handle formatting in your word processor — then the Summary option is for you (and is covered in more detail in Chapter 13).
Predefined compile formats
Scrivener comes preloaded with an impressive number of formats representing some of the most common compile setups, which you can view by clicking the Format As list (refer to Figure 12-1). In this case, the format refers to the appearance of the outputted file. Formats contain settings for font style and size, line spacing, chapter numbering, margins, page numbers, headers, and so on.
You can use a format as-is or take it as a starting point for creating your own. How a document gets formatted during the compile process depends on how you structure that document in the Binder. Most formats assume that folders are chapters and documents are scenes or sections, but because everyone has their own preferred way to set up a project, a preexisting format may not work perfectly for you without some tweaks.
The project template you’re using determines which format is selected by default, but you can choose any format you want.
Many of the formats are described in the following list, but for the most current and complete list of available formats, refer to the Scrivener User Manual. Chapter 13 discusses creating your own, and revealing hidden, format presets.
The list is a bit different in each version of Scrivener, but here are some commonly offered formats:
![]() E-Book: A simple format for use on electronic readers that treats containers as chapters and text documents as sections for scenes. If you have extra levels, such as Part folders, you might need to make some adjustments, or use the hidden format called E-Book (with Parts). Chapter 13 reveals how to view hidden formats.
E-Book: A simple format for use on electronic readers that treats containers as chapters and text documents as sections for scenes. If you have extra levels, such as Part folders, you might need to make some adjustments, or use the hidden format called E-Book (with Parts). Chapter 13 reveals how to view hidden formats.
![]() Enumerated Outline: This format provides a numbered list of document titles in a hierarchical fashion. When you use this format, the All Options page allows you to add synopses in the Formatting tab, if desired.
Enumerated Outline: This format provides a numbered list of document titles in a hierarchical fashion. When you use this format, the All Options page allows you to add synopses in the Formatting tab, if desired.
![]() Non-Fiction Manuscript Format: A common academic format that treats folders and top-level file groups as chapters, and gives titles to top-level files within those folders and file groups. This format is the non-fiction equivalent of Standard Manuscript Format.
Non-Fiction Manuscript Format: A common academic format that treats folders and top-level file groups as chapters, and gives titles to top-level files within those folders and file groups. This format is the non-fiction equivalent of Standard Manuscript Format.
![]() Paperback Novel: This format is set up to produce a good result for PDF output, suitable for submission to print-on-demand (POD) services such as CreateSpace.
Paperback Novel: This format is set up to produce a good result for PDF output, suitable for submission to print-on-demand (POD) services such as CreateSpace.
![]() Plain Text Screenplay (Celtx, Movie Magic): Outputs the file into a plain-text format that’s compatible with several screenplay software programs, including Celtx and Movie Magic.
Plain Text Screenplay (Celtx, Movie Magic): Outputs the file into a plain-text format that’s compatible with several screenplay software programs, including Celtx and Movie Magic.
![]() Proof Copy: Creates a double-spaced manuscript that allows for easy note taking, and includes a disclaimer in the header and after each chapter that says Not for Distribution. This format treats folders as chapters and all lower-level containers as sections.
Proof Copy: Creates a double-spaced manuscript that allows for easy note taking, and includes a disclaimer in the header and after each chapter that says Not for Distribution. This format treats folders as chapters and all lower-level containers as sections.
![]() Script or Screenplay: This format uses settings for integration with Final Draft (version 8 or later), using the FDX format.
Script or Screenplay: This format uses settings for integration with Final Draft (version 8 or later), using the FDX format.
![]() Standard Manuscript Format: Outputs the manuscript in Courier, 12-point font, double-spaced. It adds scene separators, changes italics to underlines, inserts page numbers, and treats folders as chapters and all lower level containers as sections. This format is best used with RTF, PDF, or Print output.
Standard Manuscript Format: Outputs the manuscript in Courier, 12-point font, double-spaced. It adds scene separators, changes italics to underlines, inserts page numbers, and treats folders as chapters and all lower level containers as sections. This format is best used with RTF, PDF, or Print output.
![]() Original: This first option in the list when using a blank template moves to the bottom when you’re working from any other project template. This option is basically a lack of format that carefully preserves your draft the way you formatted it within Scrivener.
Original: This first option in the list when using a blank template moves to the bottom when you’re working from any other project template. This option is basically a lack of format that carefully preserves your draft the way you formatted it within Scrivener.
 This format doesn’t add any page breaks, titles, or format adjustments. It just compiles the documents exactly as they appear in the Editor, with an empty line between each and a page break after each document that’s followed by a folder.
All other format presets are a modified version of Original. To experiment with Compile settings, choose Original, and then try out the different options on the All Options page until you get the results you want. (The All Options page is covered in the section “Accessing the Compilation Options,” later in this chapter.) Chapter 13 even shows you how to save your custom format for future use.
![]() Custom: This format represents the current settings if you’ve made any changes to the options on the All Options page. The bulk of this chapter is devoted to customizing the Compile options.
Custom: This format represents the current settings if you’ve made any changes to the options on the All Options page. The bulk of this chapter is devoted to customizing the Compile options.
You may also find a preset at the very top of the list, separate from the others (for example, Novel). This preset represents the original compile formatting created for the specific project template you chose. (I talk about project templates in Chapter 15.)
Output types
After you decide on the format of your draft (as discussed in the preceding section), you need to choose the type of output. How you plan to use the compiled project determines your choice. Want to view your work on an e-reader? Choose one of the E-Book options. Want to print your manuscript for a read-through on paper? Pick Print.
Find the output options in the Compile For list (refer to Figure 12-1). Depending on which version of Scrivener you’re using, your output options may be slightly different, but most of the options in this list should be available to you:
![]() Print: Use this option to send the project to your printer.
Print: Use this option to send the project to your printer.
![]() PDF: Saves the file to PDF format.
PDF: Saves the file to PDF format.
![]() Rich Text (.rtf – Word Compatible): Usually the best choice when exporting for use in a word processor, even Microsoft Word, because it retains more of your format options than any other type. The RTF file supports images, bullets, comments, footnotes, and tables, and it’s compatible with most word-processing programs.
Rich Text (.rtf – Word Compatible): Usually the best choice when exporting for use in a word processor, even Microsoft Word, because it retains more of your format options than any other type. The RTF file supports images, bullets, comments, footnotes, and tables, and it’s compatible with most word-processing programs.
![]() Rich Text With Attachments (.rtfd): This Mac-only option creates an RTFD file, mainly useful for exporting to Apple Cocoa applications such as TextEdit or Pages, especially when your file contains images. Not compatible with most word processors or non-Apple operating systems.
Rich Text With Attachments (.rtfd): This Mac-only option creates an RTFD file, mainly useful for exporting to Apple Cocoa applications such as TextEdit or Pages, especially when your file contains images. Not compatible with most word processors or non-Apple operating systems.
![]() Microsoft Word 97-2004 (.doc): Exports to DOC format, but isn’t as quick as using the RTF exporter. And, depending on your computer setup, you may lose some formatting, such as indents, line spacing, footnotes, comments, and bullets. If you have issues with this format, try RTF, instead.
Microsoft Word 97-2004 (.doc): Exports to DOC format, but isn’t as quick as using the RTF exporter. And, depending on your computer setup, you may lose some formatting, such as indents, line spacing, footnotes, comments, and bullets. If you have issues with this format, try RTF, instead.
![]() Microsoft Word (.docx): Exports to DOCX format for newer versions of Word, but still has the same issues as the DOC version.
Microsoft Word (.docx): Exports to DOCX format for newer versions of Word, but still has the same issues as the DOC version.
This option is available on Windows if Word 2007 or higher is installed on your computer. Choose Tools⇒Options, and then select the General tab on the Options window that appears. In the Import/Export section, specify that you want to use Word for the conversion. You may need to close and reopen Scrivener for the setting to take effect.
![]() Open Office (.odt): Creates an ODT file but may lose formatting such as line spacing, indents, bullets, comments, and footnotes. For best results, use the RTF format.
Open Office (.odt): Creates an ODT file but may lose formatting such as line spacing, indents, bullets, comments, and footnotes. For best results, use the RTF format.
![]() Plain Text (.txt): Creates a plain-text file with no formatting that’s compatible with almost any software on any platform.
Plain Text (.txt): Creates a plain-text file with no formatting that’s compatible with almost any software on any platform.
![]() Final Draft 8 (.fdx): Use this option when exporting for Final Draft version 8 or newer. This output format converts synopses to scene summaries and supports scene titles and custom script-element formatting.
Final Draft 8 (.fdx): Use this option when exporting for Final Draft version 8 or newer. This output format converts synopses to scene summaries and supports scene titles and custom script-element formatting.
![]() Final Draft 5–7 Converter (.fcf): This Mac-only option converts output to FCF format for use with older versions of Final Draft. Only maintains basic screenplay formatting.
Final Draft 5–7 Converter (.fcf): This Mac-only option converts output to FCF format for use with older versions of Final Draft. Only maintains basic screenplay formatting.
![]() ePub eBook (.epub): Creates an EPUB file compatible with most e-readers. Supports formatting, table of contents, hyperlinks, and footnotes (converted to endnotes).
ePub eBook (.epub): Creates an EPUB file compatible with most e-readers. Supports formatting, table of contents, hyperlinks, and footnotes (converted to endnotes).
![]() Kindle eBook (.mobi): Outputs a MOBI file for use with Amazon Kindle devices. Supports formatting, table of contents, hyperlinks, and footnotes (converted to endnotes). Requires Amazon’s KindleGen software. For Mac, KindleGen works only on Intel machines (to check yours, choose ⇒About This Mac, and then look next to Processor in the window that appears).
Kindle eBook (.mobi): Outputs a MOBI file for use with Amazon Kindle devices. Supports formatting, table of contents, hyperlinks, and footnotes (converted to endnotes). Requires Amazon’s KindleGen software. For Mac, KindleGen works only on Intel machines (to check yours, choose ⇒About This Mac, and then look next to Processor in the window that appears).
![]() Web Page (.html): Outputs an HTML file for web publication.
Web Page (.html): Outputs an HTML file for web publication.
![]() Web Archive (.webarchive): Exclusive to Mac, this option is generally compatible with only Safari and some Mac OS X applications. This option produces a
Web Archive (.webarchive): Exclusive to Mac, this option is generally compatible with only Safari and some Mac OS X applications. This option produces a .webarchive file that’s like HTML with images bundled into a single file.
![]() eXtensible Web Page (.xhtml): This Windows-only option creates a single XHTML file. Good for newer web platforms.
eXtensible Web Page (.xhtml): This Windows-only option creates a single XHTML file. Good for newer web platforms.
![]() PostScript (.ps): Available for Windows only. Produces a file similar to a PDF that appears the same on any platform. Commonly used in design and publishing.
PostScript (.ps): Available for Windows only. Produces a file similar to a PDF that appears the same on any platform. Commonly used in design and publishing.
![]() MultiMarkdown: Exports a plain-text MultiMarkdown (
MultiMarkdown: Exports a plain-text MultiMarkdown (.mmd) file that can be archived or modified after export.
![]() MultiMarkdown->LaTeX: Creates a LaTeX (
MultiMarkdown->LaTeX: Creates a LaTeX (.tex) file with full MultiMarkdown parsing. For LaTeX files without MultiMarkdown (MMD), use the plain-text MMD exporter.
![]() MultiMarkdown->RTF: For Mac only. Uses HTML to create an RTF file with partial MMD support. Features are limited, and the result isn’t equal to the standard RTF file.
MultiMarkdown->RTF: For Mac only. Uses HTML to create an RTF file with partial MMD support. Features are limited, and the result isn’t equal to the standard RTF file.
![]() MultiMarkdown->HTML/MultiMarkdown to Web Page (.html): MultiMarkdown->HTML applies to the Mac, and MultiMarkdown to Web Page (.html) appears in Windows. Creates a W3C-compliant HTML file (
MultiMarkdown->HTML/MultiMarkdown to Web Page (.html): MultiMarkdown->HTML applies to the Mac, and MultiMarkdown to Web Page (.html) appears in Windows. Creates a W3C-compliant HTML file (.html) for web publication or additional modification.
![]() MultiMarkdown->Flat XML (.fodt): Listed as MultiMarkdown to OpenDocument Flat XML (.fodt) in Windows, this option creates a single OpenDocument flat XML file for use in OpenOffice.
MultiMarkdown->Flat XML (.fodt): Listed as MultiMarkdown to OpenDocument Flat XML (.fodt) in Windows, this option creates a single OpenDocument flat XML file for use in OpenOffice.
![]() MultiMarkdown to Outline Processor Markup Language (.opml): Windows only. Produces output suitable for OPML, an XML format for outlines.
MultiMarkdown to Outline Processor Markup Language (.opml): Windows only. Produces output suitable for OPML, an XML format for outlines.
..................Content has been hidden....................
You can't read the all page of ebook, please click here login for view all page.