
Figure 12-15: The Project Properties window.
Customizing Headers and Footers
Need to add a header or footer to your compiled file? Want to edit or delete one that’s already specified by the compile format you chose?
The Header and Footer settings are available as long as you’ve chosen an output type that supports them: Print, PDF, Rich Text (.rtf), or Microsoft Word 97–2004 (.doc).
In addition to regular text, the header and footer allow the use of special character tags that are replaced with a value during the compile process. Here’s a sampling of the special tags available for use (for more tags, choose Help⇒Placeholder Tags List or consult the Scrivener User Manual):
![]() <$p>: Inserts the page number
<$p>: Inserts the page number
![]() <$pagecount>: Inserts the total number of pages
<$pagecount>: Inserts the total number of pages
![]() <$projecttitle>: Uses the title specified in Project Properties (shown in Figure 12-15), or if none is specified, uses the name of the Scrivener project file
<$projecttitle>: Uses the title specified in Project Properties (shown in Figure 12-15), or if none is specified, uses the name of the Scrivener project file
![]() <$surname>: Takes the surname from the Project Properties or the author’s Address Book entry
<$surname>: Takes the surname from the Project Properties or the author’s Address Book entry
![]() <$fullname>: Inserts the full name from the Project Properties or the author’s Address Book entry
<$fullname>: Inserts the full name from the Project Properties or the author’s Address Book entry
 For character-based tags (including Roman numerals), you can type them in all caps to get an uppercase result (for example, <$PROJECTTITLE> produces EPIC NOVEL).
Some of the information is pulled from the Project Properties window (shown in Figure 12-15), which you can access by choosing Project⇒Meta-Data Settings⇒Project Properties. Scrivener displays the default values in gray text, but you can click in any text box to overwrite the default. The tag next to each text box is the one that you can use in the Header/Footer section, if desired.
The benefit of using a tag in the header or footer, rather than just entering the actual value of something like the project title, is that if you change your project title at a later date, it automatically updates the header. It also updates the information if you decide to use a pseudonym or different version of your name.
Plus, if you set up and save your own Compile format (covered in Chapter 13), using tags prevents you from having to edit the settings when you use the saved Compile format in a different project.

You can also format the header and footer text by bracketing it with special characters:
![]() Italic: asterisk (*); typing
Italic: asterisk (*); typing *text* produces text
![]() Bold: double asterisk (**); typing
Bold: double asterisk (**); typing **text** produces text
![]() Underline: underscore (_); typing
Underline: underscore (_); typing _text_ produces text
Adding or modifying a header or footer
Follow these steps to add a header or footer, or modify the existing one, in the Compile settings:
1. Click the Page Settings tab.
2. If the Header/Footer section isn’t visible, change your output type to one of the compatible types.
Compatible types include Print, PDF, Rich Text (.rtf), and Microsoft Word 97–2004 (.doc).
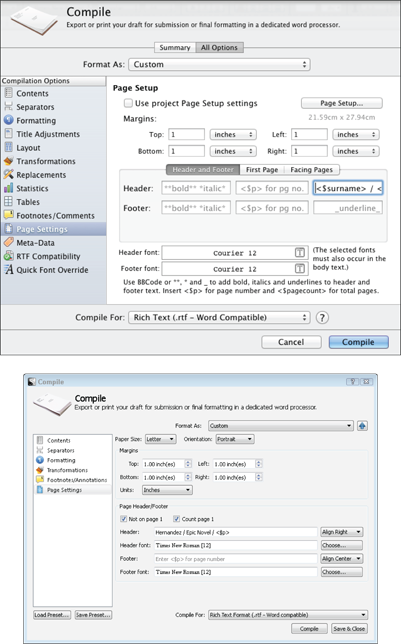
Figure 12-16 shows the Header/Footer section.
3. Click the Header and Footer button to view header and footer options.
This button appears only in the Mac version. The grayed out text within the text boxes doesn’t appear in the final output, it’s just there to remind you how to format the text or add special tags, such as page number. Any text in black will print.
4. Enter or edit the desired text and/or tags in the appropriate text boxes.
The text boxes that appear are different, depending on whether you use a Mac or Windows PC:
• Mac users: The Header and Footer sections each have three text boxes that correspond to left-aligned, centered, and right-aligned text, respectively.
• Windows users: Enter text in the single text box, and then select the alignment from the drop-down list to the right of the text box.
In Figure 12-16, the following header text is in the right text box: <$surname> / <$PROJECTTITLE> / <$p>. Based on the data in the Project Properties, the header on the second page of the compiled manuscript will be Hernandez / EPIC NOVEL / 2.
For no header or footer, delete all text in the boxes.
Figure 12-16: Specifying a right-aligned header on the Mac (top) and in Windows (bottom).
Using a different first page header or footer
To create a different header or footer on the first page of your compilation — even if it’s just a page with no header or footer at all — follow these steps:
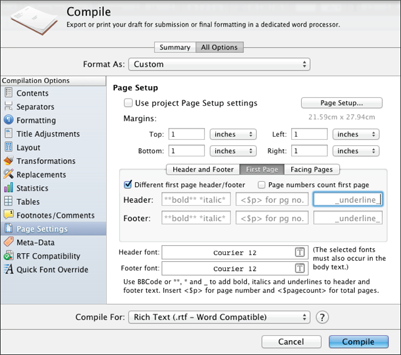
1. In the Header/Footer section of the Page Settings tab, click the First Pages button (on the Mac only).
The First Pages Header and Footer section appears, as shown in Figure 12-17. The text boxes and formatting options work exactly the same as the Header and Footer section outlined in the “Customizing Headers and Footers” section, earlier in this chapter.
2. Select Different First Page Header/Footer, if it’s not already checked.
Windows users, select Not on Page 1 to prevent the header and footer settings from applying to the first page. The only option at this time is to have no header and footer on page one, rather than specifying different text or tags.
3. Enter the desired First Page header or footer text and tags, or leave them blank to have no header or footer on the first page.
Figure 12-17: The First Page Header and Footer settings.
Starting the page count on the first page
If you’re using a different header or footer for the first page but you still want the page count to start with the first page of the first document — even if you don’t want a page number to appear — follow these steps:
1. If you’re using a Mac, click the First Pages button in the Header/Footer section of the Page Settings tab.
2. If it’s not already checked, select Different First Page Header/Footer.
Windows users, select Not on Page 1.
3. Select Page Numbers Count First Pages.
Select Count Page 1 in Windows.
 For page numbers to show up on any of the pages, you must have specified them in the Header and Footer section, as described in the “Customizing Headers and Footers” section, earlier in this chapter.
..................Content has been hidden....................
You can't read the all page of ebook, please click here login for view all page.