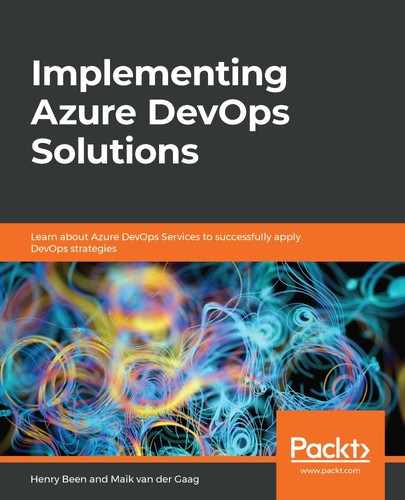
The next tab in a build definition governs what should start or trigger the build. To implement continuous integration, go through the following steps:
- Click on the Triggers tab and select the first header on the left:
- Check the Enable continuous integration box. This means that Azure DevOps will listen for changes in your repository and will queue a new build as soon as a new chance is available.
- Next, you can choose whether you want to build every incoming change individually or batch multiple changes when more than one new change comes in while building a change. It is recommended that you build every single change separately if this is feasible.
- Along with the continuous integration trigger, specify one or more branch and path filters. Here, you can specify which branches and files to queue a new build for. You can specify either inclusions or exclusions, depending on your needs. A common example is to limit your build to the master branch. If you have folders named doc and src in your repository and all your sources are in the latter folder, then it might make sense to limit the trigger to this path.
- As well as choosing to have a continuous integration trigger, you can also opt to execute a build on a recurring schedule where you select one or more weekdays and a time.
- You can also schedule a build to run whenever another build completes. This is called chaining builds.
Next, let's learn how to change the configurations of our build definition.