
Scripted testing is a technique that is used to minimize the amount of time spent on the test execution while still ensuring full coverage of all relevant test cases. This is done by splitting the testing into two distinct phases: test preparation and test execution. Test preparation is done in parallel to the development of the feature that is to be tested or even before development starts. During test preparation, the feature is analyzed and formal test cases are identified.
Once the test cases that must be executed are identified, manual test scripts are written that describe every step that is to be taken during the test execution phase later. These scripts are engineered in such a way that they are easy to follow and leave no room for questions or doubts. They are also written in such a way that the number of steps to execute is as low as possible. While this may cost more time to prepare, all of it is done to ensure that as little time as possible is spent during the test execution.
A deeper discussion of test analysis and how to identify test cases is beyond the scope of this book. While you are responsible for test case creation, Azure DevOps supports you in this. Using the Test Plans service, you can create test plans and record the test cases within them for quick execution later on.
To create a new test plan, perform the following steps:
- Open the Azure Test Plans menu:

- In this menu, click on Test Plans. Here, you will be presented with an overview of all of the test plans you currently have.
- Click the New Test Plan button to start creating a new test plan. This will open a new dialog, as shown in the following screenshot:
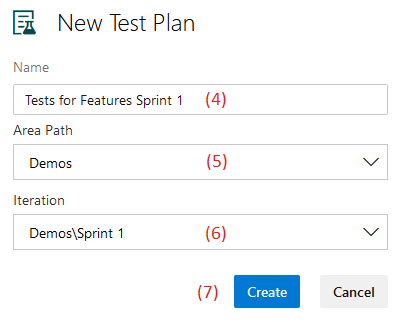
- Give a meaningful name to the test plan, for example, a name that illustrates what the test plan is for.
- Link the test plan to the correct product area path.
- Select the correct iteration, or sprint, that this test relates to.
- Press Create to finalize creating the test plan. This will automatically open this test plan, as shown here:

A test plan can be split into multiple test suites, which in turn can be split into test suites again. In essence, test suites are for tests what folders are for files. Suites can be managed by pressing the ellipsis button that appears when hovering over the test suite. This is shown in the preceding screenshot.
After creating a test plan, it is time to add one or more test cases to the plan. To do this, ensure that the Define tab is open for a test suite and click the New Test Case button. A new popup will open:

Here, the test steps and expected outcomes can be defined. To define a new test case, perform the following steps:
- Enter a title for the test case.
- In the dialog, enter one or more actions and expected results that describe the test case in detail.
- Once the test case is completely described, press the Save & Close button to save the test case and return to the previous screen where you can manage the test suites.
Once the preparation is done and a feature is ready to be tested, all tests are executed. Since all tests are scripted in detail, this can be done quickly and effectively. There might even be developers, business analysts, or people from other parts of the company helping with the test execution. This means that the test execution itself will be really quick.
To start the execution of a test suite or plan, perform the following steps:
- Navigate to the Execute tab:
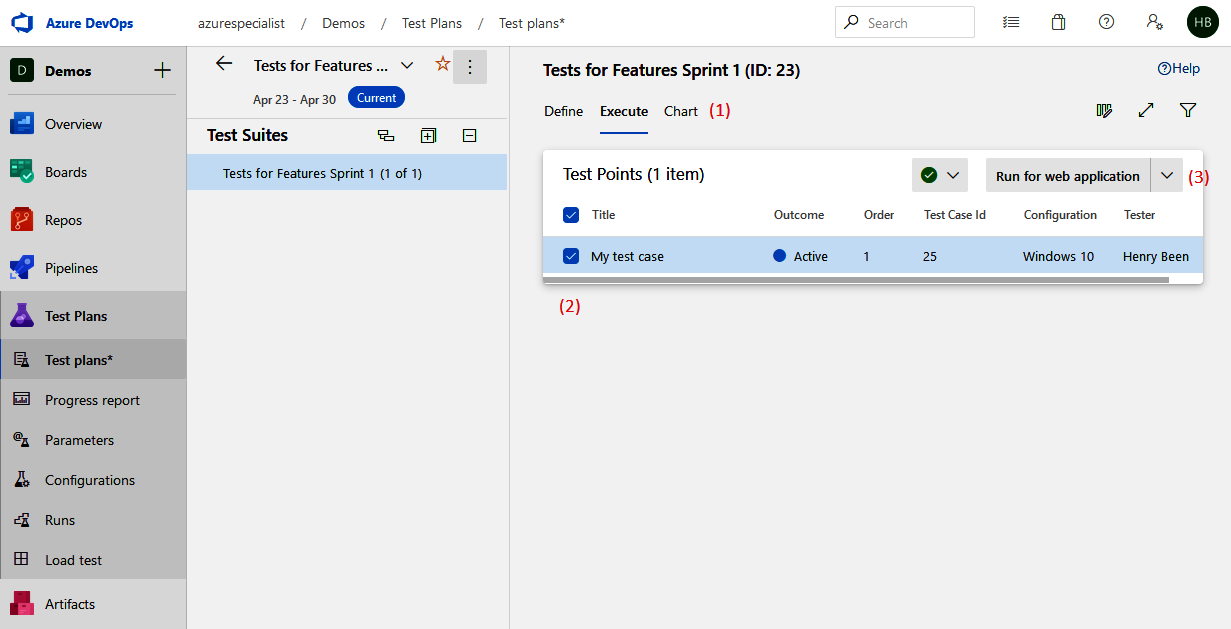
- Select one or more test cases.
- Select one of the run options at the top-right.
When choosing to run the tests against a web application, a new browser window with a test runner will open. This test runner can be used to go through all of the test cases and for every test case, through all of the steps, and keep track of all successes and errors as shown here:
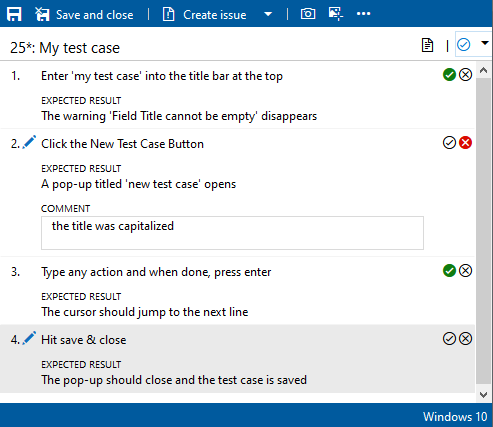
The tick or cross after every test step can be used to keep track of the outcomes for individual steps. If a step is marked as incorrect, a comment with the defect can be added. To mark a test case as passed or marked, the blue drop-down menu at the top-right can be used for marking the outcome. Once a test outcome is selected, the runner automatically progresses to the next test. Once all tests are performed, the results can be saved using the Save and close button on the top-left.
To view the outcome of a test run, navigate to Test Plans and then Runs to get the following dashboard:

Here, you can select the run for which you want to see the outcomes to get a quick overview of the test outcomes. On the second tab, Test results, it is possible to view a list of all test cases and whether they passed or not.
A major benefit of having detailed scripts is that the same tests can be performed more than once, reducing the cost per execution. If a test plan is executed multiple times, all run history is maintained and can be accessed using the view shown in the preceding screenshot. This is useful if manual tests are used as part of a regression test; however, once this becomes the case, it is often even more beneficial to automate the tests using system tests, if possible.
The next section will discuss a final form of functional testing, namely, exploratory testing.