To be able to start building the container image and publish it to the registry, we will create a new pipeline. For this example, we will make use of the YAML pipeline experience.
Perform the following steps to get started with the pipeline:
- Open you Azure DevOps project and click on Pipelines.
- In the pipelines overview, click on New Pipeline.
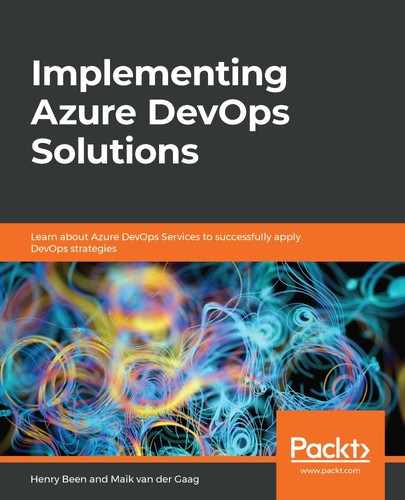
- Select Azure Repos Git, choose the correct repository, and then choose the Starter pipeline:
- From the starter pipeline, remove the two dummy script tasks and open the assistant.
- In the assistant, search for the Docker tasks and add the tasks to the pipeline.
- Choose the service connection created for the container registry and keep the other information as the defaults.
When added, the YAML should look like this:
- task: Docker@2
  inputs:
    containerRegistry: 'MSFT Container Registry'
    repository: 'azuredevops'
    command: 'buildAndPush'
    Dockerfile:'**/Dockerfile'
    buildContext:
'$(System.DefaultWorkingDirectory)/ExistingDevOpsProject'
- Save and run the pipeline. After the first run, the container image is created and published to the container registry.
The images in the container registry can be retrieved by using a predefined URL. This URL comprises a few specific components:
-
- [container registry]/[repository]:[tag]:
- Container registry: The base URL of the container registry.
- Repository: The repository as specified during the process of publishing the image.
- Tag: The tag for the specific version of the image. By default, the Docker tag used is BuildId.
- [container registry]/[repository]:[tag]:
- Now that we have a reference to the container image, Azure Container Instances should be able to retrieve the container and run it. The only thing needed for this is an Azure CLI command:
az container create --resource-group [resource group] --name [ACI name] –location westeurope –image [Image reference] --dns-name-label [dns reference] –ports 80 --registry-username [username of the registry] --registry-password [password of the registry]
Since the reference to the image is different for each build (BuildId for the tag value), BuildId is retrieved in the Azure CLI command via the $(Build.BuildId) variable:
az container create --resource-group aci-rg-devops --name aci-demo-app –location westeurope –image msftazuredevops.azurecr.io/azuredevops:$(Build.BuildId) --dns-name-label aci-msft-demo –ports 80 --registry-username $(username) --registry-password $(password)
To execute the preceding script, the Azure CLI task is added to the pipeline. In this task, we configure the correct subscription via the service endpoint and set the inline script.
The script will create a container instance in the aci-rg-devops resource group with the name aci-demo-app and retrieve the azuredevops container image from the msftazuredevops.azurecr.io repository.
The complete YAML for this task looks like this:
- task: AzureCLI@2
  inputs:
  azureSubscription: 'Subscription MPN'
  scriptType: 'bash'
  scriptLocation: 'inlineScript'
  inlineScript: 'az container create --resource-group aci-rg-devops -
name aci-demo-app --location westeurope --image msftazuredevops.azurecr.io/azuredevops:$(Build.BuildId) --dns-name-label aci-msft-demo --ports 80 --registry-username $(username) --registry-password $(password)'
Running this pipeline will result in an Azure Container Instance in Azure. That container will be running the exact same application that was running locally:

When opening the Azure Container Instance in the Azure portal, you will see that it is a running instance and that there is an FQDN attached to the Azure Container Instance based on the value supplied, dns-name-label, within the Azure CLI command, aci-msft-demo.westeurope.azurecontainer.io. Open the URL in your browser and see the application we have pushed to the container:

It shows the same content as the container that was started locally. This is because, in both places, the same container image was started.
In this section, we started the container on Azure Container Instances, but how will we manage running containers and restart them when there are problems? This is where Kubernetes comes in.