
In the previous recipe, we learnt how to record ourselves using Audacity (without pausing the recording). If we want to create a podcast for our Moodle course, we can not only record our voice, but also add some music or sound to it in order to enhance it. This is what this task is about.
Combine recordings of people speaking in their native English after describing its characteristics, ask for help from a Linguistic or Phonetics teacher. You can add this element if you happen to have it recorded. You can also add some sounds, for example for the presentation and ending of the podcast as well.
We will work with the Audacity software, which is used in the previous recipe. We can record ourselves as we did before, and convert some parts of tapes, CDs, and MP3 files where we can find the different types of English spoken around the world such as RP English, Creole, Caribbean English, American English among others. Always bear in mind the copyright issues of the material to be recorded. To design the podcast, follow these steps:
- Start Audacity.
- Click on the Record button within the Audio Control and Editing Toolbars in order to record your voice.
- Click on the Stop button before inserting the extra material to enhance the podcast.
- Click on File | Import | Audio | select the file, and click on Open.
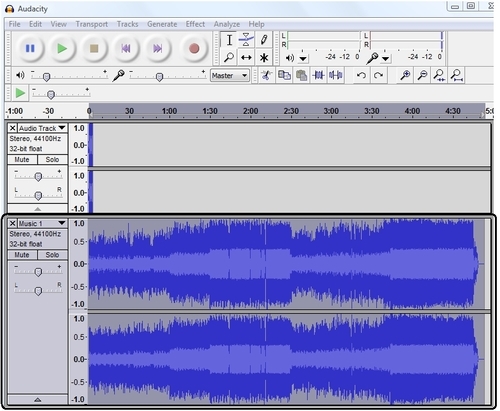
- Two waveforms appear in separate audio track portions within the Project view. Click on the second waveform and move the Selection boundary from the beginning to the end in order to select it, as shown in the following screenshot:
- Click on Edit | Cut (another option is the keys Ctrl + X).
- Place the cursor at the end of the waveform in the first Project view and click on Edit | Paste (another option is the keys Ctrl + V). It looks as shown in the following screenshot:

- Click on File | Save Project as and write a name for the project.
- Click on File | Export to save the file as WAV type so that you can embed the podcast in the Moodle course.
- Click on Save | OK.
- You can repeat steps 2 to 7 as many times as you want if you want to go on recording your voice or add extra audio files.
When we upload this podcast to our Moodle course, we can listen to it without pauses because we have just created a podcast that was combined with another source of audio, sound, or music. That is to say that we have learnt how to cope with different sounds in order to design one recording. Those parts of the songs, sounds, or just phrases that we want our students to listen to can be shared when designing a podcast for any activity.
This is a great tool suitable for any subject. Thus, the combination of sounds, music, and audio make our podcast less dull and more appealing through the variety of content. It can sometimes be boring to listen to the same person speaking all the time.