
In this activity, we would be working with another application available on the Web. It is a free, open source software called JClic author 0.2.0.5. So, the first thing that we have to do is to install it. We will create a matching activity with images. You can also carry out this activity using either Moodle or JMatch within Hot Potatoes.
Choose 16 people of achievement and their main characteristic will be labeled by an icon image. So, the students have to match each person with the achievement that they are famous for. Can you think of so many talented persons! Let's get ready!
We are going to work with JClic author, but in case that you do not happen to have it installed, you can download it from the following website: http://clic.xtec.cat/en/jclic/download.htm. You have to click on the JClic author icon and download the software following the steps.
After the installation, we are going to work with images from the following website: http://commons.wikimedia.org. Create a folder (as we have already done in the previous activities), in which we save all the icon images that we have chosen that represent these special people.
These are the steps that you have to follow to design the activity:
- Open the JClic author. Select File | New Project and complete the pop-up window, as shown in the following screenshot:
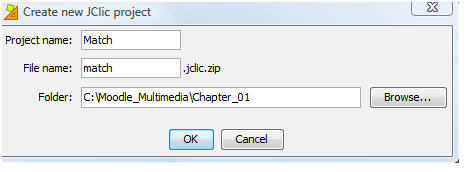
- Save the activity in the folder that you have created and saved the images in. Then click OK.
- Click on Project and complete the Title and the Description blocks, writing what students have to do in this activity.
- Click on Activities and select Insert | New activity. Select Complex association, as shown in the following screenshot:
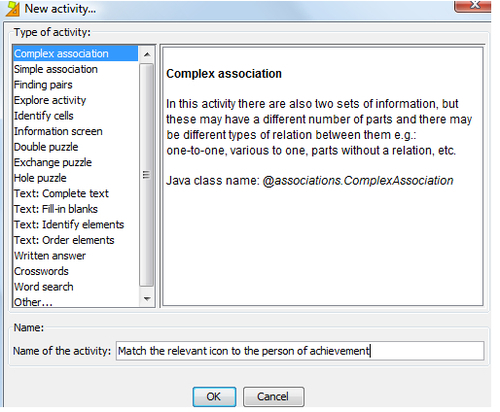
- Write the name of the activity, as shown in the previous screenshot. Then click on OK.
- Complete the blocks related to Options, as you want to display the activity.
- Then click on Window. You are also going to customize it yourself or keep it as it is. There are many options to work with.
- You can also choose to design the messages by clicking on Messages.
- Click on Panel. Grid A is the grid on the left, and write the names of the people of achievement. Grid B is the grid on the right used to insert the icon images.
- Click on Grid A and complete the options, as shown in the following screenshot. Therefore, you can insert 16 names by clicking in each cell and completing the pop-out window that appears for each of them. Only enter text on this grid:
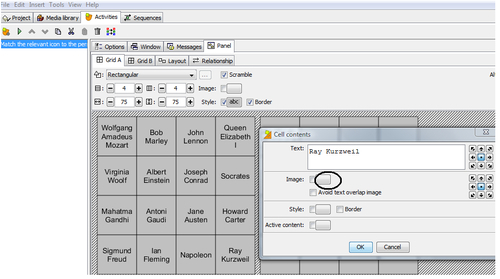
- Click on Grid B. Click on a cell, and then click on the big rectangle next to Image, as shown circled in the previous screenshot.
- A new pop-out window will appear. Click on New media object.... Choose the image that you want to upload. Click on Open | OK | OK. The image will appear inside the cell.
- Repeat the same process 15 more times, because we have inserted 16 people of achievement! Another option is to choose less items to connect.
- Select File | Save to save the changes made.
- Choose View | Preview activity. You can work out the activity, can't you?
Now that we have designed the activity in JClic author, insert the previously created activity in our Moodle course. There is not a module or block available in Moodle 2 to insert JClic activities, and this is the reason why we have to make a link to the said file. Follow these steps to prepare the activity in order to upload it to Moodle afterwards:
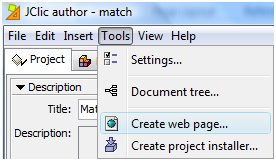
- Click on Tools | Create web page, as shown in the following screenshot:
- A pop-up window appears. Click on OK | Save | Yes.
- The activity is ready to work with. It is time to upload it to the Moodle course.
Add this matching activity as a resource in the course. It can be the warm up activity to the introduction of any topic to deal with. Therefore, choose the weekly outline section where you want to place the activity and follow these steps:
- Click on Add a resource | File.
- Complete the Name and Description blocks.
- Click on Add | Upload a file | Browse and look for the file to upload in Moodle. Look for the .htm file that was previously created.
- Click on Open | Upload this file.
- Repeat steps 3 and 4 to upload the
.jclic.zipfile as well, as shown in the following screenshot: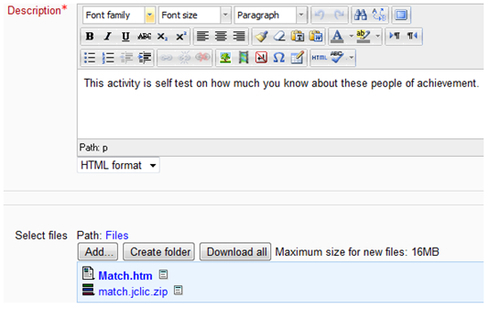
- Click on Save and display. The JClic activity is ready to work with within Moodle!
We can add another activity after this one. Use this matching activity as a lead to a writing one, for example, or as a warm up for a special assignment. We can add an Online text activity so that students give their reasons on who the most amazing person is and why; for instance.
Create a writing activity using the previous one designed in JClic author as a pre-writing one. Thus, follow these steps to insert this new one in our Moodle course:
- Click on Add an activity | Upload a single file.
- Complete the Assignment name and Description blocks.
- Click on Save and return to course.