In this recipe, we will learn how to insert a map in our Moodle course labeled with pins, because we pin all the cities that we are going to work with. Therefore, we insert the map as a resource. After that, we design activities for our students to use the interactive map that we have just added. It is another way to use a resource, making our Moodle course more appealing to the eyes of our students.
We are going to work with Google Earth, as we did in the first recipe, so we have already installed it. We should think of the cities to insert in our course because we need to pin them all!
Click on the Google Earth icon that you have on your desktop. This is a way to enrich our traveling course by enhancing its appearance. So, these are the steps that you have to follow:
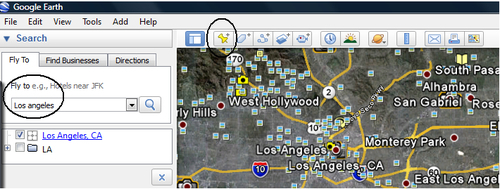
- Complete the Fly to block with the place that you want to pin.
- Click on the yellow pin, as shown in the following screenshot:
- A pop-up window will appear. Complete the Name block by writing the name of the city.
- Check the Latitude and Longitude, so that you place the pin correctly.
- You may complete the Description block.
- You can change the appearance of the pin by clicking on the pin itself. Another pop-up window will appear showing different sorts of icons, as shown in the following screenshot:
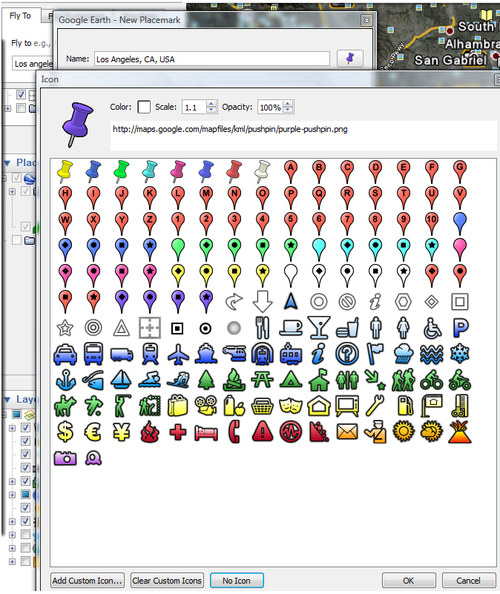
- You can choose the desired icon by clicking on it | OK. The icon that you have selected will appear in the map.
- Pin as many cities as you are going to work with and repeat steps 1-7.
- After pinning all the cities, save the file. Click on File | Save | Save Place as.
- Complete the File name block (remember to save the file in the folder which was created for this course) | Save.
- You have already saved the pinned map.
We have to insert the map in our Moodle course. In this case, we are going to Add a resource, because we are introducing all the activities that are to come. So, choose the weekly outline section where you want to save the resource. These are the steps that you have to follow:
- Click on Add a resource |File.
- Complete the Name and Description blocks.
- Click on Add |Browse.
- Click on the file that you are going to upload | Open |Upload this file | Save and return to course.
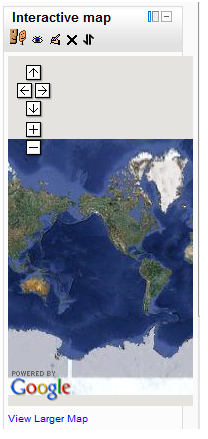
Although we have added a file, students can work with the map interactively!
We can embed the map in an HTML block in our Moodle course. Click on the downwards arrow next to Add... in Add a block, as shown in the following screenshot:

Choose HTML and a new block will appear in our Moodle course.
Open Google Earth and follow these steps in order to embed the map in the block that we have already added:
- Click on the View in Google Maps icon, as shown in the following screenshot:

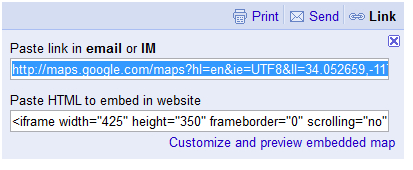
- Another window appears. Click on Link | Customize and preview embedded map, as shown in the following screenshot:
- Click on Custom and adjust the Width and Height.
- In the Preview section, click on the minus sign and adjust the map to fit the window.
- Copy the HTML code to embed in our Moodle course.
- Go back to the Moodle course and click on the configuration icon to embed the map.
- Complete the Block title.
- In the Content block, click on the HTML icon, paste the HTML code which was copied, and click on Update.
- Click on Save changes. The map will look as shown in the following screenshot: