
This is a very simple recipe. We will work with external files in case we need a photo of something specific. Teaching is enhanced when a visual aid is provided to our students, no matter which subject we are teaching. It is sometimes very difficult to have photos of all the things that we want to show them. Thus, we are going to work with Flickr.
Using Flickr to search for photos is an amazing tool due to the fact that we can insert them in our Moodle course in several ways. Copy the link to the file or embed it using the HTML code. Another option is to enable it through our file picker; in this case, we need to switch our role to administrator.
Enter http://www.flickr.com/ and create a free account (we can also upload photos and videos, though this is not the aim). Follow these steps in order to find a photo:
- Go to the aforementioned website.
- Click on Create Your Account.
- Complete the pop up that appears with the necessary data. You will have to create a Yahoo! account if you do not happen to have one.
- Click on Sign in.
- Click on Sign in on the right-hand margin.
- Complete the Search block with the type of photo that we need, as shown in the following screenshot:

- Click on Search.
- Click on Share this | Grab the link, as shown in the following screenshot:
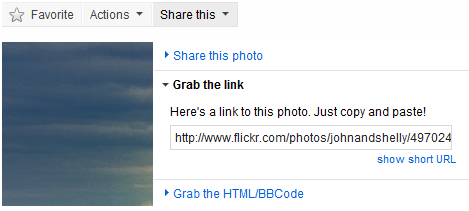
- Copy the link.
- Another option is to click on Share this | Grab the HTML/BBCode.
- Copy the HTML code to embed in the Moodle course.
It is time to upload the art photo in our Moodle course. Choose the weekly outline section where we want to create the activity. Follow these steps in order to insert the images in our Moodle course:
- Click on Add an activity | Chat.
- Complete the Name of this chat room block.
- In the Introduction text block, write what students should do. Click on the Insert/edit an image icon.
- Paste the link of the photo in the Image URL block.
- Click on Insert. Another option is to make a link to the website that displays the photo.
- Embed another photo. Click on the HTML icon.
- Paste the HTML code of the photo.
- Click on Update.
- Click on Save and return to course.
- You have created a chat room in which students can share their opinions about these art photos.