In this recipe, we will work with the following website: http://www.bing.com/maps/. We are going to add social activity to our Moodle course because we are designing a Wiki activity. We ask our students to imagine that they are architects and that they have to travel to San Sebastian, Spain to build a shopping center there. Therefore, we locate the said city in the map using the aforementioned website; you can also use Google Earth, as we did in the other recipes.
We open your default web browser and look for the aforementioned website. We look for San Sebastian, Spain and we select an area in which our students have to locate the shopping center. So, if you do not happen to know the place, there will appear some information on the left-hand side of the margin giving data as well as images of the places that are there.
Follow these steps in order to select an area of the map and embed it to our Moodle course, and also to develop the activity:
- Click on the star that appears at the bottom on the left-hand margin.
- Another pop-up window will appear in which you can find several options to carry out. Click on My Places | New list in order to save the area of the map. Complete the blocks within the Properties section: Title, Notes, and Tags blocks.
- Click on Save.
- Click on 2D on the left-hand margin so that you can mark an area within the map.
- Click on the Mark an area within the map icon (circled in the following screenshot) and select the area that you want your students to take into account. Your map will look as shown in the following screenshot:

- 6 Save the changes.
- Click on the Share your map icon, next to the star on the bottom left-hand margin (it looks like an envelope).
- Click on Customize and preview. Embed this part of the map. You can choose to embed either a Static map or a Draggable map.
- After you customize your options, click on Generate code | Copy code to paste this code in the Moodle course.
We have just finished designing the map, the part of the world that we want our students to travel in order to build a shopping center. We enter and choose the weekly outline section where we want to design the activity. We are going to carry out this activity in Wiki so that students can interact among themselves:
- Click on Add an activity | Wiki.
- Complete the Wiki name and Wiki description blocks.
- Click on the HTML icon and paste the code. Click on Update.
- Click on Save and return to course.
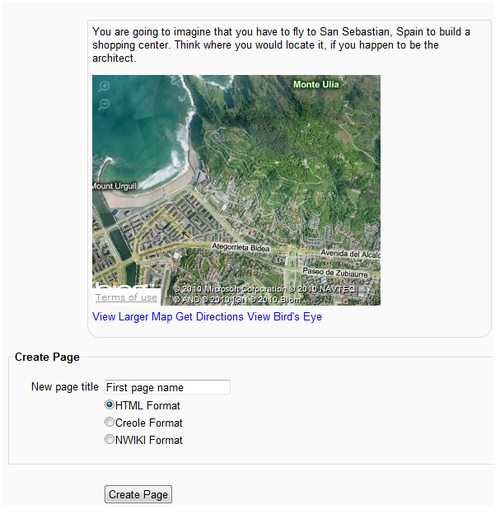
- The activity looks as shown in the following screenshot: