
When we save a bitmap image, we can choose between lossy and lossless compression schemes to reduce the file size that stores the color information for each pixel that is composed in the bitmap image.
Lossless compression schemes retain all the original color information; and therefore, they keep the original quality, but they produce a large file size. On the other hand, lossy compression schemes replace some color information with approximated values to produce a smaller file size. Thus, lossy compression schemes don't keep the original quality.
In this recipe, we will learn how to choose between one scheme over the other. However, a smaller size is not the only thing that matters!
Capture an image of the map of the Louvre Museum in France in order to use it in our Moodle course. In this case, we contrast both lossy and lossless compression with this map. Save them as .PNG, not as .JPG, because the resolution of a .JPG image is low and is not convenient to work with.
Enter http://maps.google.com/ and capture the image of the location of the Louvre Museum in France. We have already covered maps in Chapter 2, Working with 2D and 3D Maps. We are going to use GIMP. If you do not have it yet, download and install GIMP 2.6.8 (http://www.gimp.org/downloads/). Therefore, these are the steps to follow:
- Enter http://maps.google.com/ and look for the location of the Louvre Museum in France. You may look for another museum or art gallery if you wish.
- Press the Print Screen key when you find the location of the museum.
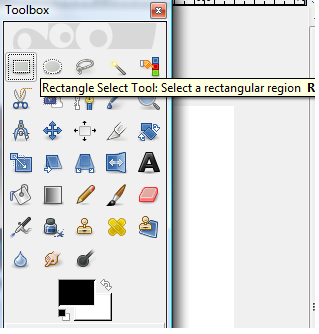
- Paste the image in GIMP. Click on Rectangle Select Tool: Select a rectangular region R and choose the part of the map where the museum is located (you do not need the whole map, as shown in a later screenshot):
- Click on Edit | Cut and paste the new image in a new document. In fact, you are going to work with two documents. Save the same image with two different extensions.
We are going to compare the two files. The image is the same: the part of the map that shows the location of the Louvre Museum in France. What we change is the extension, the type of the image file. We compare the two pictures and they will show that lossless compression is used when it is important that the original and the decompressed bitmap image or photograph be identical. PNG only uses lossless compression.
Remember that we are still working with GIMP. Follow these steps in order to compare both images:
- Click on File | Save as ....
- Complete the Name field. Type "Louvre_Lossy".
- Click on the downwards arrow in All images at the bottom of the pop-up window and choose JPEG image. The image is blurry and pixilated. If you happen to see them in color, they tend to fade away. The more you enlarge the
.JPGimage, the blurrier it gets. Pixels with different colors that add noise to the image delete color information and replace it with pixels of approximated values. This is shown in the following screenshot: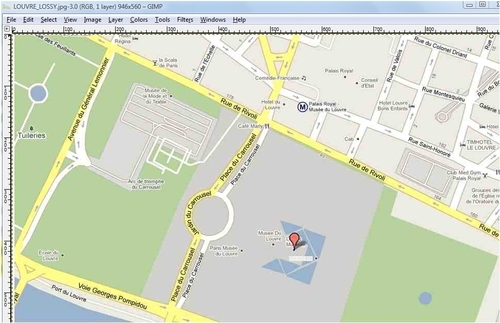
- It is time to see how
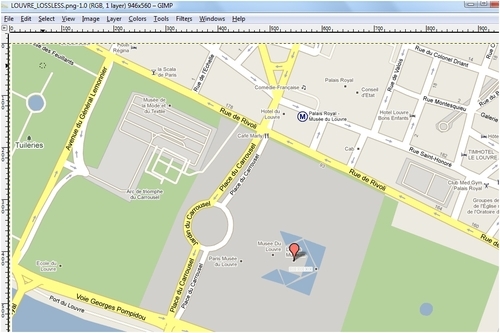
.PNGworks. This type of image is lossless compression. Follow steps 1-3. The difference is that in the Name field, type "Louvre_Lossless" and make sure the extension is PNG image. - The image will be clearer and of a better quality than the previous one. It is shown in the following screenshot:
- Chapter 2, Working with 2D and 3D Maps
- Uploading images to Moodle