In this recipe, we are going to work with photos and add hotspots to them. We use GIMP in order to create them. In Chapter 3, Working with Different Types of Interactive Charts, we had created hotspots using a website. In this chapter, we will create them using this free and open source software.
Choose a photo and think of the links that you want to add to it. A good idea related to Art is to choose some famous paintings and add hotspots related to the painter who did them and their biography.
It would be a good idea to resize the image before adding hotspots to it, especially if we are dealing with a photo. Follow these steps in order to add hotspots to the image:
- Click on File | Open. Choose the photo to work with.
- Click on Filters | Web | Image map. The editor block appears and you can add the hotspots.
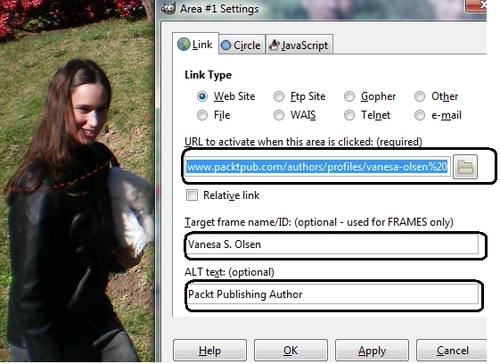
- Click on the left-hand margin to choose a shape to map the image. Circle a part of the image to add hotspots. Another pop-up window will appear. Unclick the Relative link block. Complete the blocks marked with the links that you want to display, as shown in the following screenshot:
- Click on Apply | OK.
- The links appear on the right panel.
- Save the file as .map. Click on File | Save and the extension .map will appear automatically. Click on Save.
- You can add as many hotspots to the photo as you want. If so, repeat steps 2-4 as many times as hotspots you want to add.
- When you finish adding hotspots, click on File | Save.
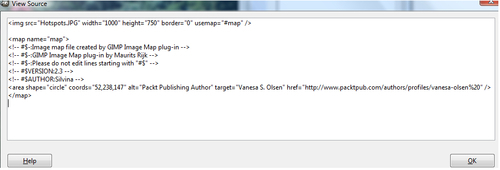
- Click on View | Source. A pop-up window displaying the HTML code will appear, as shown in the following screenshot:
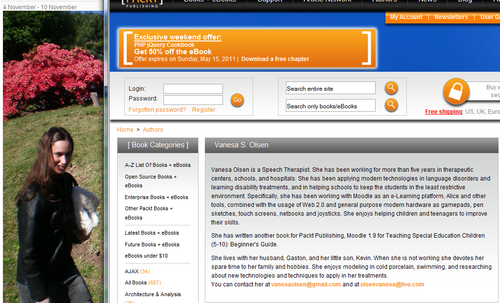
We have just added a hotspot to the photo. Our photo will not be an ordinary one; when hovering the mouse over the selected area, we will be able to click, and the website that we have selected will appear.
It is time to upload the image to our Moodle course. Therefore, choose the weekly outline section where you want to add the activity and upload the image to the Edit summary section. These are the steps that you have to follow:
- Click on the Edit summary icon in the week that you want to upload the image.
- If you want to complete the Section name block, untick the Use default section name box.
- In the Summary block, click on the Insert/edit image icon. Click on Find or upload an image | Upload a file | Browse and look for the photo that you want to upload.
- Click on Upload this file.
- Complete the Image description block. Click on Insert.
- Click on the HTML icon.
- This is the original HTML code you will see:
<p><img alt="hotspots" src="http://localhost/draftfile.php/13/user/draft/765594482/Hotspots.JPG" width="1000" height="750" /></p>
- Insert the following code before
/>:usemap="#map" border="0"
- The code will read as follows:
<p><img alt="hotspots" src="http://localhost/draftfile.php/13/user/draft/765594482/Hotspots.JPG" width="1000" height="750" usemap="#map" border="0"/></p>
- Now, insert a new line after the last line and paste the code from GIMP's map source:
<map name="map">
<!-- #$-:Image map file created by GIMP Image Map plug-in -->
<!-- #$-:GIMP Image Map plug-in by Maurits Rijk -->
<!-- #$-:Please do not edit lines starting with "#$" -->
<!-- #$VERSION:2.3 -->
<!-- #$AUTHOR:Silvina -->
<area shape="circle" coords="57,241,124" alt="Packt Publishing Author" target="Vanesa S. Olsen" href="http://www.packtpub.com/authors/profiles/vanesa-olsen%20" />
</map>
- Do not copy the code of the image because you have already uploaded the image into our Moodle course. It was the first step! The final code is:
<p><img alt="hotspots" src="http://localhost/draftfile.php/13/user/draft/803924560/Hotspots.JPG" usemap="#map" border="0" width="1000" height="750" /></p>
<p>
<map name="map">
<!-- #$-:Image map file created by GIMP Image Map plug-in --> <!-- #$-:GIMP Image Map plug-in by Maurits Rijk --> <!-- #$-:Please do not edit lines starting with "#$" --> <!-- #$VERSION:2.3 --> <!-- #$AUTHOR:Silvina -->
<area shape="circle" coords="57,241,124" alt="Packt Publishing Author" target="Vanesa S. Olsen" href="http://www.packtpub.com/authors/profiles/vanesa-olsen%20" />
</map>
</p>
- Click on Update, as shown in the following screenshot:

- Click on Save changes.
When hovering the mouse over the image, you will be able to click on the selected image and the website that we have inserted will appear, as shown in the following screenshot: