Perhaps contrary to the common opinion, the biggest challenge for managing content in SharePoint is not how to display more information to users, but how to display less. SharePoint 2010 is scalable to millions of documents, pages, or items per library or list and the average user is only interested in browsing a few of them at any given time. While there are extensive filtering and grouping capabilities available in lists and libraries, limited options exist for building views that dynamically change the display for each user.
Audiences in SharePoint 2010 are used to display specific sets of content to a group of users most likely to be interested in that content, and to hide content that they are not interested in. Here are some ways an audience can be used:
- Filter the pages displayed in a Content Query web part to reduce the items that users need to read.
- Hide and show different web parts on a page to optimize the use of the page real estate.
- Change the set of global navigation menu links that users see to avoid cluttering the navigation experience.
Creating an Audience
Built-in audiences are available to site administrators that are based on either Active Directory security groups or on SharePoint site groups. However, the most powerful type of audience is a global audience created within the User Profile service application. This type of audience can make full use of all profile properties and can be used across site collections. A global audience is generated by defining a set of one or more business rules with specific criteria identifying which users or groups will belong to the audience. The audience is then compiled to create the resulting set of users.
To create a global audience:
1. From SharePoint 2010 Central Administration, under Application Management, click Manage Service Applications.
2. On the Manage Service Applications page, click the User Profile Service Application link.
3. On the Manage Profile Service page, under the People section, click Manage Audiences.
4. On the View Audiences page, click New Audience.
5. In the Name box, shown in Figure 7.14, enter a display name for this audience and in the Description box, enter some explanatory details.
Figure 7.14: Settings for create an audience
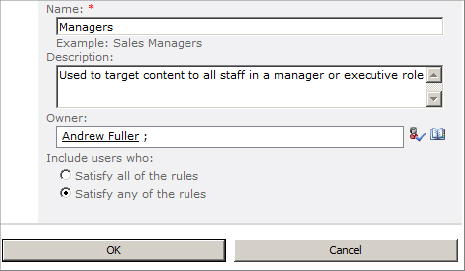
6. In the Owner field, enter the account name of the user who will be responsible for maintaining this audience.
7. Under the Include Users Who setting, select whether a user will be included in the audience only if they satisfy all of the rules (an AND relationship) or if they satisfy any of the rules (an OR relationship).
8. Click OK.
9. On the Add Audience Rule page (shown in Figure 7.15), under Select one of the following, select either User or Property to build the criteria on.
Figure 7.15: Add Audience Rule settings
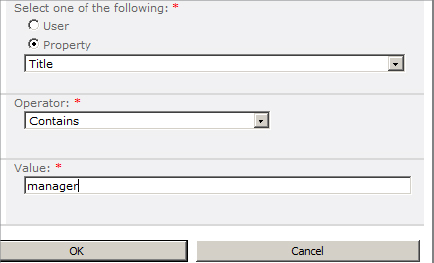
- If you select User, you can then select users based on who their manager is (the Reports Under setting) or which Active Directory group they belong to (the Member Of setting).
- If you select Property, you can then choose one of the user profile properties, a value, and an operator (=, Contains, <>, Not Contains) to use as a criterion.
10. Once the audience is defined, it will need to be compiled. On the View Audience Properties page, click Compile Audience. The Number Of Members value displayed on the page should change to show the compiled total of users in the audience.
11. To view the users in an audience, click the View Membership link.
Editing an Audience
To edit an existing audience, follow these steps:
1. From SharePoint 2010 Central Administration, under Application Management, click Manage Service Applications.
2. On the Manage Service Applications page, click the User Profile Service Application link.
3. On the Manage Profile Service page, under the People section, click Manage Audiences.
4. On the View Audiences page, click the context menu of the audience you want to edit and select View Properties.
5. On the View Audience Properties page, you can edit individual rules or click Edit Audience to modify the audience name or description.
Deleting an Audience
To delete an existing audience, perform the following steps:
1. From SharePoint 2010 Central Administration, under Application Management, click Manage Service Applications.
2. On the Manage Service Applications page, click the User Profile Service Application link.
3. On the Manage Profile Service page, under the People section, click Manage Audiences.
4. On the View Audiences page, click the context menu of the audience you want to edit and click Delete.
5. Click OK to confirm.
Scheduling Audience Compilation
Since audience membership is tied to profile properties, it is important to schedule audience compilation to occur after profile synchronization so that the most current profile data is available. We recommend that audiences be recompiled at least once a week, but you may do so as often as once a day.
To modify the compilation schedule, perform these steps:
1. From SharePoint 2010 Central Administration, under Application Management, click Manage Service Applications.
2. On the Manage Service Applications page, click the User Profile Service Application link.
3. From the Manage Profile Service page, under the People section, click Schedule Audience Compilation.
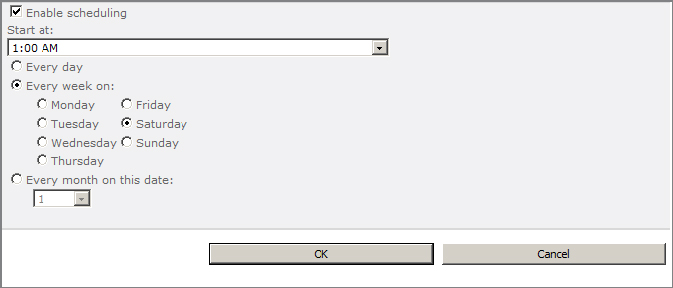
4. On the Specify Compilation Schedule page, shown in Figure 7.16, set the date and time for compilation. Remember to schedule compilation to take place after the estimated end time of the profile synchronization job.
Figure 7.16: Specifying a compilation schedule