
Configure My Sites and Social Networking
The purpose of a My Site is to provide users with a personal space, similar to their Windows desktop, where they can store content and manage it conveniently. Unlike a user’s desktop, the contents of a My Site can be shared with other users either in whole or in part, depending on the owner’s preference. My Sites can be viewed in much the same way as the thumbtack board in a user’s cubicle; they are a means for users to manage information that is important to them but that doesn’t fit into any of the formal sites created for departments or projects.
Since all My Sites are indexed along with other content in SharePoint, any information that users choose to share with others will be discoverable. In addition, every My Site allows users to create a personal blog through which they can share ideas and information with others in the organization. Users can explore all of the capabilities of SharePoint sites through their My Site without requiring additional permissions on any of the more formally controlled sites elsewhere in SharePoint.
Setting Up My Sites
Some of the My Sites configuration details are set up during the creation of the User Profiles service application discussed earlier. Other settings must be configured later, under the Setup My Sites link. In preparation for this configuration task, you will need to have at least one site configured using the Enterprise Search Center template. This site will be linked into each user’s My Site and allow users to perform enterprise searches directly by having their query redirected to the Enterprise Search Center you configured.
To set up My Sites, do the following:
1. From SharePoint 2010 Central Administration, under Application Management, click Manage Service Applications.
2. On the Manage Service Applications page, click the User Profile Service Application link.
3. On the Manage Profile Service page, under the My Site Settings section, click Setup My Sites. The My Site Settings page opens.
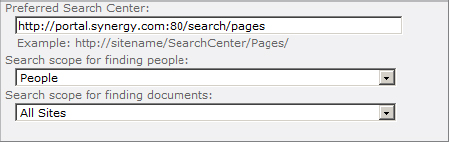
4. In the Preferred Search Center section, shown in Figure 7.17, enter the URL to the site created earlier based on the Enterprise Search Center site template. Include the full path to the pages library—for example, http://portal.synergy.com/search/pages. Select the search scope to be used for finding people (it defaults to People) and the scope to be used for content search (it defaults to All Sites).
Figure 7.17: Preferred Search Center
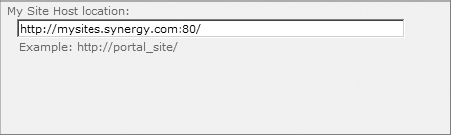
5. The My Site Host Location section, shown in Figure 7.18, is for specifying the site that was created using the My Site Host template (discussed earlier in the chapter). Enter that same URL here.
Figure 7.18: My Site Host Location
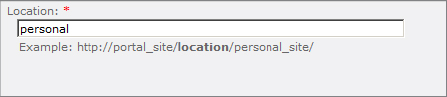
6. In the Personal Site Location section, shown in Figure 7.19, enter the managed path that was created previously to use as the root for all My Site site collections. Both “personal” and “my/personal” are common examples.
Figure 7.19: Personal Site Location
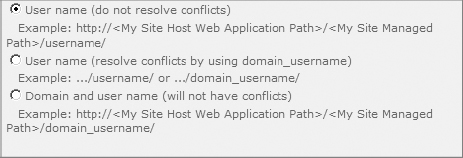
7. In the Site Naming Format section, shown in Figure 7.20, choose the pattern for SharePoint to use to name each new My Site as it is created. The first option, “User name (do not resolve conflicts),” provides a simple format for single-domain environments. For example, Andrew Fuller’s My Site URL would become /afuller. The second option, “User name (resolve conflicts by using domain_username,” is useful when there are trusted domains where two users could have the same account name and you want to eliminate conflicts only when they arise. For example, if Andrew Fuller’s My Site URL already existed at /afuller, and then Adam Fuller from the CORP domain also created a My Site, Adam’s URL would be /corp_afuller. The final option, “Domain and user name (will not have conflicts),” simply enforces the pattern of domain_accountname for all users regardless of conflicts.
Figure 7.20: Site Naming Format
TIP There is still a risk of name conflicts occurring when a My Site is created if a user has left the organization and their account has been deleted but their My Site still exists. If a new user account is created with the same name, then the new user won’t be able to create a new My Site but also won’t be able to access the old user’s My Site due to lack of permissions. The solution is to delete the old user’s My Site, which will immediately allow the new user to create their own My Site using the same name.
8. If you have installed multiple language packs on the server, you will see an option labeled “Allow users to choose the language of their personal site.” Check the box to allow users to make this selection, or uncheck it to disallow changes.
9. The Read Permission Level section controls which groups will be allowed to read content stored in each user’s Shared Documents and Shared Pictures libraries. By default, all authenticated users are granted read rights.
10. In the My Site E-Mail Notifications section, enter an email address or a dummy email address that will become the “from” address for My Site email notifications. The address is not verified, so it does not need to be real.
11. Click OK.
Configuring Trusted Host Locations
In an organization that has multiple divisions or subsidiaries requiring their own separate SharePoint environments, there may be a requirement for multiple User Profile service applications. While each of these applications may have its own separate My Sites web application, it may be more efficient to consolidate all the My Sites under one or more centralized URLs. The Trusted My Site host location is a set of URLs that represent My Site locations that can be used by more than one User Profile service application. This ensures that users have consistent access to a single My Site even if they access their My Site from different web applications connected to different User Profile service applications.
1. From SharePoint 2010 Central Administration, under Application Management, click Manage Service Applications.
2. On the Manage Service Applications page, click the User Profile Service Application link.
3. On the Manage Profile Service page, click Configure Trusted Host Locations.
4. Click New Link to create a new entry.
5. In the URL box, enter the address of the My Site location.
6. In the Description box, enter the explanation of the purpose for this address.
7. Optionally, enter a target audience for this location.
8. Click OK.
Configuring Personalization Site Links
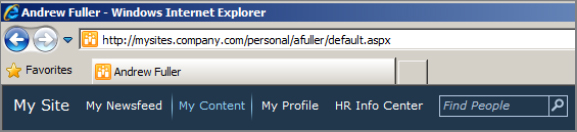
Personalization site links are used to provide users in My Sites with additional menu links that can direct them to other sites of interest. The links appear in the menu bar at the top of the My Site, as shown by the example of the HR Info Center link in Figure 7.21.
Figure 7.21: Personalized site link in a My Site
To set up personalization site links, follow these steps:
1. From SharePoint 2010 Central Administration, under Application Management, click Manage Service Applications.
2. On the Manage Service Applications page, click the User Profile Service Application link.
3. On the Manage Profile Service page, click Configure Personalization Site.
4. In the URL box, enter the address of the site you want to link to.
5. In the Description box, enter the display text for the link.
6. In the Owner box, provide the account of the user who will manage this link. This is generally the user who is responsible for the site that the link connects to.
7. Optionally, select a target audience for this link.
8. Click OK.
Publishing Links to Office Client Applications
To assist users in knowing where to find and save files in SharePoint, administrators can provide users with shortcut links to the preferred locations. These links show up in the user’s Office application File Open and Save As dialog boxes, under the Favorites link heading in a category labeled SharePoint Sites.
1. From SharePoint 2010 Central Administration, under Application Management, click Manage Service Applications.
2. On the Manage Service Applications page, click the User Profile Service Application link.
3. On the Manage Profile Service page, click Publish Links To Office Client Applications.
4. On the Published Links To Office Client Applications page, click New Link.
5. In the URL box, enter the address of the location where users will be able to open or save documents.
6. In the Description box, enter a name for this location.
7. Select the descriptive type of the location that this link connects to.
8. Optionally, select a target audience for this link.
9. Click OK.