Configure Information Management Policies
Information management policies are sets of rules designed to affect documents and items based on their content type. Policies can be applied directly to site content types, thereby applying wherever the content type is used, or they can be applied to specific lists or libraries. There are four types of information management policies in SharePoint 2010: retention policies, auditing policies, barcodes, and labels. Together, these policies allow records managers to apply consistent behavioral rules to content to meet compliance requirements.
Creating an Information Management Policy
Sometimes an information management policy is being implemented to conform to compliance requirements. Such a policy must be applied consistently to all content in a site or site collection. In this case, it is best to apply a policy directly to a content type. Then when the content type is assigned, the policies apply to that content automatically.
In some cases, a policy requirement should apply only to a single list or library, or a user does not have permissions to configure a policy on a content type. In these situations, an information management policy can be configured in the list or library. The policy is still applied per content type, but the scope is limited to the specific list or library.
SharePoint 2010 also provides the ability to create a site collection policy. This is a form of policy template that can be applied to either a content type or a list or library. Site collection policies allow content managers to create predefined policies at the site collection level. These policies can then be applied by users at a lower level in the site without the users’ needing to understand policy creation details. Later in this chapter, in the section “Creating a Site Collection Policy,” we will look at creating policy templates. Now let’s discuss creating each of the types of policies.
To create an information management policy on a content type:
1. Open the site you want to configure.
2. From the Site Actions menu, select Site Settings.
3. In the Galleries section, click Site Content Types.
4. Click the link for the content type you want to configure.
5. In the Settings section, click Information Management Policy Settings.
6. In the Name and Administrative Description boxes, enter a unique name and a description that is meaningful to others who will be editing this policy.
7. In the Policy Statement box, enter text that will help users understand how this policy operates.
8. Check the box next to the policy actions that you want to enable for this policy and configure the settings by referencing one of the sections that follow: Creating a Retention Policy; Creating an Auditing Policy; Creating a Barcodes Policy; Creating a Label Policy.
9. Click OK.
Creating a Retention Policy
The retention policy is a core element in any records management plan that must track and dispose of content in a consistent manner. The policy specifies an expiration time for a document or item. The expiration time is measured in days, months, or years from a date set on the document or item. The date is typically drawn from one of the metadata columns available. The created date or modified date is commonly used, but a custom date column can be used as well. When the expiration date is reached, the policy dictates what action will be taken on the item (e.g., deleting or archiving).
To configure a retention policy:
1. From the Edit Policy page, check the box next to Enable Retention to display the options shown in Figure 12.16.
Figure 12.16: Retention policy options

2. Under the Non-Records section, click the link Add A Retention Stage. The Stage Properties page opens, as shown in Figure 12.17.
Figure 12.17: Stage Properties page
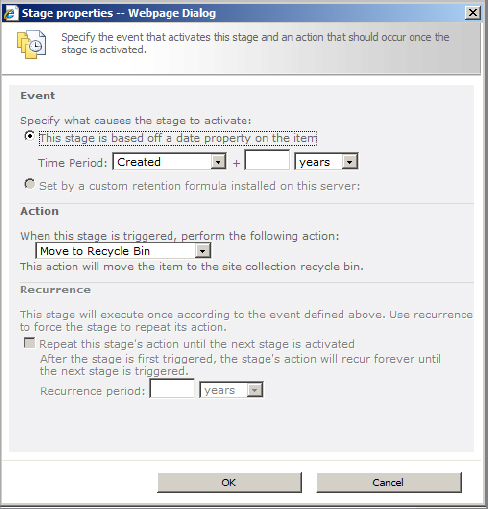
3. In the Event section, choose the field that will be used to provide the start date of the retention period calculation. The drop-down list will show only Date and Time columns. Then enter the interval number and select the interval increment (Days, Months, or Years).
4. In the Action section, select which operation this stage of the policy will perform.
5. Click OK.
Note that applying a retention policy on a content type can be overridden if the Library And Folder Based Retention site collection feature is enabled. This feature allows list administrators to create retention schedules at the list or library level that override the content type policies.
Creating an Auditing Policy
An auditing policy is a means for content managers to implement tracking and reporting of actions on documents for compliance purposes. Auditing in SharePoint monitors and records specific actions taken by individuals so that these actions can be retrieved and analyzed later. The purpose of enabling auditing through a policy is to capture only the details that are specifically required to limit the amount of data that is stored and reported. Auditing and audit reports are covered in further detail in Chapter 15, “Managing Security.”
To configure an auditing policy:
1. From the Edit Policy page, check the box next to Enable Auditing to display the options shown in Figure 12.18.
Figure 12.18: Auditing policy options
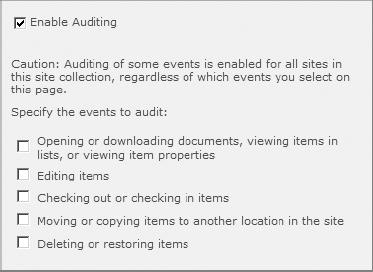
2. Select the appropriate actions to audit.
3. Click OK.
Creating a Barcodes Policy
A barcodes policy enables SharePoint 2010 to generate a random and unique barcode image for each document that the policy is applied to. This barcode can be printed onto a label or inserted into an Office 2007 or Office 2010 document to be printed out along with the document for tracking purposes. The built-in barcode provider generates barcodes using the Code 39 standard (ANSI/AIM BC1-1995, Code 39). SharePoint also supports custom barcode generators created through the policies object model.
To configure a barcodes policy:
1. From the Edit Policy page, check the box next to Enable Barcodes.
2. If you wish, check the option labeled “Prompt users to insert a barcode before saving or printing.” This reminds users working in Office 2007 or Office 2010 to insert a barcode into the document before saving or printing.
3. Click OK.
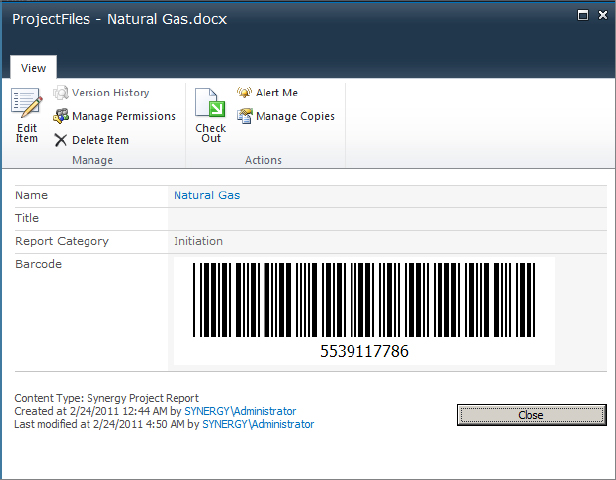
Once the barcodes policy is enabled, you will need to edit the properties of a document to trigger SharePoint to generate the barcode. Then, from the document context menu in the library, select View Properties to see the generated barcode, as shown in Figure 12.19.
Figure 12.19: Document properties showing SharePoint 2010 barcode
Creating a Labels Policy
Labels are used to create formatted messages that can include metadata values and can be inserted into an Office 2007 or Office 2010 document. Labels are typically used to create preformatted text that is inserted onto the first page of a document as part of the cover sheet or into the footer. Labels do not dynamically update unless the file is opened and edited or printed.
To configure a labels policy:
1. From the Edit Policy page, check the box next to Enable Labels to display the options shown in Figure 12.20.
Figure 12.20: Labels policy options
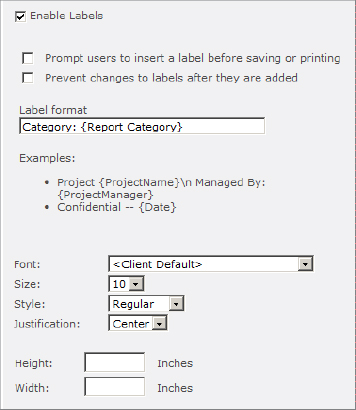
2. If you wish, check the option labeled “Prompt users to insert a label before saving or printing” to remind users who are working in either Office 2007 or Office 2010 to insert a label into the document before saving or printing.
3. In the Label Format field, enter text and incorporate values from columns in the content type by placing the column name between braces, as shown in Figure 12.20.
4. Select font formatting and sizing options and click the Refresh button (not shown in the figure) to show a preview of the label output.
5. Click OK.
Creating a Site Collection Policy
Policies that are created on content types are reusable wherever the content type is used. It is also possible to apply policies directly to lists and libraries; however, doing so makes it difficult to apply the same policies on multiple lists or libraries. SharePoint 2010 supports site collection policies, which act as policy templates that can be applied to lists and libraries throughout the site collection.
To create a site collection policy:
1. Open the site collection you want to configure.
2. From the Site Actions menu, select Site Settings.
3. In the Site Collection Administration section, click Site Collection Policies.
4. On the Policies page, click Create.
5. Configure the policies using the same options as described in the “Creating an Information Management Policy” section earlier for a policy on a content type.
6. Click OK.
Exporting and Importing a Site Collection Policy
Once created, a site collection policy can be exported and reused in another site collection. To export the policy, from the Policies page, click the policy link and, at the bottom of the Policies page, click Export to save the policy as an XML file to a local drive.
To import a policy, from the Policies page, click Import and browse to a policy XML file to upload and import it.
Applying a Site Collection Policy
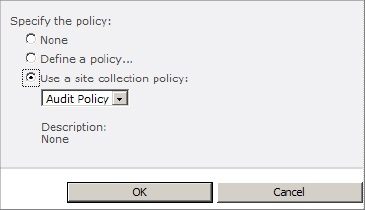
To apply a site collection policy, open a list or library that you want to apply the policy to; then open the list or library settings page and click the Information Management Policies link. Click the content type that the policy should be applied to, and then click the Use A Site Collection Policy option. Select the policy you want to apply, as shown in Figure 12.21, and click OK.
Figure 12.21: Applying a site collection policy